
User's Manual
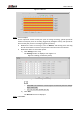

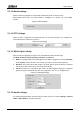
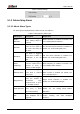

Table Of Contents
- Foreword
- Important Safeguards and Warnings
- 1 Overview
- 2 Configuration Flow
- 3 Device Initialization
- 4 Basic Configuration
- 4.1 Login
- 4.2 Live
- 4.3 PTZ Operation
- 4.4 Playback
- 4.5 Camera
- 4.5.1 Conditions
- 4.5.2 Setting Video Parameters
- 4.5.2.1 Video
- 4.5.2.2 Snapshot
- 4.5.2.3 Overlay
- 4.5.2.3.1 Configuring Privacy Masking
- 4.5.2.3.2 Configuring Channel Title
- 4.5.2.3.3 Configuring Time Title
- 4.5.2.3.4 Configure Text Overlay
- 4.5.2.3.5 Configure Font Attribute
- 4.5.2.3.6 Configure Picture Overlay
- 4.5.2.3.7 Configure Custom Overlay
- 4.5.2.3.8 Configuring OSD Info
- 4.5.2.3.9 Configuring Counting
- 4.5.2.3.10 Configuring Structured Statistics
- 4.5.2.3.11 Configuring Ranging
- 4.5.2.3.12 Configuring ANPR
- 4.5.2.3.13 Configuring Face Statistics
- 4.5.2.4 ROI
- 4.5.2.5 Path
- 4.5.3 Audio
- 4.6 Network
- 4.7 Storage
- 4.8 System
- 5 Event
- 5.1 Setting Alarm Linkage
- 5.2 Setting Smart Track
- 5.3 Setting Panoramic Calibration
- 5.4 Setting Video Detection
- 5.5 Setting Smart Motion Detection
- 5.6 Setting Audio Detection
- 5.7 Setting Smart Plan
- 5.8 Setting IVS
- 5.9 Setting Crowd Map
- 5.10 Setting Face Recognition
- 5.11 Setting Face Detection
- 5.12 Setting People Counting
- 5.13 Setting Heat Map
- 5.14 Setting Stereo Analysis
- 5.15 Setting ANPR
- 5.16 Setting Video Structuralization
- 5.17 Setting Relay-in
- 5.18 Setting Abnormality
- 6 Maintenance
- Appendix 1 Cybersecurity Recommendations

User’s Manual
118
After Record Delay is configured, alarm recording continues for an extended period after the
alarm ends.
Record linkage Figure 5-6
5.1.1.3 Snapshot Linkage
After snapshot linkage is configured, the system can automatically alarm and take snapshots
when an alarm is triggered.
After Motion is enabled in Snapshot, the system takes snapshots when an alarm is triggered.
For querying and setting snapshot storage location, see "4.5.2.5 Path."
5.1.1.3.1 Setting Snapshot Plan
According to the configured snapshot plan, the system enables or disables snapshot at
corresponding time.
Select Setting > Storage > Schedule > Snapshot.
Step 1
The Snapshot interface is displayed. See Figure 5-1.
Snapshot Figure 5-1
Select snapshot type and set time period. Step 2
Green represents normal snapshot plan (such as timing snapshot); yellow represents
motion snapshot plan (such as snapshot triggered by intelligent events); red represents
alarm snapshot plan (such as snapshot triggered by alarm-in).
Method one: Select snapshot type, such as Normal, and directly press and drag
the left mouse button to set time period for normal snapshot on the timeline.
Method two: Enter an actual time period.
1) Click Setting next to a day.
The Setting interface is displayed. See Figure 5-2.