
User's Manual

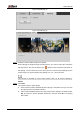

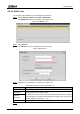
Table Of Contents
- Foreword
- Important Safeguards and Warnings
- 1 Overview
- 2 Configuration Flow
- 3 Device Initialization
- 4 Basic Configuration
- 4.1 Login
- 4.2 Live
- 4.3 PTZ Operation
- 4.4 Playback
- 4.5 Camera
- 4.5.1 Conditions
- 4.5.2 Setting Video Parameters
- 4.5.2.1 Video
- 4.5.2.2 Snapshot
- 4.5.2.3 Overlay
- 4.5.2.3.1 Configuring Privacy Masking
- 4.5.2.3.2 Configuring Channel Title
- 4.5.2.3.3 Configuring Time Title
- 4.5.2.3.4 Configure Text Overlay
- 4.5.2.3.5 Configure Font Attribute
- 4.5.2.3.6 Configure Picture Overlay
- 4.5.2.3.7 Configure Custom Overlay
- 4.5.2.3.8 Configuring OSD Info
- 4.5.2.3.9 Configuring Counting
- 4.5.2.3.10 Configuring Structured Statistics
- 4.5.2.3.11 Configuring Ranging
- 4.5.2.3.12 Configuring ANPR
- 4.5.2.3.13 Configuring Face Statistics
- 4.5.2.4 ROI
- 4.5.2.5 Path
- 4.5.3 Audio
- 4.6 Network
- 4.7 Storage
- 4.8 System
- 5 Event
- 5.1 Setting Alarm Linkage
- 5.2 Setting Smart Track
- 5.3 Setting Panoramic Calibration
- 5.4 Setting Video Detection
- 5.5 Setting Smart Motion Detection
- 5.6 Setting Audio Detection
- 5.7 Setting Smart Plan
- 5.8 Setting IVS
- 5.9 Setting Crowd Map
- 5.10 Setting Face Recognition
- 5.11 Setting Face Detection
- 5.12 Setting People Counting
- 5.13 Setting Heat Map
- 5.14 Setting Stereo Analysis
- 5.15 Setting ANPR
- 5.16 Setting Video Structuralization
- 5.17 Setting Relay-in
- 5.18 Setting Abnormality
- 6 Maintenance
- Appendix 1 Cybersecurity Recommendations

User’s Manual
95
Date and time Figure 4-89
Configure date and time parameters. For details, see Table 4-36. Step 2
Table 4-36 Description of date and time parameters
Parameter
Description
Date Format
Configure the date format.
Time Format
Configure the time format. You can select from 12-Hour or 24-Hour.
Time Zone
Configure the time zone that the camera is at.
Current Time
Configure system time.
Click Sync PC, and the system time changes to the PC time.
DST
Enable DST as needed.
Select the check box, and configure start time and end time of DST with
Date or Week.
NTP
Select the check box, and then NTP (network time protocol) is enabled,
the system then syncs time with the internet server in real time.
You can also enter the IP address, time zone, port, and interval of a PC
which installed NTP server to use NTP.
NTP Server.
Time Zone
Port
Interval
Click Save. Step 3
4.8.3 Splicing
When the panorama contains multiple images of various lens, enable this function. Before
splicing, make sure that the surveillance scene is large and there is no shield on the image, and
do not move the camera; otherwise, the spplicing might fail.
Select Setting > System > General > Splicing Step 1
The Splicing inteface is dispalyed. See Figure 4-90 and Figure 4-91.