
User's Manual

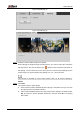

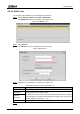
Table Of Contents
- Foreword
- Important Safeguards and Warnings
- 1 Overview
- 2 Configuration Flow
- 3 Device Initialization
- 4 Basic Configuration
- 4.1 Login
- 4.2 Live
- 4.3 PTZ Operation
- 4.4 Playback
- 4.5 Camera
- 4.5.1 Conditions
- 4.5.2 Setting Video Parameters
- 4.5.2.1 Video
- 4.5.2.2 Snapshot
- 4.5.2.3 Overlay
- 4.5.2.3.1 Configuring Privacy Masking
- 4.5.2.3.2 Configuring Channel Title
- 4.5.2.3.3 Configuring Time Title
- 4.5.2.3.4 Configure Text Overlay
- 4.5.2.3.5 Configure Font Attribute
- 4.5.2.3.6 Configure Picture Overlay
- 4.5.2.3.7 Configure Custom Overlay
- 4.5.2.3.8 Configuring OSD Info
- 4.5.2.3.9 Configuring Counting
- 4.5.2.3.10 Configuring Structured Statistics
- 4.5.2.3.11 Configuring Ranging
- 4.5.2.3.12 Configuring ANPR
- 4.5.2.3.13 Configuring Face Statistics
- 4.5.2.4 ROI
- 4.5.2.5 Path
- 4.5.3 Audio
- 4.6 Network
- 4.7 Storage
- 4.8 System
- 5 Event
- 5.1 Setting Alarm Linkage
- 5.2 Setting Smart Track
- 5.3 Setting Panoramic Calibration
- 5.4 Setting Video Detection
- 5.5 Setting Smart Motion Detection
- 5.6 Setting Audio Detection
- 5.7 Setting Smart Plan
- 5.8 Setting IVS
- 5.9 Setting Crowd Map
- 5.10 Setting Face Recognition
- 5.11 Setting Face Detection
- 5.12 Setting People Counting
- 5.13 Setting Heat Map
- 5.14 Setting Stereo Analysis
- 5.15 Setting ANPR
- 5.16 Setting Video Structuralization
- 5.17 Setting Relay-in
- 5.18 Setting Abnormality
- 6 Maintenance
- Appendix 1 Cybersecurity Recommendations

User’s Manual
94
General Figure 4-88
Configure general parameters. For details, see Table 4-35. Step 2
Table 4-35 Description of general parameters
Parameter
Description
Name
The name of the device.
Each device has its own name.
Language
Select system language.
Video Standard
Select video standard from PAL and NTSC.
TVOut
Select On or Off. This function is available on models with analog
output.
If the TV out is On, smart plans will be disabled; if the smart plans
are enabled, the TV out will be set as Off.
SDI and HDCVI are available on select models.
Click Save. Step 3
4.8.2 Date & Time
You can configure date and time format, time zone, current time, DST (Daylight Saving Time) or
NTP server.
Select Setting > System > General > Date & Time. Step 1
The Date & Time interface is displayed. See Figure 4-89.