
INSTALLATION GUIDE

UNPACKING
Your system includes the following:
BC581E82
Eight-channel HDCVI Recording Kit
❶
Cameras
• 8 x HDCVI Dome Cameras
• 8 x Hardware Packs, with:
Moun ng Template,
Expansion Bolts (3),
Self-tapping Screws (3), Hex Wrench,
Startup Guide, and So ware CD
HDCVI DVR
• 1 x 8-channel HDCVI DVR, with:
Pre-installed 2 TB HDD,
12 VDC Power Supply,
Ethernet Cable, Mouse,
Hard Drive SATA Cable, HD Hardware,
Startup Guide, and So ware CD
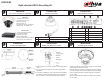
CONNECTIONS
Camera Connec ons
❷
1 Video Output HDCVI, CVBS, AHD, TVI
2 Power Input 12 VDC
CONNECTIONS
HDCVI DVR Connec ons
1 Audio IN (x4) 7 USB Port
2 Analog Video IN (x8) 8 12 VDC Power IN
3 Audio OUT 9 Alarm I/O
4 HDMI OUT 10 Audio IN (x4)
5 RJ-45 11 VGA OUT
6 RS485 A/B 12 On/Off Bu on
❸
DIMENSIONS
Camera and HDCVI DVR
• Ensure the wall or ceiling can support 3x the weight of the
camera.
• Do not connect the camera to the power supply during
installa on.
• For outdoor installa ons, ensure the connec on between
the network cable and the camera jack is housed within a
wall or indoors or use the waterproof cable connector.
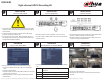
❹
INSTALLATION
Mount and Make Connec ons
❺
INSTALLATION
Posi oning the Camera
• Loosen, but do not remove the set screws on either side of
the bracket that holds the camera.
• Tilt the camera to adjust the lt angle (0° to +65°). Tighten
the two locking screws on the bracket to lock the lt angle.
• Turn the camera module to adjust image pan orienta on
(0° to +355°).
• Turn the camera base to adjust the rota on of the camera
(0° to +355°).
❻