
LCD Television Instruction Manual


42
PR
PR
PR
PR
PR
PR
PR
PR
PR
PR
SCALE AUTO
H-POSITION 50
V-POSITION 50
PHASE 50
CLOCK 50
AUTO-ADJUST
POSITION ACCESS EXIT
SCREEN
SCALE AUTO
H-POSITION 50
V-POSITION 50
PHASE 50
CLOCK 50
AUTO-ADJUST
POSITION ACCESS EXIT
SCREEN
SCALE AUTO
H-POSITION 50
V-POSITION 50
PHASE 50
CLOCK 50
AUTO-ADJUST
POSITION ACCESS EXIT
SCREEN
SCALE AUTO
H-POSITION 50
V-POSITION 50
PHASE 50
CLOCK 50
AUTO-ADJUST
POSITION ACCESS EXIT
SCREEN
SCALE AUTO
H-POSITION 50
V-POSITION 50
PHASE 50
CLOCK 50
AUTO-ADJUST
POSITION ACCESS EXIT
SCREEN
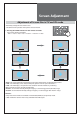
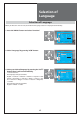
Screen Adjustment
Adjustment of the screen in the PC mode
1. Adjustment of the H-Position
• Move to H-Position in the Screen menu.
• Press the ”/” buttons to adjust the horizontal
position of displayed image.
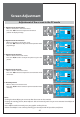
2. Adjustment of the V-Position
• Move to V-Position in the Screen menu.
• Press the ”/” buttons to adjust the vertical position of dis-
played image.
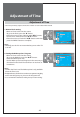
3. Adjustment of the Phase
• Move to Phase in the Screen menu.
• Press the ”/” buttons to adjust the phase to get a clear
picture.
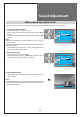
4. Adjustment of the Clock
• Move to Clock in the Screen menu.
• Press the ”/” buttons to adjust the clock to fit the size of
the screen.
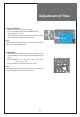
5. Auto Adjustment
• Move to Auto in the Screen menu.
• Press the ”/” buttons to detect optimal resolution auto-
matically.
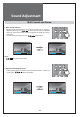
Note :
• During the Auto Adjust, you must not alter the screen on the monitor.
• During the moving picture, Auto Adjust is able to incorrectly work. So you must execute Auto Adjust in
still image.
• Auto Adjust works incorrectly on a part graphic card or picture.
• When Auto Adjust is not correctly working, you can adjust with H/V position, and phase.