
Installation guide

Installation
Instructions
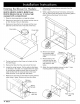
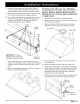
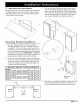
11.
Route
the
wiring
harness
as
shown.
Secure
the
har-
ness
to
the
motor
assemblies
using
the
cable
clamps
supplied
with
the
hood
in
the
positions
shown
below.
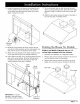
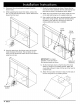
12.
Attach
the
wiring
harness
to
the
brace
inside
the
hood,
on
the
right
side
using
two
(2)
supplied
cable
ties.
13.
Use
a
cable
tie
to
take
up
any
remaining
slack
that
may
exist
in
the
wiring
harness.
Stow
the
harness
behind
the
plate
on
the
right
side.
Securing
any
slack
will
reduce
additional
noise
due
to
vibration.
Cable
Wiring
harness
IMPORTANT:
For
proper
operation,
route
and
secure
the
harness
exactly
as
shown.
Cable
tie
if
necessary
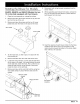
14.
Tip the
hood
back
down
so
that
the
top
of
the
hood
faces
up.
Using
existing
screws,
attach
the
cover
plates
removed
in
step
3
to
the
top
of
the
hood
to
cover
the
holes.
15.
Attach
the
duct
collars
removed
in
step
2
to
the
back
of
the
unit
using
the
existing
screws.
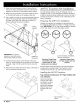
AHT10
Transition
Kit
Installation
On
dual
exhaust
models,
the
two
8”
exhausts
may
be
merged
into
one
10”
duct
using
Dacor
transition
kit
AHT10.
Install
the
transition
before
installing
the
hood
on
the
wall.
It
connects
to
the
hood
on
the top
or
rear,
depending
on
the
type
of
installation.
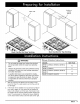
Preparing
the
AHT10
for
Installation
Prepare
the
transition
for
installation
by
bending
the
bot-
tom
edges
at
right
angles
to
create
a
*%”
flange
around
the
base.
IMPORTANT:
On
12”
high
hoods
modified
to
exhaust
out
the
rear,
leave
one
of
the
long
edges
unbent.
G2).
Leave
this
edge
unmodified,
bend
up
other
three.
Transition
Flange
Prep:
12”
high
models
with
rear
exhaust
Transition
Flange
Prep:
All
models
using
top
exhaust
and
18”
high
models
with
rear
exhaust
Drill
pilot
holes
around
the
edges
of
the
mounting
flange
including
the
unmodified
edge,
if
the
transition
will
be
mounted
to
the
back
of
a
12”
high
hood
(see
above).
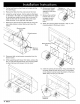
Installing
the
AHT10
Transition:
Top
exhaust
models
and
18”
high
models
with
rear
exhaust:
Center
the
transition
over
the
duct
collars
and
fasten
it
in
place
using
sheet
metal
screws
(not
included).
Seal
the
base
of
the
transition
with
duct
tape.
Top
mounting
shown
16
cdacor.