
Installation Instructions


English60
Installation instructions
Installation instructions
Verifying proper operation
Before operating the range, read the accompanying use and care manual completely. It
contains Important safety, service and warranty information.
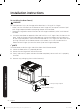
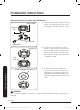
1. Before beginning the test procedure, ensure that all cooktop control valves are in the
OFF position, and all burner rings, burner caps, and grates are properly positioned on
the cooktop frame.
2. Turn on the gas supply at the shut-off valve. Check for gas leaks.
3. Turn on power to the range at the circuit breaker or fuse box.
4. Follow the prompts on the oven’s display to set up the user preferences and wireless
network settings.
5. Touch the MENU key on the display.
6. Touch the BAKE key on the display. The default bake temperature should appear on
the display .
7. Touch Start. After 3 minutes, open the door to make sure the air inside oven has begun
to heat.
8. The display should show BAKE, and the preheating temperature.
9. Touch OFF to stop oven heating process.
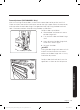
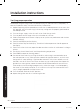
10. Test one of the burners by pushing the knob in and turning it counterclockwise to
the HIGH position. It may take up to four seconds for ignition to occur, at which time
the ignitor will stop sparking. If ignition does not occur within four seconds, turn off
the knob, wait for at least five minutes to allow any gas to dissipate, then repeat the
ignition test. After ignition, rotate the control knob counterclockwise from HIGH to
LOW to adjust the flame height progressively. When the range is installed properly,
the flame will be steady and quiet. It will also have a sharp, blue inner cone that will
vary in length proportional to the burner size.
11. Turn the control knob to the OFF position.
12. Repeat the ignition test for all remaining burners.
Normal Flame
Install_NY9900M_PRORANGE_DOP48M96DLM_DA_DG68-00936A-00_EN+MES+CFR.indb 60 2017-05-12 7:36:55