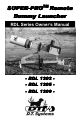
TM SUPER-PROTM Remote Dummy Launcher RDL Series Owner’s Manual - RDL 1202 - RDL 1205 - RDL 1209 -
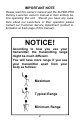
IMPORTANT NOTE Please read this owner’s manual and the SUPER-PRO Dummy Launcher owner’s manual in their entirety before operating this unit. Should you have any questions about our Launchers or their operation please contact our Customer Service department (contact information on back page of this manual). NOTICE! According to how you use your transmitter, the transmitting range might be much different.
SAFETY WARNING! KEEP OUT OF REACH OF CHILDREN AT ALL TIMES! THIS UNIT IS NOT A TOY! SAFETY TIPS AND PROCEDURES This product can be extremely hazardous if not used properly. While it is not a firearm, the same caution and safety procedures should always be followed as if it were. • Read this Owner’s Manual in it’s entirety. • Follow all instructions and never modify the unit. • Always use it for its intended purpose only. • Always wear safety glasses and hearing protection when operating the launcher.
TABLE OF CONTENTS • Safety Warning! .......................................... 3 • Table of Contents ....................................... 4 • Introduction................................................. 5 • Quick Tips .................................................. 6 • Package Contents ...................................... 7 • Features ..................................................... 7 • Parts & Functions .......................................
INTRODUCTION Thank you for purchasing the D.T. Systems SUPERPROTM Remote Dummy Launcher, the most technologically advanced Dummy Launcher on the market today. Through extensive field research, with feedback from our top retriever Pro-Trainers and working retriever owners all around the country, D.T. Systems has created a remote training aid that will make retriever training easier, more productive, and result in a more well rounded working dog in the field, on hunt tests, and in trials.
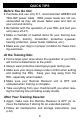
QUICK TIPS Before You Go Out: • Purchase and use only D.T. recommended GREEN and • • • YELLOW power loads. RED power loads are not recommended as they will cause faster wear and tear on your unit and dummy. Be familiar with the operation of your RDL and test your unit (see p.20-21). Make a checklist of needed items for your training session (RDL, dummy, transmitter, protective eyewear, hearing protection, power loads, batteries, etc.).
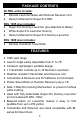
PACKAGE CONTENTS All RDL units include: • Remote Launcher Base with Remote Receiver Unit • Owner’s Manual for Super-Pro RDL RDL 1205 also includes: • Super-Pro Dummy Launcher (pre-attached to Base) • White Super-Pro Launcher Dummy • Owner’s Manual for Super-Pro Dummy Launcher RDL 1209 also includes: • Remote Handheld Transmitter FEATURES • • • • • • • • • • • 1200 yard range Launch angle easily adjustable from 0° to 75° Compact, lightweight, portable design 1 Transmitter controls up to 16 Remote Launchers
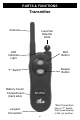
PARTS & FUNCTIONS Transmitter Antenna Launcher Selector Knob LED Indicator Light Bird Button “T” Switch* Beeper Button Battery Cover/ Compartment (back side) *Most Transmitters have a “T” Switch that is permanently in the ‘up’ position.
PARTS & FUNCTIONS ‘BIRD’ Button - Activates Motor Arm to raise Ratcheting Safety Arm and release Ratcheting Cocking Lever to fire Dummy Launcher. ‘BEEPER’ Button - Activates Beeper/Locator to help audibly locate the launcher in the field from up to 450 yards away. Launcher Selector Knob - Chooses which launcher is being controlled. The RDL Transmitter can control up to 16 different launchers.
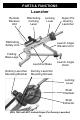
PARTS & FUNCTIONS Launcher Remote Receiver Unit Ratcheting Cocking Lever Locking Lever Ratcheting Safety Arm Super-Pro Dummy Launcher Launch Angle Elevator Arm Folding Base Legs Launcher Base Dummy Launcher Mounting Bracket Launch Angle Knob Dummy Launcher Mounting Screws Locking Lever Shell Chamber Shell Extractor (RDL 1202 will NOT include Super-Pro Dummy Launcher) 10
PARTS & FUNCTIONS Launcher Base - Solid aluminum frame construction makes it lightweight yet durable. Super-Pro Dummy Launcher (not included with RDL 1202) - Please refer to the Super-Pro Dummy Launcher owner’s manual for detailed information on parts and proper use/maintenance of this unit. Locking Lever - Lever allows opening and lockdown of the dummy launcher for access to the power load. Shell Chamber - Chamber to insert blank power load.
PARTS & FUNCTIONS Remote Receiver Beeper/Locator Horn LED Indicator Light Power Button Receiver Antenna Motor Arm Mounting Bracket Mounting Wing Nuts Battery Compartment 9V Battery Connector Battery Cover 12
PARTS & FUNCTIONS Power Button - Turns Remote Receiver ON/OFF, resets unit after each launch, and is used in programming procedure. Receiver LED Indicator Light - Flashes once a second to indicate the Remote Receiver is ON. Lights when signal for launch or beep is received from Transmitter. Flashes rapidly when battery is low and needs replacing. Flashes once every 3 seconds when in Power Save Mode (see p.18 for more details). Beeper/Locator Horn - Emits loud beeps to help locate Launcher in the field.
INSTALLING/REMOVING DUMMY LAUNCHER WARNING - Do not remove/install Dummy Launcher while loaded with a Power Load. These directions are for adding a Super-Pro Dummy Launcher unit to a RDL 1202 Launcher Base and for removing the Dummy Launcher for periodic maintenance. 1. If you are installing your existing Super-Pro Dummy Launcher, remove the foam padding from the handle. 2. Remove the 4 screws found under the foam padding. 3. Attach the Dummy Launcher Mounting Bracket using the 4 exposed screw holes (fig.
INSTALLING/REMOVING DUMMY LAUNCHER fig.1 fig.2 fig.3 fig.4 fig.5 fig.6 fig.7 fig.8 fig.9 Removing for Maintenance 1. Detach the spring from the Ratcheting Safety Arm and swing the arm to the other side (fig.4). 2. Unscrew and remove all four Dummy Launcher Mounting Screws (fig.6). 3. Hold the Ratcheting Cocking Lever and pull out the Dummy Launcher to lift it out of Launcher base (fig.5). 4. Follow maintenance directions in your Super-Pro Dummy Launcher instruction manual.
INSTALLING/REMOVING REMOTE RECEIVER WARNING - Do not remove/install Remote Receiver while Launcher is loaded with a Power Load. These directions are for removing the Remote Receiver unit to replace battery or for replacing a Remote Receiver unit on a Remote Launcher. Installing Remote Receiver 1. Slide the Remote Receiver into Mounting Bracket on the Launcher Base. 2. Line up screw holes on the Remote Receiver with the Mounting Bracket. 3.
INSTALLING BATTERIES WARNING - Do not remove/install battery while Launcher is loaded with a Power Load. You must install a 9V battery in Transmitter and Remote Receiver before using the Remote Launcher. Use only Alkaline batteries from major brand name manufacturers. Generic brands may not work with these units. Installing Transmitter Battery 1. Push in the “PUSH” at the top of the Battery Cover and slide down to open. 2.
TURNING REMOTE RECEIVER ON/OFF WARNING - Do not turn unit ON/OFF while Launcher is loaded with a Power Load. NOTE - The Transmitter is in a permanent “sleep” state and is only active when a button is pressed. Turning Remote Receiver ON 1. Push and hold the Power Button on the Remote Receiver. The Red LED will light solidly for about 2 seconds while holding button. 2. Release the Power Button when the Red LED light goes off.
PROGRAMMING RECEIVER/TRANSMITTER WARNING - Do not Program unit while Launcher is loaded with a Power Load. These directions are for initial Programming of a new Launcher, Programming after battery replacement, and Programming additional Launchers to the Transmitter. Programming 1. Verify that the Remote Receiver is off. 2. Choose a number (1-16) on the Launcher Selector Knob of the Transmitter (optional: label the Launcher with the number for easy recognition). 3.
TESTING LAUNCHER These are instructions on testing the unit indoors without actually firing with a power load. This will still let you test the functions of the unit and will allow you to get familiar with the process in a safe, controlled environment. CAUTION: Do not launch indoors with Launcher loaded. Always check that the Launcher is not loaded before testing. Keep out of reach of children at all times. Testing the Launcher 1. Make sure the Launcher is not cocked 2.
TESTING LAUNCHER Testing the Remote Receiver Only 1. Make sure the Launcher is not cocked 2. Turn Remote Receiver ON, or quickly push the Power Button to reset the Remote Receiver if already ON. 3. Select the correct Launcher on the Selector Knob and push the ‘BIRD’ button on the Transmitter. The Motor Arm should rotate to lift the Ratcheting Safety Arm. Testing the Beeper/Locator 1. Turn Remote Receiver ON. 2. Select the correct Launcher on the Selector Knob and push the ‘BEEPER’ button on Transmitter. 3.
OPERATING LAUNCHER CAUTION: The RDL series Launcher is designed to launch a dummy at a very high velocity and thus fires with great force. Make sure all persons and dogs are completely clear of the flight path of the dummy at all times when loaded. Always wear hearing and eye protection when operating this unit. Do not launch indoors. Keep out of reach of children at all times. Launching the RDL 1. Make sure the Launcher is not cocked. 2. Place on firm level ground with Folding Legs out. 3.
OPERATING LAUNCHER Ejecting Used/Misfired Power Load 1. After launch (or misfire), lift Locking Lever and open Dummy Launcher. 2. Continue opening past normal stopping point. 3. Release and allow Launcher to go back normal stopping point, and remove Power Load. Resetting Remote Launcher After Launch Follow the “Launching the RDL” procedure on p. 22 with these modifications: 1. For Step 4, follow “Ejecting Power Load” above. 2.
MAINTENANCE • • • • Regular Maintenance* Wipe and clean RDL and Transmitter with a clean, soft cloth and warm, soapy water after each use. Take care not to use too much water when cleaning the Remote Receiver and Transmitter. Dry off any moisture to prevent corrosion/rusting as this may cause malfunction of the unit. Regularly clean and oil the Ratcheting Cocking Lever track and the Dummy Launcher firing shaft. Follow Dummy Launcher maintenance directions in the Dummy Launcher instruction manual.
TROUBLESHOOTING If your Launcher is not operating properly: • Make sure the correct channel is selected on the Launcher Selector Knob. • Reset Remote Receiver after each launch. • Replace batteries. Use only Alkaline batteries from major brand name manufacturers. Generic brands may not work with these units. • Reprogram Remote Launcher (see p.19). Please contact Customer Service (see p.28) for further troubleshooting or repair options. IMPORTANT SAFETY NOTES • Always wear eye and hearing protection.
WARRANTY All RDL series units have a one year parts and labor warranty effective from the original date of purchase. A copy of the original sales receipt is required to validate the date of purchase for any warranty repairs. This warranty covers all repair costs for any manufacturer’s defects or defects that occur during normal use and maintenance. It also covers regular return shipping back to the customer.
FCC/IC/CE COMPLIANCE Your RDL Series TM Launcher has been manufactured under complete compliance with Part 15 of the Federal Communication Commission (FCC) rules, Industry Canada (IC) Standard RSS-310, and Article 3 of the Directive 1999/5/EC. The complex internal structure of each product has been designed to operate within specific regulations of FCC specifications.
D.T. Systems, Inc. 2872 Walnut Hill Lane Dallas, Texas 75229 (214) 350-9446 (888) 588-8364 Fax: (214) 350-7847 www.dtsystems.com customerservice@dtsystems.com RDL Series 2013.