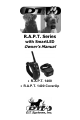
R.A.P.T. Series with SmartLED Owner’s Manual • R.A.P.T. 1400 • R.A.P.T.
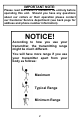
IMPORTANT NOTE: Please read this owner’s manual in its entirety before operating this unit. Should you have any questions about our collars or their operation please contact our Customer Service department (see back page for address and phone number information). NOTICE! According to how you use your transmitter, the transmitting range might be much different.
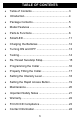
TABLE OF CONTENTS • Table of Contents ................................................3 • Introduction..........................................................4 • Package Contents ...............................................5 • Model Features ...................................................5 • Parts & Functions ................................................6 • SmartLED............................................................11 • Charging the Batteries ...............................
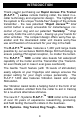
INTRODUCTION Thank you for purchasing our Rapid Access Pro Trainer (R.A.P.T.TM) series remote training collar, the latest in ecollar technology and ergonomic design. The highlight of the system is the unique "hands-free" design of the remote transmitter - the new patented “Rapid AccessTM" total control button is easily accessible for instantaneous correction of your dog and our patented "SureGripTM" strap securely holds the unit in place - freeing up your hands for other activities.
PACKAGE CONTENTS • • • • • • • Transmitter with Antenna and Lanyard Collar Receiver NiMH Batteries for Collar (already installed) Battery Charger Triple-Jack Splitter/Adaptor Cable for charging Test Light Owner’s and Training Manuals MODEL FEATURES • • • • • • • • • • • • • • PATENTED Curved Transmitter for one finger operation Programmable “Rapid AccessTM” button Small, Compact, Lightweight, “Hands-Free” design Multiple Grip options for ambidextrous use 1,400 Yard (3/4 Mile) range (MAXX-Range 360) 16 le
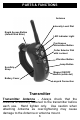
PARTS & FUNCTIONS Antenna Intensity Level Dial Rapid Access Button (default Nick Stim.) LED Indicator Light Continuous Stimulation Button Collar Selector Dial with Lockout Vibration Button Jump Button SureGrip Strap Magnet ON/OFF Switch (white dot) Battery Cover Lanyard Connection Transmitter Transmitter Antenna - Always check that the Antenna is securely fastened to the transmitter before each use. Hand tighten only.
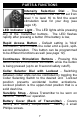
PARTS & FUNCTIONS Intensity Selection Dial - The intensity selection dial can be set from level 1 to level 16 to find the exact stimulation level for your dog (see page 18). LED Indicator Light - The LED lights while pressing any of the Transmitter buttons. The LED flashes rapidly after pressing a button if the battery is low, Rapid Access Button - Default setting is ’Nick’ Stimulation, which makes the collar emit a quick, splitsecond stimulation.
PARTS & FUNCTIONS Vibration and Jump Buttons - Pressing the Vibration Button makes the collar vibrate only. Pressing the Jump Button makes the collar give a ‘Jump’ Stimulation, making the intensity level instantly “jump” to a user-programmed intensity level (see page 18). Magnetic ON/OFF Switch - White dot on Transmitter indicating location of the magnet used to power ON/ OFF the Collar Unit. Lanyard Connection - Point of attachment for lanyard.
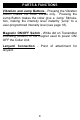
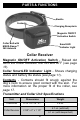
PARTS & FUNCTIONS Buckle Contacts Charging Receptacle Magnetic ON/OFF Activation Switch Collar Belt with MAXX-Range™ 360 Antenna SmartLED Indicator Light Collar Receiver Magnetic ON/OFF Activation Switch - Raised dot turns the Collar Receiver unit ON and OFF (see page 13). Collar SmartLED Indicator Light - Shows charging status and battery life status (see page 11). Contacts - Contacts should fit snugly against the dog’s neck to ensure good contact with the skin.
PARTS & FUNCTIONS Collar Belt with MAXX-Range™ 360 Antenna - The embedded MAXX-Range™ Antenna is woven into the collar belt and runs along the entire length of the belt, providing extended range without the drawback of an external antenna. Because it wraps around the neck along with the collar belt, the MAXX-Range Antenna provides 360˚ degrees of signal reception and is not blocked by your dog’s body, regardless of which direction your dog is facing.
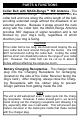
SmartLED R.A.P.T. Series collar units are equipped with the SmartLED battery status system. The SmartLED system lets you know when the unit is charging and when the charging is complete. It also gives you a status on how much charge is remaining in the battery during use, when it needs charging, and when the batteries will need to be replaced.
CHARGING THE BATTERIES All R.A.P.T. Series TM collar units are equipped with rechargeable Nickel Metal Hydride (NiMH) batteries, which are not memory sensitive and do not require depletion before recharging. Although batteries come partially charged from the factory, it is recommended that they are given a full charge (about 12 hours) before initial use. Battery Charging Procedure 1. Make sure the unit is off. 2. Plug the charger into a standard electrical outlet. 3.
TURNING ON AND OFF The Transmitter is always in a permanent sleep state. It is only ON when a button is being pressed and does not need to be turned off by the user. If the Transmitter does not activate, make sure you have a good battery installed and that your Collar Selector Dial is not in the Lockout position. Turning the Collar Unit ON/OFF: Turning the Collar Unit ON and OFF uses the same procedure: 1.
TESTING NOTE: If the collar unit is not responding to any signals from the transmitter, the collar may need to be reprogrammed to the transmitter (see page 16). Before testing, make sure that both units are fully charged and the power to the Collar Receiver is “ON”. To Test the Electronic Stimulation: 1. Place the tester firmly on the contacts of the Collar Receiver. 2. Set the intensity (note - an intensity level setting of 4 or less might not be enough to light the tester). 3.
Re-Thread SureGrip Strap 1. With the buckle of the strap facing outwards, thread the suregrip strap through the bottom 2. Thread both sides of the suregrip strap through the neoprene loop. 3. Thread loose end (nonbuckle end) of the strap through the top guide. 4. Thread loose end through the top-portion of buckle as shown.
PROGRAMMING THE COLLAR When adding an “Add-On” collar, the collar will need to be programmed to the transmitter. If your current collar unit is not responding to the transmitter, it may also need to be reprogrammed to the transmitter. 1. Select the desired Collar Selecting Switch position on the transmitter. 2. Hold the Transmitter Magnet Indicator (white dot) directly against the Magnetic Activation Switch (small bump) on the right side of the Collar Receiver. 3.
PROPERLY FITTING THE COLLAR NOTE: Proper collar tightness and position are very important to insure safe and consistent collar use. All electronic collars need to be very snug around the dog’s neck to work properly. They must be just tight enough to allow the “contacts” or electrodes to make good contact on your dog’s skin. If the collar is too loose, the stimulation may not work properly because good/consistent skin contact is not being achieved.
SETTING THE INTENSITY LEVEL It is very important to set the correct intensity level on your R.A.P.T. Training System before beginning your training sessions to provide the proper level of stimulation without over-stimulating your dog. 1. Place the Intensity Selection dial so that the system is set on Level 1. 2. Turn on the Collar Receiver and then fit it properly around your dog’s neck. 3. Press the ‘Cont.’ button and check for a reaction.
SETTING THE INTENSITY LEVEL Setting the Jump Stimulation Level (cont.): 1. Press and hold Button Jump button. 2. While holding the Jump button, turn the Intensity Dial to the desired Jump stimulation level. The LED will start flashing to indicate that you are programming the Jump stimulation level 3. Release the Jump button. The LED will flash the number of the new Jump level to confirm successful Jump level programming.
MAINTENANCE It is very important to periodically clean your R.A.P.T. SeriesTM system for maximum performance. Regular cleaning will also lengthen the life of your unit. • Clean the collar box, belt and buckle with lukewarm water and a mild anti-bacterial soap. • Thoroughly clean the space between the electrodes and the belt. • Always allow the entire unit to completely dry before charging/using.
IMPORTANT SAFETY NOTES • Before training with this unit, your dog’s health should be examined by a veterinarian. • Do not use with aggressive-tempered dogs. • Your R.A.P.T. Series TM collar is a very valuable tool if used correctly. It is extremely important that you completely understand all the functions of the collar and how to properly train with it before placing it on your dog.
WARRANTY • D.T. Systems Premium Lifetime Warranty is the best warranty offered in the industry. This warranty is free to participating U.S. customers (a completed warranty registration card must be returned within 30 days of original purchase). This changes our normal one year parts and labor warranty to a limited lifetime warranty against manufacturing defects on parts and a one year warranty on labor.
FCC/IC/CE COMPLIANCE Your R.A.P.T. Series TM Trainer has been manufactured under complete compliance with Part 15 of the Federal Communication Commission (FCC) rules, Industry Canada (IC) Standard RSS-310, and Article 3 of the Directive 1999/5/EC. The complex internal structure of each product has been designed to operate within specific regulations of FCC specifications.
2872 Walnut Hill Lane Dallas, Texas 75229 Tel: (214) 350-9446, (888) 588-8364 Fax: (214) 350-7847 Website: www.dtsystems.com E-mail: customerservice@dtsystems.com 1-RAPT 2013.04.