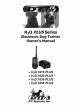
H 20 PLUSSeries Electronic Dog Trainer Owner's Manual • • • • H2 0 H2 0 H2 0 H2 0 1810 PLUS 1820 PLUS 1830 PLUS 1850 PLUS D.T. Systems, Inc.
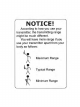
NOTICE! According to how you use your transmitter, the transmitting range might be much different.
TABLE OF CONTENTS • Table of Contents .................. .. ................... 3 • Introduction ................................................ 4 • Package Contents ...................................... 5 • Model Features .......................................... 6 • Parts & Functions ....................................... 7 • Charging the Batteries ................................ 12 • Turning ON and OFF .................................. 13 • Testing ..................................
INTRODUCTION Congratulations and thank you for purchasing our H2 0 PLUS Series ™ Training Collar with "Add-On" capability. It offers the Maxx-Range ™ Internal Antenna System, the industry's only internally woven antenna in the collar. With up to a one mile range, they are perfect for hunting, basic obedience, and professional training. H2 0 PLUS series collars feature sixteen levels of intensity easily selected by one hand for maximum control and safety.
IMPORTANT NOTE: Please read this owner's manual in its entirety before operating this unit. Should you have any questions about our collars or their operation please contact our Customer Service department (see back page for address and phone number information ).
MODEL FEATURES .
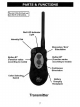
PARTS & FUNCTIONS The H20 1810 PLUS will not have the #1 or #2 buttons.
PARTS & FUNCTIONS 'H2 0 1850 PLUS only. /I other models will not Collar Belt with MAXX.Range ™ Antenna ON/OFF Button Collar Receiver PARTS & FUNCTIONS Intensity Selection Dial The intensity selection dial can be set from level 1 to level 16 to find the exact stimulation level for your dog (see page 18). Transmitter Indicator Light When one of the buttons on the transmitter is pushed, the Red LED light will turn on to indicate that the transmitter is being operated.
PARTS & FUNCTIONS Transmitter Antenna Be sure to check that the antenna is securely fastened to the transmitter before each use. Hand tighten only. Use care when attaching antenna. Over-tightening may cause damage to the antenna or antenna mount. Momentary and Continuous Stimulations Pressing the upper button will make the collar give a Momentary (or 'Nick') Stimulation. Pressing the lower button gives a Continuous Stimulation. These buttons are the same on every model of the H2 0 series.
PARTS & FUNCTIONS Rise Button (H 2 0 1830 PLUS only) Pressing the button on the right (#2) of the transmitter will make the collar give a stimulation that gradually increases in intensity level the longer the 'Rise' button is pressed. Locate and Run/Point Buttons (H 2 0 1850 PLUS only) Pressing the 'Locate' button on the left side (#1) of the Transmitter will make the Collar Receiver beep.
PARTS & FUNCTIONS Collar Indicator Light When the Collar Receiver is turned on, the Red LED light will flash steadily once every two seconds to indicate that the unit is active. The Red LED light changes to a rapid flash when the battery is in need of charging. The Red LED light stays lit while plugged into the charger. Contacts Contacts should fit snugly against the dog's neck to ensure good contact with the skin. For more information on the proper fit of the collar, see page 17.
CHARGING THE BATTERIES All H2 0 PLUS Series ™ units are equipped with rechargeable Nickel Metal Hydride (NiMH) batteries. NiMH batteries are not memory sensitive and do not require depletion before recharging. The batteries come partially charged from the factory. However, it is recommended that the batteries are given a full charge (about 12 hours) before initial use. Remember - Always keep batteries away from flammable substances (especially when charging).
CHARGING THE BATTERIES NOTE Rechargeable batteries typically last about 2-5 years on average depending on use and care. Do not overcharge your unit (12 hour maximum charge time). Do not store your unit without a charge for extended periods of time. Do not store your unit in extreme heat/cold or moist/humid conditions. TURNING ON AND OFF The Transmitter is always in a permanent sleep state. It is only ON when a button is being pressed and does not need to be turned off by the user.
TESTING NOTE: Before testing, make sure that both units are fully charged and the power to the Collar Receiver is "ON". To Test the Electronic Stimulation: A) Place the tester firmly on the contacts of the Collar Receiver. B) Set the intensity (note - an intensity level setting of 4 or less might not be enough to light the tester). C) Push the 'NICK' or 'CONT' button.
TESTING To Test the Rise: (H 2 0 1830 PLUS only) A) The Rise feature will gradually increase the intensity level starting from the level set on your dial. To see a greater range of intensity change, set the intensity dial to a lower level. 8) Press and hold the button on the right side of the transm itter (Rise button) and the test light will get brighter as the button is held. To Test the Beeper: (H 2 0 1850 PLUS only) A) Press the button located on the left side of the transmitter (Locate button).
PROGRAMMING THE COLLAR When adding an "Add-On" collar, the collar will need to be programmed to the transmitter. If your current collar unit is not responding to the transmitter, it may also need to be reprogrammed to the transmitter. 1. Select the desired Collar Selecting Switch position on the transmitter. 2. Press and hold the power button on the collar like the colfar unit is being turned ON. 3.
PROPERLY FITTING THE COLLAR NOTE: Proper collar tightness and position are very important to insure safe and consistent collar use. All electronic collars need to be very snug around the dog's neck to work properly. They must be just tight enough to allow the "contacts" or electrodes to make good contact on your dog's skin. If the collar is too loose, the stimulation may not work properly because good/ consistent skin contact is not being achieved.
SETTING THE INTENSITY LEVEL It is very important to set the correct intensity level on your H2 0 PLUS Training System before beginning your training sessions to provide the proper level of stimulation without over-stimulating your dog. To do this, place the Intensity Selection dial so that the system is set on Level 1. Turn on the Collar and then fit it properly around your dog's neck. Press either the 'NICK' or tHE? 'CONT' Button and check for a reaction .
SETTING THE INTENSITY LEVEL Jump stimulation is a great feature when regularly using two different stimulation levels in training . It is also a great safety tool for emergency situations when your dog is excited and cannot feel or ignores the normal intensity level. Pressing the Jump button directly rather than increasing the intensity level manually will save precious time during these situations when your dog may be heading towards imminent danger.
MAINTENANCE It is very important to periodically clean your H2 0 PLUS Series ™ systems for maximum performance. Regular cleaning will also lengthen the life of your unit. • Clean the H20 PLUS Series ™ collar box with lukewarm water and a mild anti-bacterial soap. • Take care to thoroughly clean the space between the electrodes and the belt. • The belt and buckle should be cleaned with water and a mild soap then allowed to dry completely. • Always allow the entire unit to completely dry before using.
IMPORTANT SAFETY NOTES • Before training , your dog should be examined by a veterinarian to assure that your dog is in good health. • Never leave your dog unattended with the unit on. Since no electronic device is perfect, there is a very slight possibility that your dog may receive an unintentional electric stimulation. • Your H2 0 PLUS Series ™ training collar is a very valuable tool if used correctly.
WARRANTY D.T. Systems Premium Lifetime Warranty is the best warranty offered in the industry. This warranty is free to participating U.S. customers (a completed warranty registration card must be returned within 30 days of original purchase). This changes our normal one year parts and labor warranty to a limited lifetime warranty against manufacturing defects on parts and a one year warranty on ;Iabor. What is covered: D.T.
WARRANTY How the Limited Lifetime Warranty works: • To qualify for the Warranty you must fill out the warranty registration card which came with your system and mail it (with your original sales receipt) to D.T. Systems within 30 days of purchase. • There is no charge for parts or labor for the first year on any of our lifetime warranty products.
D.T. Systems, Inc. 2872 Walnut Hill Lane Dallas, Texas 75229 Tel: (214) 350-9446, (888) 588-8364 Fax: (214) 350-7847 Website: www.dtsystems.com E-mail: customerservice@dtsystems.com 1-H2 0 PLUS 2009.09.