
Hardware reference guide


DSN-1100 Hardware Reference Guide 23
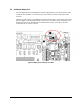
3.6 Connecting the Power Cords
The DSN-1100 storage system has a single power receptacle:
1. Plug the female end of the power cord into the 3-pronged power connectors on the back
of the DSN-1100 storage system. Plug the other end of the power cord into a working AC
outlet that is not controlled by a wall switch.
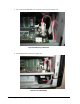
3.7 Powering-on the DSN-1100 Storage System
To power-on the DSN-1100 storage system, press the power switch located inside the front
cover. When the DSN-1100 storage system powers-on, the following actions occur:
The DSN-1100 storage system Power LED turns green.
The DSN-1100 storage system runs its power-on procedure (~4 minutes), then the
Ready/Fault LED turns green and drive LEDs may flash.
The completion of the power-on process can be verified as indicated in Table 3-2.
Table 3-2. Verifying Completion of the DSN-1100 Storage System Power-on Process
If the DSN-1100 Storage System… Verify the Power-on Process by…
Has no front panel Ready/Fault LED Wait five minutes after powering-on the DSN-1100 storage
system.
Has a front panel Ready/Fault LED. The LED turns green when the startup process completes. If
the LED turns red, reboot the DSN-1100 storage system. If the
problem persists, contact Technical Support.
Diagnostic port is connected to a PC via a diagnostic cable. The message RCP sequence complete appears on the PC
monitor. After verifying this message, disconnect the PC from
the diagnostic port.
After the DSN-1100 storage system powers-on for the first time, it automatically loads the
factory-default configuration settings. If necessary, you can use the xStack Storage
Management Center to change these settings to suit your requirements. For a description of
the array’s factory-default configuration settings and how to change them, refer to the
xStack Storage Management Center User's Guide.