DFL-1100 INSTALLATION GUIDE Package Contents • D-Link® DFL-1100 NETDEFEND™ Network Security Firewall • CAT5 UTP Straight-Through Ethernet Cable • CAT5 UTP Crossover Cable • RS-232 Console Interface Cable • CD-ROM (Containing Manual) • Power Cord System Requirements • Computer with an Ethernet adapter and a Windows, Mac, or Unix based operating system. • Internet Explorer or Netscape Navigator, version 6.0 or above, with JavaScript enabled. ©2004 D-Link Systems, Inc. All rights reserved.
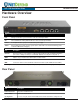
DFL-1100 Installation Guide Hardware Overview Hardware Overview Front Panel LED Function Link Solid green indicates a good connection on the associated port number. Act The Act LED flashes during data transmission on the associated port number. Power A solid light indicates a proper connection to the power supply. Status LED should flash to indicate an active system. (If the status LED is lit solid and not flashing, please contact D-Link® Technical Support.
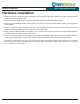
DFL-1100 Installation Guide Hardware Installation Hardware Installation 1. Connect the power cord to the power connector on the rear panel of the DFL-1100. Plug the other end of the power cord to a wall outlet or power strip. 2. Turn on the power switch on the rear panel of the DFL-1100. The Power LED will illuminate. 3. Power off your broadband modem. Some modems may not have an on/off switch and will require you to unplug the power adapter. 4.
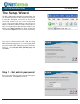
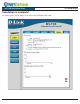
DFL-1100 Installation Guide The Setup Wizard The Setup Wizard The DFL-1100 provides Web based configuration. You can configure your DFL-1100 using Internet Explorer or Netscape Navigator version 6.0 or above with JavaScript enabled. To access the configuration screen, launch your Web browser and enter the IP address of the DFL-1100 in the address field and press enter. If using the DFL-1100’s default IP address, you would enter https://192.168.1.
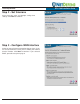
DFL-1100 Installation Guide The Setup Wizard Step 2 - Set timezone Select your time zone and daylight savings time settings. Click Next to continue. Step 3 - Configure WAN interface Select the type of Internet connection that you have. If you are unsure of which to select, please contact your Internet Service Provider. Click Next to continue. If you selected DHCP, proceed to step 4 on page 8.
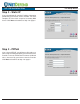
DFL-1100 Installation Guide The Setup Wizard Step 3 - Static IP If you selected Static IP, enter the IP address information provided by your Internet Service Provider. You must complete all of the fields except for Secondary DNS Server. Click Next and continue to Step 4 on page 8. Step 3 - PPPoE If you selected PPPoE, you will have to fill out the user name and password provided by your Internet Service Provider.
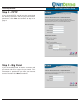
DFL-1100 Installation Guide The Setup Wizard Step 3 - PPTP If you selected PPTP, you will need to specify both the tunnel parameters and the physical interface parameters. Click Next and continue to Step 4 on page 8. Step 3 - Big Pond If you selected Big Pond, fill out the username and password and then retype the password. This information is provided to you from your Internet Service Provider. Click Next to continue.
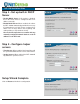
DFL-1100 Installation Guide The Setup Wizard Step 4 - Set up built-in DHCP Server • Disable DHCP Server: If this option is disabled, then LAN clients must be configured with an IP address manually. • Enable DHCP Server: When enabled, this allows the DFL-1100 to automatically provide the necessary IP information to all LAN clients configured for DHCP. The IP range defines the beginning and ending addresses to provide the clients.
DFL-1100 Installation Guide The Setup Wizard A message will appear indicating that the unit is restarting. After you’ve configured the unit, you will need to reconnect to the web browser interface. Type in https://192.168.1.1 Be sure to include the “s” in https. Type in the admin username and the password that you defined during the Setup Wizard.
DFL-1100 Installation Guide The Setup Wizard Installation is complete! You should see the System Status screen after reconnecting to the DFL-1100.
DFL-1100 Installation Guide Activating Changes Activating Changes to the D-Link® DFL-1100 When changes are made to the configuration of the DFL-1100, two new buttons appear below the existing menu buttons. Once all changes to the configuration of the DFL-1100 have been made, click on the Activate button to go to the Activate Changes window. Once the changes are activated, the admin account must login within the timeout period configured on this page.
DFL-1100 Installation Guide Administration Settings Administration Settings The Administration settings screen can be found by clicking on the System tab and selecting the Administration button. By default, administrative access is limited to the LAN interface. The selection you made during the Setup Wizard determines whether you can access the DFL-1100 via HTTP and HTTPS or only via HTTPS.
DFL-1100 Installation Guide Administration Settings You may selectively add administration features to any of the interfaces. To do so, click on the desired interface (WAN, DMZ, or ETH4) under the heading titled Add administrative access via: or click on Edit next to an interface that has already been configured. Note: User settings and interface settings limit what a user can do.
DFL-1100 Installation Guide WAN Interface Settings WAN Interface Settings When you first connect to the DFL-1100, the Setup Wizard guides you through configuring the basic firewall settings. Your WAN settings are configured at that time. Should you need to modify these settings, go to the System tab and click on the Interfaces button. Click on the Edit option next to WAN. Static IP If your Internet connection uses a Static IP Address, this information is provided to you by your Internet Service Provider.
DFL-1100 Installation Guide WAN Interface Settings DHCP If using DHCP, there is no need to enter any values. PPPoE If you are using a PPPoE connection, you must enter the username and password, retype the password, and enter any other information your Internet Service Provider (ISP) requires. Username: The login or username supplied by your ISP. Password: The password associated with the login or username. Service Name: Only use this option if required by your ISP.
DFL-1100 Installation Guide Logging Logging To go to the logging configuration screen, select the System tab and click on the Logging button. Logging allows you to track events such as startup, shutdown, and the opening and closing of connections. The startup and shutdown events are always logged. Events such as the opening and closing of allowed connections are user configurable. The DFL-1100 sends the log data to one or two Syslog servers.
DFL-1100 Installation Guide Time Time The time configuration screen can be found by selecting the System tab and then clicking on the Time button. The time can be set manually or synchronized to an Internet Network Time Server. Changing the Time Zone 1. Select the correct time zone from the dropdown menu. 2. Specify your daylight savings time or select no daylight savings time by selecting the appropriate radio button. 3. Click Apply to apply the settings or click Cancel to disregard the changes.
DFL-1100 Installation Guide Firewall Policy Firewall Policy The DFL-1100 allows you to configure policies to handle data being transmitted and recieved via the various interfaces. The policy configuration window can be found by going to the Firewall tab and the Policy button is the default selection. Adding a New Policy 1. Select the desired interfaces to create a policy for. For instance, LAN > WAN would create a policy for data from the internal LAN to the Internet. 2. Click on the Add new link. 3.
e DFL-1100 Installation Guide Port Mapping Port Mapping / Virtual Servers The Port Mapping / Virtual Servers configuration section allows you to configure virtual servers such as Web servers. Mappings are read from top to bottom. The first matching mapping is carried out. The Port Mapping / Virtual Servers configuration screen can be found by going to the Firewall tab and clicking on the Port Mapping button. Adding a New Mapping 1. Click the Add new link. 2.
DFL-1100 Installation Guide IPSec VPN Configuration IPSec VPN Configuration The VPN configuration screen can be found by going to the Firewall tab and selecting the VPN button. IPSec VPN Between a Client and an Internal Network Users can connect to the main office internal network from any Internet connection. Communication between the client and the internal network takes place in an encrypted VPN tunnel that connects the DFL-1100 and the roaming users across the Internet.
DFL-1100 Installation Guide IPSec VPN Configuration IPSec VPN Between Two Networks Users can connect from an internal network at one location to an internal network at another location via the Internet. Communication between the two networks takes place in an encrypted VPN tunnel that connects two DFL-1100 units across the Internet. Users of the internal networks are not aware that when they connect to a computer on the other network, the connection runs across the Internet.
DFL-1100 Installation Guide Backup Backup To reach the Backup screen, go to the Tools tab and select the Backup button. The Backup option allows the administrator the ability to backup and restore the configuration of the DFL-1100. The configuration file stores system settings, IP addresses, address tables, service tables, IPSec settings, port mappings, and policies. When your DFL-1100 is fully configured, you can save the configuration file to a local drive.
DFL-1100 Installation Guide Restart/Reset Restart / Reset The Restart / Reset window can be found by going to the Tools tab and clicking on the Reset button. Restarting the DFL-1100 1. Select quick or full restart. A quick restart will reset the interfaces and re-read the configuration. A full restart is the same as starting up after the unit has been powered off. 2. Click on the Restart Unit button and the unit will restart.
DFL-1100 Installation Guide Technical Support TECHNICAL SUPPORT You can find software updates and user documentation on the D-Link® support website. D-Link® provides free technical support for customers within the United States and within Canada for the duration of the warranty period on this product. U.S. and Canadian customers can contact D-Link® Technical Support through our website or by phone.