Section 4 - Security 5. Enter the same security key or passphrase that is on your router and click Ok. It may take 20-30 seconds to connect to the wireless network. If the connection fails, please verify that the security settings are correct. The key or passphrase must be exactly the same as on the wireless router.
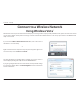
Section 4 - Security Connect to a Wireless Network Using Windows Vista® Windows Vista users may use the built-in wireless utility. If you are using another company’s utility or Windows 2000, please refer to the user manual of your wireless adapter for help with connecting to a wireless network. Most utilities will have a “site survey” option similar to the Windows Vista utility as seen below. If you receive the Wireless Networks Detected bubble, click on the center of the bubble to access the utility.
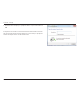
Section 4 - Security Configure Wireless Security It is recommended to enable wireless security (WPA/WPA2) on your wireless router or access point before configuring your wireless adapter. If you are joining an existing network, you will need to know the security key or passphrase being used. 1. Open the Windows Vista® Wireless Utility by right-clicking on the wireless computer icon in your system tray (lower right corner of screen). Select Connect to a network. 2.
Section 4 - Security 3. Enter the same security key or passphrase that is on your router and click Connect. It may take 20-30 seconds to connect to the wireless network. If the connection fails, please verify that the security settings are correct. The key or passphrase must be exactly the same as on the wireless router.
Section 4 - Security Connect Using WCN 2.0 The router supports Wi-Fi protection, referred to as WCN 2.0 in Windows Vista. The following instructions for setting this up depends on whether you are using Windows Vista to configure the router or third party software. When you first set up the router, Wi-Fi protection is disabled and unconfigured. To enjoy the benefits of Wi-Fi protection, the router must be both enabled and configured.
Section 5 - Connecting to a Wireless Network Connect to a Wireless Network Using Windows® XP Windows XP users may use the built-in wireless utility (Zero Configuration Utility). The following instructions are for Service Pack 2 users. If you are using another company’s utility or Windows 2000, please refer to the user manual of your wireless adapter for help with connecting to a wireless network. Most utilities will have a “site survey” option similar to the Windows XP utility as seen below.
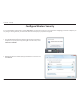
Section 5 - Connecting to a Wireless Network Configure WPA-PSK It is recommended to enable encryption on your wireless router or access point before configuring your wireless adapter. If you are joining an existing network, you will need to know the passphrase being used. 1. Open the Windows® XP Wireless Utility by right-clicking on the wireless computer icon in your system tray (lower-right corner of screen). Select View Available Wireless Networks. 2.
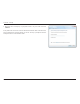
Section 5 - Connecting to a Wireless Network 3. The Wireless Network Connection box will appear. Enter the WPA-PSK passphrase and click Connect. It may take 20-30 seconds to connect to the wireless network. If the connection fails, please verify that the WPA-PSK settings are correct. The WPA-PSK passphrase must be exactly the same as on the wireless router.
Section 6 - Troubleshooting Troubleshooting This chapter provides solutions to problems that can occur during the installation and operation of the DIR-632. Read the following descriptions if you are having problems. (The examples below are illustrated in Windows® XP. If you have a different operating system, the screenshots on your computer will look similar to the following examples.) 1. Why can’t I access the web-based configuration utility? When entering the IP address of the D-Link router (192.168.0.
Section 6 - Troubleshooting • Configure your Internet settings: • Go to Start > Settings > Control Panel. Double-click the Internet Options Icon. From the Security tab, click the button to restore the settings to their defaults. • Click the Connection tab and set the dial-up option to Never Dial a Connection. Click the LAN Settings button. Make sure nothing is checked. Click OK. • Go to the Advanced tab and click the button to restore these settings to their defaults. Click OK three times.
Section 6 - Troubleshooting 3. Why can’t I connect to certain sites or send and receive emails when connecting through my router? If you are having a problem sending or receiving email, or connecting to secure sites such as eBay, banking sites, and Hotmail, we suggest lowering the MTU in increments of ten (Ex. 1492, 1482, 1472, etc). Note: AOL DSL+ users must use MTU of 1400. To find the proper MTU Size, you’ll have to do a special ping of the destination you’re trying to go to.
Section 6 - Troubleshooting You should start at 1472 and work your way down by 10 each time. Once you get a reply, go up by 2 until you get a fragmented packet. Take that value and add 28 to the value to account for the various TCP/IP headers. For example, lets say that 1452 was the proper value, the actual MTU size would be 1480, which is the optimum for the network we’re working with (1452+28=1480). Once you find your MTU, you can now configure your router with the proper MTU size.
Appendix A - Wireless Basics Wireless Basics D-Link wireless products are based on industry standards to provide easy-to-use and compatible high-speed wireless connectivity within your home, business or public access wireless networks. Strictly adhering to the IEEE standard, the D-Link wireless family of products will allow you to securely access the data you want, when and where you want it. You will be able to enjoy the freedom that wireless networking delivers.
Appendix A - Wireless Basics What is Wireless? Wireless or Wi-Fi technology is another way of connecting your computer to the network without using wires. Wi-Fi uses radio frequency to connect wirelessly, so you have the freedom to connect computers anywhere in your home or office network. Why D-Link Wireless? D-Link is the worldwide leader and award winning designer, developer, and manufacturer of networking products. D-Link delivers the performance you need at a price you can afford.
Appendix A - Wireless Basics Who uses wireless? Wireless technology as become so popular in recent years that almost everyone is using it, whether it’s for home, office, business, D-Link has a wireless solution for it.
Appendix A - Wireless Basics Where is wireless used? Wireless technology is expanding everywhere not just at home or office. People like the freedom of mobility and it’s becoming so popular that more and more public facilities now provide wireless access to attract people. The wireless connection in public places is usually called “hotspots”.
Appendix A - Wireless Basics Wireless Modes There are basically two modes of networking: • Infrastructure – All wireless clients will connect to an access point or wireless router. • Ad-Hoc – Directly connecting to another computer, for peer-to-peer communication, using wireless network adapters on each computer, such as two or more DIR-632 wireless network Cardbus adapters. An Infrastructure network contains an Access Point or wireless router.
Appendix B - Networking Basics Networking Basics Check your IP address After you install your new D-Link adapter, by default, the TCP/IP settings should be set to obtain an IP address from a DHCP server (i.e. wireless router) automatically. To verify your IP address, please follow the steps below. Click on Start > Run. In the run box type cmd and click OK. (Windows Vista® users type cmd in the Start Search box.) At the prompt, type ipconfig and press Enter.
Appendix B - Networking Basics Statically Assign an IP address If you are not using a DHCP capable gateway/router, or you need to assign a static IP address, please follow the steps below: Step 1 Windows® 7 - Click on Start > Control Panel > Network and Internet > Network and Sharing Center. Windows Vista® - Click on Start > Control Panel > Network and Internet > Network and Sharing Center > Manage Network Connections. Windows XP - Click on Start > Control Panel > Network Connections.
Appendix C - Technical Specifications Technical Specifications Standards • IEEE 802.11n • IEEE 802.11g • IEEE 802.3 • IEEE 802.3u Transmitter Output Power • 17.
Appendix D - Contacting Technical Support Contacting Technical Support U.S. and Canadian customers can contact D-Link technical support through our web site or by phone. Before you contact technical support, please have the following ready: • Model number of the product (e.g. DIR-632) • Hardware Revision (located on the label on the bottom of the router (e.g. rev A1)) • Serial Number (s/n number located on the label on the bottom of the router).
Appendix E - Warranty Warranty Subject to the terms and conditions set forth herein, D-Link Systems, Inc. (“D-Link”) provides this Limited Warranty: • Only to the person or entity that originally purchased the product from D-Link or its authorized reseller or distributor, and • Only for products purchased and delivered within the fifty states of the United States, the District of Columbia, U.S. Possessions or Protectorates, U.S. Military Installations, or addresses with an APO or FPO.
Appendix E - Warranty Software will be warranted for the remainder of the original Warranty Period and is subject to the same limitations and exclusions.
Appendix E - Warranty While necessary maintenance or repairs on your Product can be performed by any company, we recommend that you use only an Authorized D-Link Service Office. Improper or incorrectly performed maintenance or repair voids this Limited Warranty.
Appendix E - Warranty FCC Statement: This equipment has been tested and found to comply with the limits for a Class B digital device, pursuant to Part 15 of the FCC Rules. These limits are designed to provide reasonable protection against harmful interference in a residential installation. This equipment generates, uses and can radiate radio frequency energy and, if not installed and used in accordance with the instructions, may cause harmful interference to radio communications.
Appendix E - Warranty IC statement Operation is subject to the following two conditions: 1) This device may not cause interference and 2) This device must accept any interference, including interference that may cause undesired operation of the device. This device has been designed to operate with an antenna having a maximum gain of 2dBi. Antenna having a higher gain is strictly prohibited per regulations of Industry Canada. The required antenna impedance is 50 ohms.
Appendix F - Registration Registration Product registration is entirely voluntary and failure to complete or return this form will not diminish your warranty rights. Version 1.