
User`s guide


XStack Storage User’s Guide 35
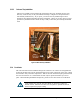
3.1.3.2 Drive and Tray Installation
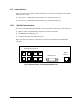
A drive/tray assembly can be installed by inserting the drive/tray assembly into the open
drive bay. Push the tray at the point indicated in Step 1 of
Figure 3-3 and push until it is
seated firmly within the bay. As you press, you will see the tray handle begin to move
inwards as the locking mechanism enters the locking slot. When you see this, then you must
push the tray handle inwards as shown in Step 2 until you hear the green locking mechanism
click.
Figure 3-3 Drive and Tray Installation
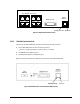
3.1.4 Front Vents
The enclosure that houses the XStack Storage unit contains a set of three hot-swappable fans
located in the mid-section of the chassis drawing air into vents in the front of the unit, cooling
the hard drive array and other components. This air exits the chassis through a grill located at
the rear of the chassis. It is advised that the unit only be operated with the top cover in
place. When installing the XStack Storage unit, please be sure these vents are not blocked.
A fully loaded array with all drive bays filled can generate a significant
amount of heat. Please be sure the cover is in place to provide the forced
air flow required for proper cooling.