
Installation Instructions Part 1


Section 3 – Configuration
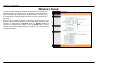
D-Link DSL-2640R User Manual 26
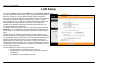
Use the Router for DHCP
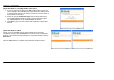
To use the built-in DHCP server, click the DHCP radio button to Enabled if it has not already selected. The IP Address Pool settings can be adjusted.
The Starting IP Address is the lowest available IP address (default = 192.168.1.2). If you change the IP address of the Router, this will change
automatically to be 1 more that the IP address of the Router. Type in the Lease Time in the entry field provided. This is the amount of time in
seconds that a workstation is allowed to reserve an IP address in the pool if the workstation is disconnected from the network or powered off.
You may also configure DNS settings for the LAN when using the Router in DHCP mode. Toggle the DNS Relay setting to Use User Discovered
DNS Server Only from Use Auto Discovered DNS Server Only and enter the IP addresses for the Primary DNS Server and Secondary DNS
Server in the field provided. The manually configured DNS settings will be supplied to clients that are configured to request them from the Router.
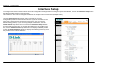
Disable the DHCP Server
To disable DHCP, select the Disabled option and click on the SAVE button. Choosing this option requires that workstations on the local network
must be configured manually or use another DHCP server to obtain IP settings.
If you configure IP settings manually, make sure to use IP addresses in the subnet of the Router. You will need to use the Router’s IP address as the
Default Gateway for workstations in order to provide Internet access.
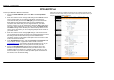
Use DHCP Relay
To use DHCP service from your ISP or another DHCP server, select the Relay option and type the DHCP Server IP for Relay Agent address in the
space provided. Click SAVE to begin DHCP relay from the ISP.