D-Link DNS-120 USB to Ethernet Network Storage Adapter Manual Version 1.
Contents Package Contents .................................................................................. 3 Introduction .............................................................................................. 4 Features .................................................................................................. 4 Hardware Overview ................................................................................. 5 Disconnect Button .............................................................
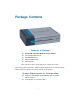
Package Contents Contents of Package: ! ! ! ! ! D-Link USB to Ethernet Network Storage Adapter Power Adapter-DC 5V, 2.5A CD-ROM with manual Quick Installation Guide Ethernet Cable If any of the above items are missing, please contact your reseller. Note: Using a power supply with a different voltage rating than the one included with the DNS-120 will cause damage and void the warranty for this product.
Introduction The D-Link DNS-120 USB to Ethernet Network Storage Adapter is a convenient way to share data, media-rich files and resources on your network. With two USB ports, the DNS-120 allows you to plug in up to two USB drives, configure your file-sharing settings, and begin sharing storage on your network. Features ! Compact design ! USB 1.1 and 2.
Hardware Overview Front Panel Power LED: Solid green indicates a good power source connection. USB LED: The USB LED will blink green when a USB drive is being connected. When the USB drive is fully connected the USB LED will appear solid green. The USB LED blinks red when the drive is being disconnected. Ethernet LED: Solid green indicates an Ethernet connection. Blinking green indicates activity on the Ethernet network.
Disconnect Button The Disconnect button is located on the back panel of the DNS-120. This button will safely disconnect all attached USB drives on the DNS-120. To safely remove a USB drive from the DNS-120, press the Disconnect button on the back panel until the USB LED blinks red. After the USB LED turns off, it is safe to remove all USB drives from the DNS-120. Note: If a USB drive remains attached to the DNS-120 after being disconnected, it will no longer be accessible.
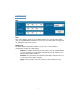
Using Easy Search At any time, you can easily access and manage the DNS-120 with the convenient utility, Easy Search (provided on the Installation CD-ROM). Easy Search is a tool that allows you to easily find DNS-120 units for configuration and add USB drive content to the network for user access. To use Easy Search: 1. Insert the Installation CD-ROM into your computer’s CD-ROM drive to initiate the Autorun program. The Autorun Screen of the Installation CD-ROM 2.
Using Easy Search Server List This list will detect all DNS-120 units on the network. Each DNS-120 will be displayed on a separate line with the current IP address, Network Mask, and Gateway IP. Refresh Click this button to refresh or re-detect all DNS-120 units on the network. Configuration This is used to bring up the Web configuration utility of the DNS-120.
Using Easy Search LAN LAN This section displays details of selected DNS-120 unit. To review the LAN settings, click on an available DNS-120 unit in the Server List. The LAN settings now appear in the appropriate fields in this section. DHCP Client The DNS-120 takes advantage of DHCP server presence on the network to automatically configure the LAN settings. Enabled – The DNS-120 will request an IP address from the available DHCP server and configure the LAN settings automatically.
Using Easy Search LINK INFO LINK INFO This section lists all available shared folders on a USB drive attached to DNS-120. Click on the desired DNS-120 in the Server List. All available shared folders will be displayed in the Link Info List, along with the mapped drive letter (if any). At the user’s option, any of the available shared folders may be mapped as a network drive letter to the local PC or to disconnect an existing mapped drive. MAP (CONNECT) A DNS-120 SHARED FOLDER AS A NETWORK DRIVE 1.
Using Easy Search MAP (CONNECT) A DNS-120 SHARED FOLDER AS A NETWORK DRIVE (continued) Enter in a valid user name and password. Press OK to continue or Cancel to reset the User name and Password fields. You will then see one of the following messages appear: Failure Notice Success Notice If the user name and password entered is incorrect, you will see a failure notice (shown above). If the user name and password entered is valid, you will see a success notice (shown above). 5.
Using Easy Search DISCONNECT A MAPPED (CONNECTED) DRIVE Failure Notice Success Notice 1. Click on the desired shared folder in the Link Info list (will highlight in blue). 2. Click the Disconnect button. 3. You will see one of the above messages. If the mapped drive was disconnected successfully, a success notice (shown above) will appear. If the mapped drive could not be successfully disconnected, a failure notice (shown above) with some possible reasons will appear. 4.
DNS-120 Web Login Screen DNS-120 WEB LOGIN SCREEN Access the Web login screen from the Easy Search utility. (Please see page 7). This is the DNS-120 login screen for access to Download Scheduling and the Web Configuration. Enter your User Name and Password here. For first-time configuration of DNS-120, enter “admin” for user name and leave the password field blank.
Web Configuration Utility This utility contains all of the settings and options available to configure the DNS-120. The utility is divided up into five tabbed sections. Each tabbed section includes a number of options represented by buttons on the left side. The Logout button remains present on every configuration page for instant logout of the utility. Home > Wizard Run Wizard Click this button to access the Setup Wizard.
Web Configuration Home > LAN LAN Settings This section contains all LAN settings to configure the DNS-120 to the network. Depending on how the network is set up, changes to this page may or may not be necessary. DHCP Client Clicking this option enables the DNS-120 to request an IP and auto-configure itself to the network if there is a DHCP Server present. By default, DHCP is enabled.
Web Configuration Home > LAN (continued) NOTE: If DHCP Client is enabled, but there is no DHCP server, the DNS-120 will fall back to the default IP address of 192.168.0.101. Once all changes to the LAN settings have been made, click the Apply button to put the changes into effect. The DNS-120 will then reboot itself. Wait approximately 30 seconds before attempting to log in again. To clear any changes made to the settings and start over again, click the Cancel button.
Web Configuration Advanced > User User Accounts This section will allow the Administrator to create additional user accounts. These accounts can then be used to access the Download Schedule section of the web configuration utility. ADD A USER ACCOUNT 1. Enter a unique user name 2. Enter a password associated with the user name 3. Re-Enter the password to confirm 4. Click Apply to save changes and add the user account To reset the user account field and start over, click the Cancel button.
Web Configuration Advanced > Folder Folder Settings This section will allow you to designate folders on attached USB drives as shared folders. Once shared, these folders can be mapped as a network drive using the Easy Search utility. Path To set the folder path, click the Open button to begin folder selection. A window will appear with a graphical representation of the folder structure on the USB drive(s).
Web Configuration Advanced > Folder (continued) To select a folder, click on the sign next to the USB drive name to reveal all subfolders available. When the folder you want is displayed, click on the folder name, scroll to the bottom of the folder structure, and verify the correct folder path listed. If the folder path is correct, click on the OK button to accept.
Web Configuration Advanced > FTP Server FTP Server Settings This section will allow the Administrator to configure, stop, and start the built-in FTP server. The FTP server allows users outside of the network to access the DNS-120 through the Internet. Path To set the folder path, click the Open button to begin folder selection. A window will appear with a graphical representation of the folder structure on the USB drive(s).
Web Configuration Advanced > FTP Server (continued) Idle Time Select a period between 1-10 minutes before the DNS-120 logs out the current user from the FTP server. Flow Control Select Unlimited or enter a data rate (x10 KB) for restricted data flow. This setting is only necessary where network traffic is significant and can be affected by FTP server activity. Click the Apply button to save changes and start the FTP server. To reset the FTP Server options and start over, click the Cancel button.
Web Configuration Tools > Admin Administrator Settings Set a new password for the Administrator account. 1. 2. 3. 4. 5. Enter the current password for the Administrator (admin) account Enter the new password for the Administrator account Re-Enter the new password to confirm the change Click Apply to accept the changes A success notice will appear if the password change is successful To reset the Administrator password settings and start over, click the Cancel button.
Web Configuration Tools > Time Time Settings This section will set the DNS-120 internal clock. It is important that accurate time is set for scheduled downloading and backup of files and folders. Current Time is displayed in 24-hour format (e.g. 14:00 is 2:00pm). Current Date is displayed in Month/Day/Year format. Default NTP Server (Optional) *NTP: Network Time Protocol synchronizes clocks on devices in the network, using Internet time servers.
Web Configuration Tools > Time (continued) Time Zone Set the local time zone for the DNS-120 internal clock from the drop-down box. Daylight Savings Time If the local region where the DNS-120 is located observes Daylight Savings Time, select the appropriate region (US or EU) from the drop-down box. Otherwise choose the None option. Click the Apply button to save time changes. To reset the Time settings and start over, click the Cancel button. To access online help for Time Settings, click the Help button.
Web Configuration Tools > System System Settings This is a set of additional useful functions for the DNS-120. Restart This function will allow the Administrator to do a warm restart of the DNS-120, meaning a restart without disconnecting the power adapter. Click the Restart button to begin the process.
Web Configuration Tools > System (continued) Click OK to restart. The restart will take approximately 1 minute before DNS-120 will be ready for use again. Click Cancel to abort this operation. Reset To Factory Default Settings This function will reset the DNS-120 to factory default settings. Make sure to write down any current DNS-120 settings or options that need to be re-applied after the reset is completed. Click the OK button to reset.
Web Configuration Tools > Firmware Firmware Upgrade This section allows the Administrator to upgrade the firmware on the DNS-120. Upgrading the firmware will incorporate the latest fixes, additional features, and better performance. 1. Visit the D-Link support site and download the latest firmware upgrade file 2. Save the firmware upgrade file to your desktop or other convenient location on the hard drive. 3. Click on the Browse button and locate the firmware upgrade file on the hard drive.
Web Configuration Tools > Firmware (continued) 7. Click Restart to complete the firmware upgrade. The upgrade completion will take approximately 1 minute before DNS-120 will be ready for use again.
Web Configuration Status > Device Info Device Information This section will show the current DNS-120 network and folder status. For additional online help, click the Help button.
Web Configuration Help This section lists all of the available help topics for reference. Click on a topic to view the online help information.
Scheduling This function will allow the user to set up scheduled folder or file transfer and backup jobs. To access the Scheduling function, access the DNS-120 login screen, provide a valid user name and password, and click on Download Schedule to access this function. To access the Scheduling function, click on Logout in any configuration screen. The Login screen will appear. Fill in the fields and click Download Schedule. The Scheduling screen will appear.
Scheduling Login Method Select the appropriate login method to access files for download · Account – If the download site employs restricted access, check this button and enter in the User Name and Password in the appropriate fields provided below this button. · Anonymous – Click this button if this job is a local (drive/PC to drive) backup or the download site does not require any login information.
Scheduling Test (continued) URL Invalid This screen will display if the URL is invalid. Check your settings and login method and try again. Local This button will let you set the local (USB drive attached to DNS-120) folder. When you click on the button, a window will appear with a graphical representation of the folder structure on the USB drive(s). To select a folder, click on the sign next to the USB drive name (shown above) to reveal all sub-folders available.
Scheduling Save To Enter a valid destination folder path to an attached USB drive on DNS-120. Click on the Open button to begin this process. Refer to the image on the previous page and the corresponding description on how to select the desired destination folder. When Enter the date and time you wish the file or folder transfer to commence. The current date and time according the DNS-120 internal clock will be displayed in the various drop-down boxes that appear as a reference point.
Scheduling DISCLAIMER Unless additional precautions are taken, use of this function to access files over the Internet does not provide secure or encrypted transmission. It is recommended that the end user utilize a Virtual Private Network (VPN) to establish a secure transfer session Help Click this button to bring up the help files for Scheduling in a separate window. The Schedule List (shown above) will display all completed, active, and pending scheduled transfer or backup jobs.
Scheduling Scheduling > Status The Status Schedule List will show additional details on all completed, active, and pending scheduled transfer or backup jobs. Scheduling > Help Click on any of the topics listed to obtain more detailed information.
Networking Basics Using the Network Setup Wizard in Windows XP In this section you will learn how to establish a network at home or work, using Microsoft Windows XP. Note: Please refer to websites such as http://www.homenethelp.com and http://www.microsoft.com/windows2000 for information about networking computers using Windows 2000/Me/98SE. Go to Start>Control Panel>Network Connections. Select Set up a home or small office network. When this screen appears, click Next.
Networking Basics Please follow all the instructions in this window: Click Next. In the following window, select the best description of your computer. If your computer connects to the Internet through a router, select the second option as shown. Click Next.
Networking Basics Enter a Computer description and a Computer name (optional.) Click Next. Enter a Workgroup name. All computers on your network should have the same Workgroup name. Click Next.
Networking Basics Please wait while the Network Setup Wizard applies the changes. When the changes are complete, click Next. Please wait while the Network Setup Wizard configures the computer. This may take a few minutes.
Networking Basics In the window below, select the option that fits your needs. In this example, Create a Network Setup Disk has been selected. You will run this disk on each of the computers on your network. Click Next. Insert a disk into the Floppy Disk Drive, in this case drive A.
Networking Basics Please read the information under Here’s how in the screen below. After you complete the Network Setup Wizard you will use the Network Setup Disk to run the Network Setup Wizard once on each of the computers on your network. To continue click Next.
Networking Basics Please read the information on this screen, then click Finish to complete the Network Setup Wizard. The new settings will take effect when you restart the computer. Click Yes to restart the computer. You have completed configuring this computer. Next, you will need to run the Network Setup Disk on all the other computers on your network. After running the Network Setup Disk on all your computers, your new wireless network will be ready to use.
Networking Basics Naming Your Computer To name your computer in Windows XP, please follow these directions: ! Click Start (in the lower left corner of the screen). ! Right-click on My Computer. ! Select Properties. ! Select the Computer Name Tab in the System Properties window. ! You may enter a Computer Description if you wish; this field is optional. ! To rename the computer and join a domain, click Change.
Networking Basics Naming Your Computer ! In this window, enter the Computer name. ! Select Workgroup and enter the name of the Workgroup. ! All computers on your network must have the same Workgroup name. ! Click OK. Checking the IP Address in Windows XP All wireless adapter-equipped computers in your network must be in the same IP address range (see Getting Started in this manual for a definition of IP address range.
Networking Basics Checking the IP Address in Windows XP This window will appear. ! Click the Support tab. ! Click Close. Assigning a Static IP Address in Windows XP/2000 Note: Many broadband routers will automatically assign IP addresses to the computers on the network, using DHCP (Dynamic Host Configuration Protocol) technology. If you are using a DHCP-capable router you will not need to assign static IP addresses.
Networking Basics Assigning a Static IP Address in Windows XP/2000 ! Double-click on Network Connections. ! Right-click on Local Area Connections. ! Click on Properties.
Networking Basics Assigning a Static IP Address in Windows XP/2000 ! Click on Internet Protocol (TCP/IP). ! Click Properties. ! Input your IP address and subnet mask. (The IP addresses on your network must be within the same range. For example, if one computer has an IP address of 192.168.0.2, the other computers should have IP addresses that are sequential, like 192.168.0.3 and 192.168.0.4. The subnet mask must be the same for all the computers on the network.) ! Input your DNS server addresses.
Networking Basics Checking the Wireless Connection by Pinging in Windows XP and 2000 Go to Start > Run > type cmd. A window similar to this one will appear. Type ping xxx.xxx.xxx.xxx, where xxx is the IP address of the wireless router or access point. A good wireless connection will show four replies from the wireless router or access point, as shown. Checking the Wireless Connection by Pinging in Windows Me and 98 Go to Start > Run > type command. A window similar to this will appear. Type ping xxx.
Technical Specifications Standards Network Standards ! IEEE 802.3 ! IEEE 802.3u USB Interface ! ! USB 2.0 USB 1.1 Connecting Ports ! ! ! One 10/100 RJ-45 connector (Auto MDI-X) Two USB 2.0 ports One Power jack Management ! Windows-based management Operating System Support ! Windows XP/2000/Me/98SE Environmental and Physical ! ! ! ! ! ! Power Supply: 5V, 2.
Techni cal Support echnical You can find software updates and user documentation on the D-Link website. D-Link provides free technical support for customers within the United States and within Canada for the duration of the warranty period on this product. U.S. and Canadian customers can contact D-Link technical support through our web site, or by phone. Tech Support for customers within the United States: D-Link Technical Support over the Telephone: (877) 453-5465 24 hours a day, seven days a week.
Subject to the terms and conditions set forth herein, D-Link Systems, Inc. (“D-Link”) provides this Limited warranty for its product only to the person or entity that originally purchased the product from: • • D-Link or its authorized reseller or distributor and Products purchased and delivered within the fifty states of the United States, the District of Columbia, U.S. Possessions or Protectorates, U.S. Military Installations, addresses with an APO or FPO.
• The original product owner must obtain a Return Material Authorization (“RMA”) number from the Authorized D-Link Service Office and, if requested, provide written proof of purchase of the product (such as a copy of the dated purchase invoice for the product) before the warranty service is provided.
Governing Law: This Limited Warranty shall be governed by the laws of the State of California. Some states do not allow exclusion or limitation of incidental or consequential damages, or limitations on how long an implied warranty lasts, so the foregoing limitations and exclusions may not apply. This limited warranty provides specific legal rights and the product owner may also have other rights which vary from state to state. Trademarks: D-Link is a registered trademark of D-Link Systems, Inc.