DKVM-2/4 2/4-Port Keyboard, Video, and Mouse Switch User’s Manual Rev. 1.
Contents Introduction......................................................1 Product Features .............................................2 Package Contents ...........................................2 Hardware Installation .......................................3 Front Panel Layout.................................................... 3 Rear Panel Layout .................................................... 3 Using the DKVM-2/4 ........................................9 “Select” button.......................
Introduction Thank you for purchasing the DKVM-2/4 KVM Switch. This product will ensure easy and accurate control over 2 or 4 PCs through a single console. The DKVM-2/4 is compatible with mouse and keyboard with PS/2 type connectors. Older style keyboards or mice can be used with PS/2 adapters in the case that the device is PS/2 compatible. Most older style serial keyboard and mice are not compatible with PS/2.
Product Features Allows a user to control 2/4 computers from one console. Works with DOS, Windows, OS/2, UNIX, Linux etc. No drivers or other additional software required. Keyboard and mouse emulation allows error-free boot-up. The status of the CAPS LOCK, SCROLL LOCK and NUM LOCK keys is preserved for each of the computers. Uses inexpensive and commonly available cables. Molded KVM cables are recommended. Model No. DKVM-CB Supports Monitor resolutions of up to 1920 x 1440.
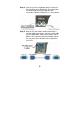
Hardware Installation This section will explain how to connect the console and the computers to the D-Link KVM switch unit. First the layout of front and rear panel will be shown. FRONT PANEL LAYOUT REAR PANEL LAYOUT Before you start connecting your computers and console devices to the DKVM-2/4, please make sure that everything is powered off.
Note: Please make sure the mouse you are planning to use is a 2 Button or 3 Button mouse, and that it is fully Microsoft Mouse compatible. If your mouse driver is not Microsoft mouse driver compatible, please do not uninstall your mouse driver or the existing driver from the PC and then install the Windows native mouse driver. Please follow the steps below closely and in the order as shown, otherwise, keyboard and/or mouse errors may occur. Step 1. Place the DKVM-2/4 in a convenient location.
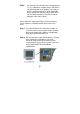
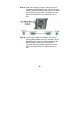
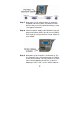
Step 3. Connect your PS/2 keyboard and PS/2 mouse to the front panel of the DKVM-2/4. The connections should be made to the two 6-pin Mini DIN connectors labeled =CONSOLE= as shown below. Step 4. Now the PC connections will be made with the monitor (VGA) connections. Connect a VGA cable (15-pin HDDB Male / Male) with the Male side to both the PC and to the connector labeled VGA on the rear panel of the DKVM-2/4 unit. Repeat this for all PCs.
Step 5. Now connect the PS/2 mouse cables from your computers to the DKVM-2/4 unit. Connect a mouse cable (6-pin Mini DIN Male / Male) to the PC and to the connector with the mouse symbol on the rear panel of the DKVM-2/4 unit. Repeat this for all PCs. Step 6. To finish the hardware installation, connect the PS/2 keyboard cables from your computers to the DKVM-2/4 unit.
Step 7. Now make sure to verify all cables. In particular, keyboard and mouse cables should be checked because they are easily switched and they use the same type of connector. Step 8. Attach the power supply to the DKVM-2/4 unit and plug it into a power outlet. You will see the LED for Port 1 light up, and you will hear a beep. Switch on your monitor. Step 9. Now power up all computers simultaneously. The first computer that is connected to port PC1 will be shown on the monitor.
choose the next computer and verify the functionality in the same way. If you find errors, recheck all cables for proper connections before going to the troubleshooting section of this manual. Note: Please do not switch the PC port (i.e. Do not press the push button of KVM switch or run hot key) while the computers are under their boot-up process. Normally, during boot-up process, each PC will communicate with the keyboard and mouse.
Using the DKVM-2/4 The DKVM-2/4 switch unit provides two ways to select which computer is the active system. Use either the “Select” button on the unit, or make use of the keyboard “Hot key” commands. You may notice that the mouse cannot be used for around 2 seconds when the DKVM-2/4 switches to another computer. This is normal and is caused by synchronization that makes sure the mouse operates properly.
KEYBOARD “HOT KEY” COMMANDS To send “Hot Key” commands to the DKVM-2/4 unit, press the SCROLL LOCK Key twice within 2 seconds. You will be given a beep as confirmation. Now press a command key to give a “Hot Key” command.
In this mode, there is no mouse or keyboard control, which is needed to prevent errors. Erratic input will result if a mouse move or keyboard key press is given just as the unit switches to the next computer. To exit Auto-Scan mode, press the SPACE BAR. The DKVM-2/4 will stop at the last computer shown. OPTIONAL CABLE Model No. DKVM-CB 6 feet (180cm) 3-in-one Cable kit is available for DKVM-2/4 KVM switch.Visit www.dlinkshop.com for details.
Troubleshooting KEYBOARD My keyboard is not detected, or a keyboard error is given during boot-up. What can be the cause? Please verify that the keyboard cables are inserted properly. The computers all boot up properly, but the keyboard is not functional. What can be the cause? One of the following may be the case: Make sure the keyboard is plugged into the DKVM2/4 unit properly. Verify that the keyboard works when plugged into the computer directly.
MOUSE My mouse is not detected during boot up. What can be the cause? One of the following may be the case: Please verify that all mouse cables are inserted properly. Check especially for a mix-up with the PS/2 keyboard cable, they have the same kind of connector and are therefore easily confused. Read your motherboard documentation and make sure that the PS/2 mouse IRQ is enabled. (This can be set for most computers in the BIOS setup pages) The computers boot properly but I cannot use the mouse.
When I switch between computers, mouse movement becomes random. What can be the cause? One of the following may be the case: Verify that your computers do not have more than one mouse driver installed. Make sure that the driver is for a standard PS/2 or fully Microsoft compatible PS/2 mouse. Also check with the mouse vendor to verify you are using the latest mouse driver. Check your config.sys and autoexec.bat files (if you run Windows that is) and verify that only one mouse driver is loaded.
Please verify that all video cables are inserted properly. It may be that your resolution or refresh rate is too high. Try a lower refresh rate, or try lowering the resolution. Your video cable may be too long. Video signals are high frequency signals and are therefore subject to interference. Please use video cables that are as short as possible. Make sure that the power adapter is plugged in at both ends and that it is working correctly. Its rating must be 9V 600mA.
Specifications Physical Properties: DKVM-2 Width: 119mm Height: 46mm Depth: 105mm Weight: 478g DKVM-4 Width: 185mm Height: 46mm Depth: 105mm Weight: 684g Operation and Storage parameters: Operating Temperature: Storage Temperature: Humidity: 0~40 Degrees C (32 to 104 Degrees F) -20~60 Degrees C (-4~140 Degrees F) 0~80% RH non condensing PC port connections Keyboard: Mouse: Monitor: Mini DIN 6 pin Female Mini DIN 6 pin Female HDDB 15 pin Female Console connections Keyboard: Mouse: Monitor: Mini DIN 6
Offices AUSTRALIA BENELUX CANADA CHILE CHINA DENMARK EGYPT FINLAND FRANCE GERMANY IBERIA INDIA ITALY JAPAN NORWAY RUSSIA SINGAPORE S. AFRICA SWEDEN TAIWAN U.K. U.S.A. D-LINK AUSTRALIA Unit 16, 390 Eastern Valley Way, Roseville, NSW 2069, Australia TEL: 61-2-9417-7100 FAX: 61-2-9417-1077 TOLL FREE: 1800-177-100 (Australia), 0800-900900 (New Zealand) E-MAIL: support@dlink.com.au, info@dlink.com.au URL: www.dlink.com.
LIMITED WARRANTY D-Link provides this limited warranty for its product only to the person or entity who originally purchased the product from D-Link or its authorized reseller or distributor.
refunded, shall become the property of D-Link upon replacement or refund.
Authorized D-Link Service Office. The claim must include a written description of the Hardware defect or Software nonconformance in sufficient detail to allow D-Link to confirm the same. The original product owner must obtain a Return Material Authorization (RMA) number from the Authorized D-Link Service Office and, if requested, provide written proof of purchase of the product (such as a copy of the dated purchase invoice for the product) before the warranty service is provided.
Disclaimer of Other Warranties: EXCEPT FOR THE LIMITED WARRANTY SPECIFIED HEREIN, THE PRODUCT IS PROVIDED “AS-IS” WITHOUT ANY WARRANTY OF ANY KIND INCLUDING, WITHOUT LIMITATION, ANY WARRANTY OF MERCHANTABILITY, FITNESS FOR A PARTICULAR PURPOSE AND NON-INFRINGEMENT. IF ANY IMPLIED WARRANTY CANNOT BE DISCLAIMED IN ANY TERRITORY WHERE A PRODUCT IS SOLD, THE DURATION OF SUCH IMPLIED WARRANTY SHALL BE LIMITED TO NINETY (90) DAYS.
limited warranty provides specific legal rights and the product owner may also have other rights which vary from state to state. Trademarks Copyright 1999 D-Link Corporation. Contents subject to change without prior notice. D-Link is a registered trademark of D-Link Corporation/D-Link Systems, Inc. All other trademarks belong to their respective proprietors.
CE Mark Warning This is a Class B product. In a domestic environment, this product may cause radio interference, in which case the user may be required to take adequate measures Warnung! Dies ist in Produkt der Klasse B. Im Wohnbereich kann dieses Produkt Funkstoerungen verursachen. In diesem Fall kann vom Benutzer verlangt werden, angemessene Massnahmen zu ergreifen. Advertencia de Marca de la CE Este es un producto de Clase B.
Registration Card Print, type or use block letters. Your name: Mr./Ms _____________________________________________________________________________ Organization: ________________________________________________ Dept.