Section 4 Security Wireless Security This section will show you the different levels of security you can use fo protect your data from intruders. The DIRGE offers the following types of security: « PAWPAW (WI-Fi Protected Access 2) » (Pr-Shared Key) = WPA (WI-Fi Protected Access) « W PA-PSK (Pr-Shared Key) What is WPA? WPA, or WI-Fi Protected Access, is 8 WI-Fi standard that was designed to improve the security features of WEP (Wired Equivalent Privacy).
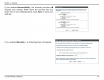
Section 4 Security Wireless Security Setup Wizard To run the security wizard, click an Setup at the top and then click Launch Wireless Security Setup Wizard, Check the Manually set Gehrig band Network Name... box io ea manually set your desired wireless network name for the SANCHEZ iia Gig si ab aids band. stint Sea SHAY SERGE Bi tan er SRE had alienate Nair BER) Type your desired wireless network name (SIDS.
Section 4 Security if you selected Automatically, the summary window will display your seedlings. Write down the security key and Se enter this on your wireless clients, Click Save 0 save your settings. Hr Tg RHE Gina Withstand Sosa ida tno ase 4K Hei dies Sheer Hor Habit Ee aun hE If you selected Manually, the following screen will appear.
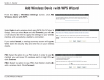
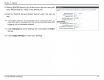
Section 4 Security Add Wireless Device with WPS Wizard AHI ERE BEIGE WE SEs Ls BT OTT SEE BE From the Setup > Wireless Settings screen, click Add Wireless Device with WPS, ssa 2s Ko yr Eat Your windless device Select Auto to add a wireless client using WPS {WI-Fi Protected | Setup). Once you select Auto and click Connect, YOU Will NAVE | SUSE sit sa of Flowing dentition etiolated sn dnd to conch. a 120 second dime limit to apply the settings to your wireless clients} and successfully establish a connection.
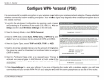
Section 4 Security Configure PA-Personal (PSK) iris recommended to enable encryption on your wireless router before your wireless network adapters. Please establish wireless connectivity before enabling encryption. Your wireless signal may degrade when enabling encryption duelist the added overhead, 1. Log into the web-based configuration by opening a web browser and entering the IP address of the router Clicker Setup and then click Wireless Settings on the left side. 2.
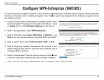
Section 4 Security Configure PA-Enterprise (RADIUS) iris recommended to enable encryption on your wireless router before your wireless network adapters. Please establish wireless connectivity before enabling snorkeling. Your wireless signal may degrade when enabling encryption dus to the added overhead. 1. Log into the web-based configuration by opening a web browser and entering the IP address of the router (182.188.0.1). Click on Setup and then click Wireless Settings on the left side. 2.
Section 4 Security 8. Extinction RADIUS Server Port, enter the port you are using with your RADIUS server. 1812 is the default port. g. Next to RADIUS Server Shared Secret, enter the securely key. 10. If the MAC Address Authentication box is selected then the user will need to connect from the same computer whenever logging into the wireless network. 11. Click Advanced to enter settings for a secondary RADIUS Server. 12. Click Apply Settings to save your settings.
Section 5 Connecting to a Wireless Network Connect to a Wireless Network Using Windows Vista® Windows Vista® users may use the built-in wireless utility. If yours using another company utility or Wiridows® 2000, please refer to the user manual of your wireless adapter for’ help wile: nonconducting to.a wireless network.
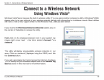
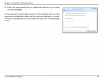
Section 5 Connecting to a Wireless Network Configure Wireless Security It is recommended to enable wireless security (PAWPAW) oh your wireless rougher or Bogeys point before configuring your wireless adapter. If you are joining an existing network, vou will need 1 know righteously key or passphrase being used. 1. Open the Windows Vista® Wireless Utility by right-clicking on 4 the wireless computer icon in your system tray (lower right Wee ve wile corner of screen). Select Connect to a network. : 2.
Section 5 Connecting to a Wireless Network 3. Enter the same security key or passphrase that is on your router and click Connect. it may take 20-30 seconds to connect {o the wireless network If the connection fails, please verify that the securely settings cornerstone The key or passphrase must be exactly the same as on the wireless router.
Section 5 Connecting to a Wireless Network Connect Using WEN 2.0 in Windows Vista® The router supports WI-Fi protection, referred to as WON 2.0 in Windows Vista®, The following instructions for setting this up depends on whether you are using Windows Vista® to configure the router or third party software. When you first set up the router, WI-Fi protection is disabled and reconfigured. To enjoy the benefits of WI-Fi protection, tha router must be both enabled and configured.
Section 5 Connecting to a Wireless Network Connect to a Wireless Network Using Windows® XP Windows® XP users may use the built-in wireless utility (Zeno Configuration Utility), The following constrictions are for Service Pack 2 users. If you are using another company’s utility or Windows? 2000, please refer to thé tires maniacal of your wireless adapter for help with connecting to a wireless network Hostilities will have a “site survey” option similar fo the Windows® XP utility as seen below.
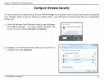
Section 5 Connecting to a Wireless Network Configure W PA-PSK It is recommended to enable WPA on your wireless router ornateness point before configuring your wireless adapter, if you are joining an existing network, you will need to know the WPA Key belly Used, 1. Open the Windows® XP Wireless Utility by right-clicking on the wireless computer icon in your system tray (lower-right corner of screen). Select View Ava liable Wireless Networks. 2.
Section 5 Connecting to a Wireless Network 3. The Wireless Network Connection box will appear Enter tee W PA-PSK passphrase and click Connect. Pm tenon Bel fences enn be Wine ens ken Ges Se lo See may take 20-30 seconds to connect {o the wireless network If the ee cae a connection all, please verify that the W PA-PSK settings ars cones . 1 The W PA-PSK passphrase must be exactly the same 8 of ‘the | wireless router.
Section & Troubleshooting Troubleshooting This chapter provides solutions to problems that can scour during the installation and operation of the DIR-825. Read the following descriptions if you are having problems. (The examples below are illustrated in Windows® XP. if you have a different operating system, the screenshots on your computer will look similar to the following examples.) 1.
Section & Troubleshooting = Configure your Interment settings: = Goth Start » Settings » Control Panel. Double-click the internet Options Icon. From the Security tab, click the button io restore the settings to their defaults, « Click the Connection tab and set the dial-up option to Never Dial a Connection. Click the LAN Fingerings button. Make sure nothing is checked. Click the Advanced tab and click the button 1o restore these settings fo their defaults. Click OK three dimes.
Section & Troubleshooting 3. Why can’t | connect to certain sites or send and receive emails when connecting through my router? I you are having a problem sending or receiving email, or connecting to secure sites such as eBay, banking sites, and Hot mail, we suggest lowering the MTU in increments of ten (Ex. 1482, 1482, 1472, sic). Note: AOL DDS users must use MTU of 1400.
Section & Troubleshooting You should start at 1472 and work your way down by 10 each time. Once you get a reply, until you get a fragmented packet. Take that value and add 28 to the value to account for the various TC PAP headers. For example, lets say that 1452 was the proper value, the actual MTU size would be 1480, which is the optimum for the network we're working with Once you find your MTU, you can now configure your router with the proper MTU size.
Appendix A Wireless Basics Wireless Basics D-Link wireless products are based on industry standards to provide easy-to-use and compatible high-speed wireless connectivity within your home, business or public access wireless networks. Strictly adhering to the [EEE standard, tha D Link wireless family of products will allow you 10 securely access the data vou want, when and where vou want it.
Appendix A Wireless Basics What is Wireless? Wireless or WEF technology is another way of connecting your computer to the network without using wires, WI-Fi uses radio frequency to connect tirelessly, so you have the freedom to connect computers anywhere in your home or office network. Why D-Link Wireless? B-Irk is the worldwide leader and award winning designer, developer, and manufacturer of networking products. B-Link delivers the performance you need at a price you can afford.