July 23, 2008 3.0 Trademarks Description • Updated for revision C1 • Added IPv6 Support D-Link DIR-615 User Manual i All rights reserved. This publication may not be reproduced, in whole or in part, without prior expressed written permission from D-Link Systems, Inc. Copyright © 2008 by D-Link Systems, Inc. D-Link and the D-Link logo are trademarks or registered trademarks of D-Link Corporation or its subsidiaries in the United States or other countries.
D-Link DIR-615 User Manual Configuration ............................................................. 13 Web-based Configuration Utility ............................ 13 Internet Connection Setup Wizard ................... 14 Manual Configuration....................................... 19 Dynamic (Cable)........................................... 19 Dynamic IP Address (DHCP) ....................... 20 PPPoE (DSL) ............................................... 21 PPTP...........................................
D-Link DIR-615 User Manual Wireless Security....................................................... 79 What is WPA? ........................................................ 79 Wireless Connection Setup Wizard ....................... 80 Add Wireless Device with WPS Wizard ................. 83 Configure WPA-Personal (PSK)............................. 84 Configure WPA-Enterprise (RADIUS).................... 85 DHCPv6 (Stateful)........................................ 52 DHCPv6 (Stateless) .....................
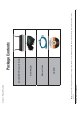
CD-ROM Ethernet Cable Power Adapter D-Link DIR-615 Wireless N Router Product PackageOverview Contents D-Link DIR-615 User Manual Note: Using a power supply with a different voltage rating than the one included with the DIR-615 will cause damage and void the warranty for this product.
Network Requirements D-Link DIR-615 User Manual CD Installation Wizard Requirements Computer with the following: • Windows® XP with Service Pack 2 or Vista® • An installed Ethernet adapter • CD-ROM drive Windows® Users: Make sure you have the latest version of Java installed. Visit www.java.com to download the latest version. Browser Requirements: • Internet Explorer 6.0 or higher • Mozilla 1.7.12 or higher • Firefox 1.5 or higher • Safari 1.0 or higher (with Java 1.3.1 or higher) • Flock 0.7.
Features D-Link DIR-615 User Manual 3 * Maximum wireless signal rate derived from IEEE Standard 802.11g and Draft 802.11n specifications. Actual data throughput will vary. Network conditions and environmental factors, including volume of network traffic, building materials and construction, and network overhead, lower actual data throughput rate. Environmental conditions will adversely affect wireless signal range.
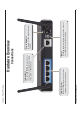
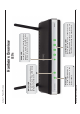
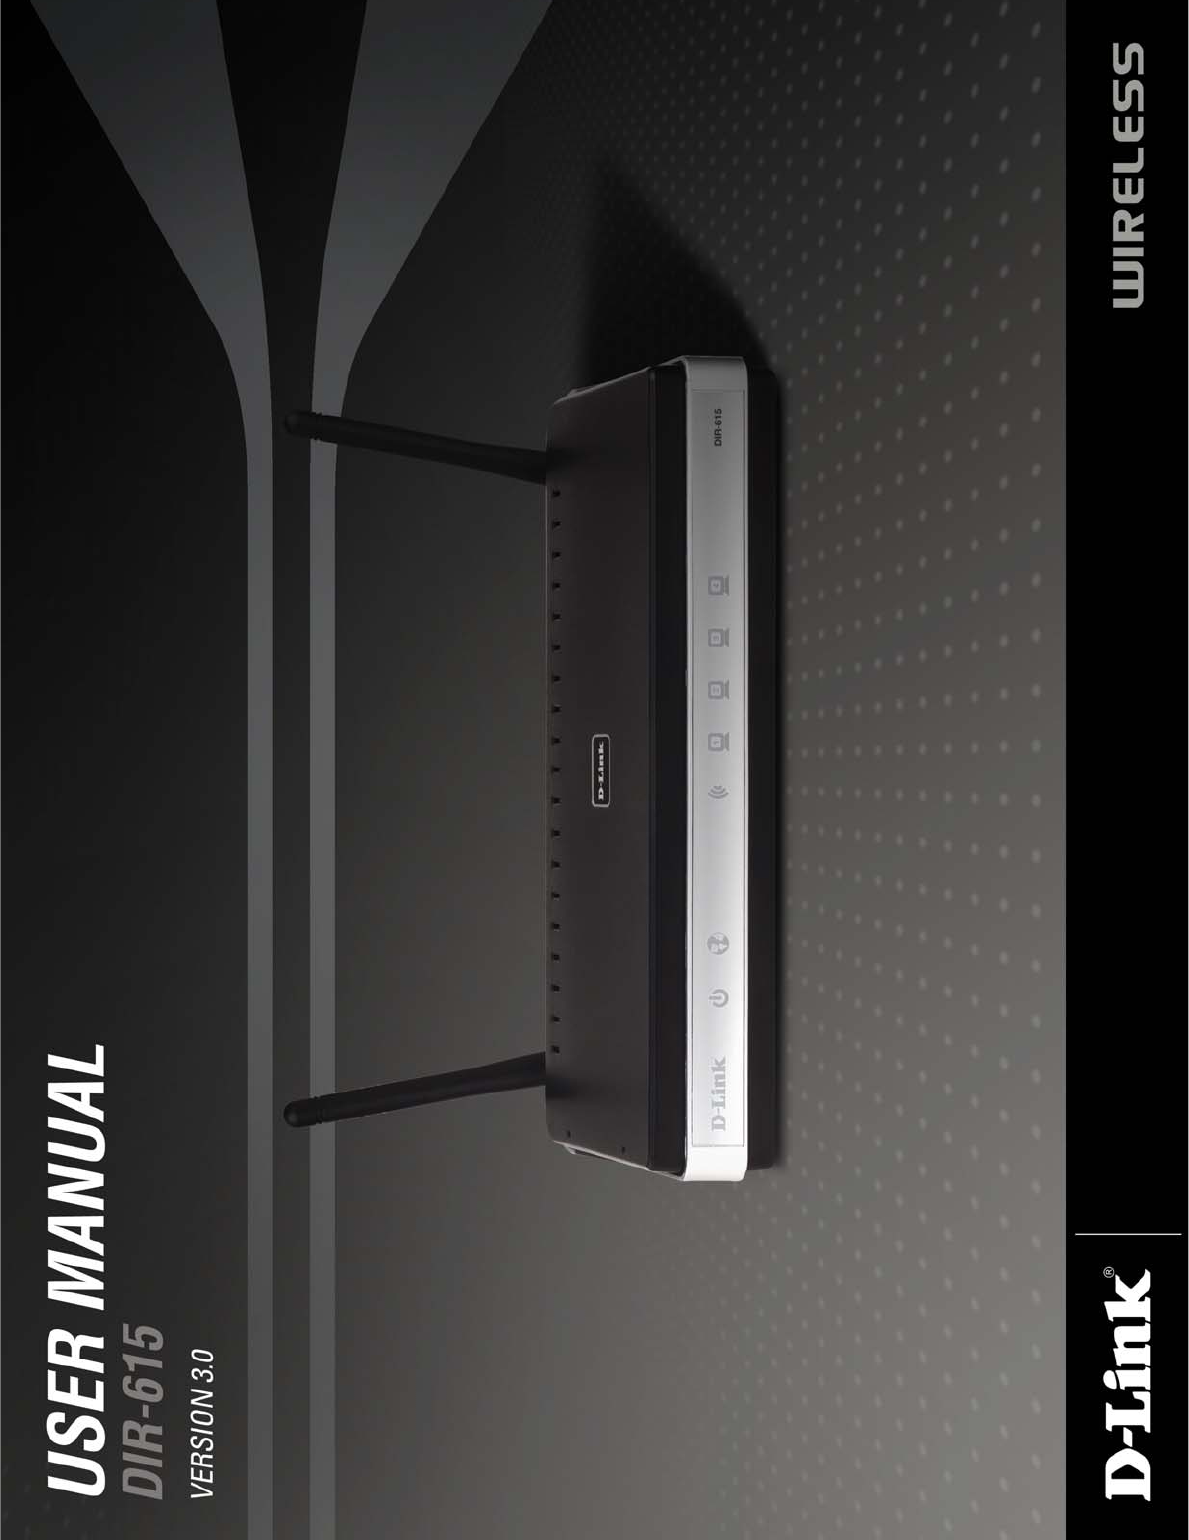
D-Link DIR-615 User Manual Power Receptor Receptor for the supplied power adapter. Reset Pressing the Reset button restores the router to its original factory default settings. Internet Port The auto MDI/MDIX Internet port is the connection for the Ethernet cable to the cable or DSL modem. Connections Hardware Overview LAN Ports (1-4) Connect Ethernet devices such as computers, switches, and hubs.
D-Link DIR-615 User Manual Power LED A solid light indicates a proper connection to the power supply. Local Network LEDs A solid light indicates a connection to an Ethernet-enabled computer on ports 1-4. This LED blinks during data transmission. WLAN LED A solid light indicates that the wireless segment is ready. This LED blinks during wireless data transmission. LEDs Hardware Overview Internet LED A solid light indicates connection on the Internet port. This LED blinks during data transmission.
Installation D-Link DIR-615 User Manual • When running the Setup Wizard from the D-Link CD, make sure the computer you are running the CD from is connected to the Internet and online or the wizard will not work. If you have disconnected any hardware, re-connect your computer back to the modem and make sure you are online.
Wireless Installation Considerations D-Link DIR-615 User Manual 5. If you are using 2.4GHz cordless phones or X-10 (wireless products such as ceiling fans, lights, and home security systems), your wireless connection may degrade dramatically or drop completely. Make sure your 2.4GHz phone base is as far away from your wireless devices as possible. The base transmits a signal even if the phone in not in use. 4.
D-Link DIR-615 User Manual Section 2 - Installation Network Diagram 8
Connect to Cable/DSL/Satellite Modem D-Link DIR-615 User Manual 9. Skip to page 13 to configure your router. 9 8. Verify the link lights on the router. The power light, Internet light, and the LAN light (the port that your computer is plugged into) should be lit. If not, make sure your computer, modem, and router are powered on and verify the cable connections are correct. 7. Turn on your computer. 6. Plug the power adapter to the router and connect to an outlet or power strip.
Connect to Another Router D-Link DIR-615 User Manual 10 5. Under Router Settings, enter an available IP address and the subnet mask of your network. Click Save Settings to save your settings. Use this new IP address to access the configuration utility of the router in the future. Close the browser and change your computer’s IP settings back to the original values as in Step 1. 4. Click Setup and then click Network Settings. Uncheck the Enable DHCP Server server checkbox. Click Save Settings to continue.
D-Link DIR-615 User Manual 11 8. You may now use the other 3 LAN ports to connect other Ethernet devices and computers. To configure your wireless network, open a web browser and enter the IP address you assigned to the router. Refer to the Configuration and Wireless Security sections for more information on setting up your wireless network. 7. Connect an Ethernet cable in one of the LAN ports of the router and connect it to your other router.
Getting Started D-Link DIR-615 User Manual Note: It is recommended to write down the login password on the provided CD holder. When the autorun screen appears, click Install Router and follow the on-screen instructions. 12 If the CD autorun function does not automatically start on your computer, go to Start > Run. In the run box type “D:\DIR615.exe” (where D: represents the drive letter of your CD-ROM drive). Insert the Quick Router Setup Wizard CD in the CD-ROM drive.
Configuration D-Link DIR-615 User Manual If you get a Page Cannot be Displayed error, please refer to the Troubleshooting section for assistance. Select Admin from the drop-down menu and then enter your password. Leave the password blank by default. To access the configuration utility, open a web-browser such as Internet Explorer and enter the IP address of the router (192.168.0.1).
Internet Connection Setup Wizard D-Link DIR-615 User Manual 14 If you want to enter your settings without running the wizard, click Manual Internet Configuration Wizard and skip to page 19. Once logged into the web interface of the router, the Setup > Internet page will appear. Click the Internet Connection Setup Wizard button to quickly configure your router using the setup wizard.
D-Link DIR-615 User Manual Select your time zone from the drop-down menu and then click Next to continue. Create a new password and then click Next to continue. Click Next to continue.
D-Link DIR-615 User Manual The Host Name is optional but may be required by some ISPs. The default host name is the device name of the Router and may be changed. If you selected Dynamic, you may need to enter the MAC address of the computer that was last connected directly to your modem. If you are currently using that computer, click Clone Your PC’s MAC Address and then click Next to continue. Select the type of Internet connection you use and then click Next to continue.
D-Link DIR-615 User Manual If you selected PPTP, enter your PPTP username and password. Click Next to continue. Note: Make sure to remove your PPPoE software from your computer. The software is no longer needed and will not work through a router. Select Static if your ISP assigned you the IP address, subnet mask, gateway, and DNS server addresses. If you selected PPPoE, enter your PPPoE username and password. Click Next to continue.
D-Link DIR-615 User Manual Click Connect to save your settings. Once the router is finished rebooting, click Continue. Please allow 1-2 minutes to connect. If you selected Static, enter your network settings supplied by your Internet provider. Click Next to continue. If you selected L2TP, enter your L2TP username and password. Click Next to continue.
Dynamic (Cable) Manual Configuration D-Link DIR-615 User Manual Click the Save Settings button when you have configured the connection. Select your Internet connection type using the “My Internet Connection is” drop-down menu. 19 If you opt to set up your Internet connection manually, you will be redirected to a WAN page that allows you to select your Internet type and enter the correct configuration parameters.
Dynamic IP Address (DHCP) D-Link DIR-615 User Manual 20 MAC Address: The default MAC Address is set to the Internet port’s physical interface MAC address on the Broadband Router. It is not recommended that you change the default MAC address unless required by your ISP. You can use the Clone Your PC’s MAC Address button to replace the Internet port’s MAC address with the MAC address of your Ethernet card.
PPPoE (DSL) D-Link DIR-615 User Manual 21 MAC Address: The default MAC Address is set to the Internet port’s physical interface MAC address on the Broadband Router. It is not recommended that you change the default MAC address unless required by your ISP. You can use the Clone Your PC’s MAC Address button to replace the Internet port’s MAC address with the MAC address of your Ethernet card. MTU: Maximum Transmission Unit - you may need to change the MTU for optimal performance with your specific ISP.
PPTP D-Link DIR-615 User Manual 22 MTU: Maximum Transmission Unit - you may need to change the MTU for optimal performance with your specific ISP. 1400 is the default MTU. DNS Servers: The DNS server information will be supplied by your ISP (Internet Service Provider.) Maximum Idle Enter a maximum idle time during which the Internet connection is maintained during inactivity. To disable this feature, enable Time: Auto-reconnect. Reconnect Mode: Select either Always-on, On-Demand, or Manual.
D-Link DIR-615 User Manual 23 MAC Address: The default MAC Address is set to the Internet port’s physical interface MAC address on the Broadband Router. It is not recommended that you change the default MAC address unless required by your ISP. You can use the Clone Your PC’s MAC Address button to replace the Internet port’s MAC address with the MAC address of your Ethernet card.
L2TP D-Link DIR-615 User Manual DNS Servers: Enter the Primary and Secondary DNS Server Addresses (Static L2TP only). 24 Maximum Idle Time: Enter a maximum idle time during which the Internet connection is maintained during inactivity. To disable this feature, enable Auto-reconnect. Reconnect Mode: Select either Always-on, On-Demand, or Manual. Password: Enter your L2TP password and then retype the password in the next box. Username: Enter your L2TP username.
D-Link DIR-615 User Manual 25 Clone MAC The default MAC Address is set to the Internet port’s physical interface MAC address on the Broadband Router. It is not Address: recommended that you change the default MAC address unless required by your ISP. You can use the Clone Your PC’s MAC Address button to replace the Internet port’s MAC address with the MAC address of your Ethernet card. MTU: Maximum Transmission Unit - you may need to change the MTU for optimal performance with your specific ISP.
Static IP Address D-Link DIR-615 User Manual MAC Address: The default MAC Address is set to the Internet port’s physical interface MAC address on the Broadband Router. It is not recommended that you change the default MAC address unless required by your ISP. You can use the Clone Your PC’s MAC Address button to replace the Internet port’s MAC address with the MAC address of your Ethernet card. MTU: Maximum Transmission Unit - you may need to change the MTU for optimal performance with your specific ISP.
Wireless Settings D-Link DIR-615 User Manual If you want to manually configure the wireless settings on your router click Manual Wireless Network Setup and refer to the next page. Click Add Wireless Device with WPS if you want to add a wireless device using Wi-Fi Protected Setup (WPS) and refer to page 83. If you want to configure the wireless settings on your router using the wizard, click Wireless Connection Setup Wizard and refer to page 80.
Manual Wireless Network Setup D-Link DIR-615 User Manual Transmission Rate: Select the transmit rate. It is strongly suggested to select Best (Auto) for best performance. 28 Wireless Channel: Indicates the channel setting for the DIR-615. By default the channel is set to 6. The Channel can be changed to fit the channel setting for an existing wireless network or to customize the wireless network. If you enable Auto Channel Scan, this option will be greyed out.
D-Link DIR-615 User Manual Wireless Security: Refer to page 79 for more information regarding wireless security. 29 Visibility Status: Select Invisible if you do not want the SSID of your wireless network to be broadcasted by the DIR-615. If Invisible is selected, the SSID of the DIR-615 will not be seen by Site Survey utilities so your wireless clients will have to know the SSID of your DIR-615 in order to connect to it.
Network Settings D-Link DIR-615 User Manual Enable DNS Relay: Uncheck the box to transfer the DNS server information from your ISP to your computers. If checked, your computers will use the router for a DNS server. Local Domain: Enter the Domain name (Optional). Subnet Mask: Enter the Subnet Mask. The default subnet mask is 255.255.255.0. If you change the IP address, once you click Apply, you will need to enter the new IP address in your browser to get back into the configuration utility.
DHCP Server Settings D-Link DIR-615 User Manual Always Broadcast: Enable this function to ensure compatibility with some DHCP clients. Lease Time: The length of time for the IP address lease. Enter the Lease time in minutes. Note: If you statically (manually) assign IP addresses to your computers or devices, make sure the IP addresses are outside of this range or you may have an IP conflict. DHCP IP Address Enter the starting and ending IP addresses for Range: the DHCP server’s IP assignment.
DHCP Reservation D-Link DIR-615 User Manual 32 Revoke: Click Revoke to cancel the lease for a specific LAN device and free an entry in the lease table. Do this only if the device no longer needs the leased IP address, because, for example, it has been removed from the network. Number of Dynamic DHCP In this section you can see what LAN devices are currently leasing IP addresses. Clients: Save: Click Save to save your entry. You must click Save Settings at the top to activate your reservations.
D-Link DIR-615 User Manual 33 Reserve: The Reserve option converts this dynamic IP allocation into a DHCP Reservation and adds the corresponding entry to the DHCP Reservations List. Note: The Revoke option will not disconnect a PC with a current network session from the network; you would need to use MAC Address Filter to do that. Revoke will only free up a DHCP Address for the very next requester.
Virtual Server D-Link DIR-615 User Manual For a list of ports for common applications, please visit http://support.dlink.com/faq/view.asp?prod_id=1191. Each virtual service that is created will be listed at the bottom of the screen in the Virtual Servers List.There are pre-defined virtual services already in the table. You may use them by enabling them and assigning the server IP to use that particular virtual service.
D-Link DIR-615 User Manual 35 Schedule: The schedule of time when the Virtual Server Rule will be enabled. The schedule may be set to Always, which will allow the particular service to always be enabled. You can create your own times in the Tools > Schedules section. Inbound Filter: Select Allow All (most common) or a created Inbound filter. You may create your own inbound filters in the Advanced > Inbound Filter page. Protocol Type: Select TCP, UDP, or Both from the drop-down menu.
Port Forwarding D-Link DIR-615 User Manual Schedule: The schedule of time when the Virtual Server Rule will be enabled. The schedule may be set to Always, which will allow the particular service to always be enabled. You can create your own times in the Tools > Schedules section. Inbound Filter: Select Allow All (most common) or a created Inbound filter. You may create your own inbound filters in the Advanced > Inbound Filter page.
Application Rules D-Link DIR-615 User Manual Schedule: The schedule of time when the Application Rule will be enabled. The schedule may be set to Always, which will allow the particular service to always be enabled. You can create your own times in the Tools > Schedules section. Traffic Type: Select the protocol of the firewall port (TCP, UDP, or Both). Firewall: This is the port number on the Internet side that will be used to access the application. You may define a single port or a range of ports.
QoS Engine D-Link DIR-615 User Manual 38 Manual Uplink The speed at which data can be transferred Speed: from the router to your ISP. This is determined by your ISP. ISP’s offer speed as a download/upload pair. For example, 1.5Mbits/284Kbits. Using this example, you would enter 284. Alternatively you can test your uplink speed with a service such as www.dslreports.com. Measured Uplink This displays the detected uplink speed.
Network Filters D-Link DIR-615 User Manual DHCP Client: Select a DHCP client from the drop-down menu and click << to copy that MAC Address. MAC Address: Enter the MAC address you would like to filter. To find the MAC address on a computer, please refer to the Networking Basics section in this manual. Configure MAC Select Turn MAC Filtering Off, allow MAC Filtering: addresses listed below, or deny MAC addresses listed below from the drop-down menu.
Access Control D-Link DIR-615 User Manual Click Next to continue with the wizard. Access Control Wizard Add Policy: Check the Enable Access Control check box and click the Add Policy button to start the Access Control Wizard. 40 The Access Control section allows you to control access in and out of your network. Use this feature as Parental Controls to only grant access to approved sites, limit web access based on time or dates, and/or block access from applications like P2P utilities or games.
Access Control Wizard (continued) D-Link DIR-615 User Manual • Address Type - Select IP address, MAC address, or Other Machines. • IP Address - Enter the IP address of the computer you want to apply the rule to. Enter the following information and then click Next to continue. Select a schedule (I.E. Always) from the drop-down menu and then click Next to continue. Enter a name for the policy and then click Next to continue.
Access Control Wizard (continued) D-Link DIR-615 User Manual Click Save to save the access control rule. To enable web logging, click Enable. Enable - Check to enable the rule. Name - Enter a name for your rule. Dest IP Start - Enter the starting IP address. Dest IP End - Enter the ending IP address. Protocol - Select the protocol. Dest Port Start - Enter the starting port number. Dest Port End - Enter the ending port number. Enter the rule: Select the filtering method and then click Next to continue.
Website Filters D-Link DIR-615 User Manual Website URL/ Enter the keywords or URLs that you want to Domain: allow or deny. Clear the list Click to delete all entries in the list. below: Configure Website Select Deny or Allow computers access to Filter Below: only these sites. 43 Website Filters are used to allow you to set up a list of allowed Web sites that can be used by multiple users through the network.
Inbound Filters D-Link DIR-615 User Manual Inbound Filter This section will list any rules that are created. Rules List: You may click the Edit icon to change the settings or enable/disable the rule, or click the Delete icon to remove the rule. Save: Click the Save button to apply your settings. You must click Save Settings at the top to save the settings. Source IP End: E n t e r t h e e n d i n g I P a d d r e s s. E n t e r 255.255.255.255 if you do not want to specify and IP range.
Firewall Settings D-Link DIR-615 User Manual 45 IP Address: Specify the IP address of the computer on the LAN that you want to have unrestricted Internet communication. If this computer obtains its IP address automatically using DHCP, be sure to make a static reservation on the System > Network Settings page so that the IP address of the DMZ machine does not change. Note: Placing a computer in the DMZ may expose that computer to a variety of security risks.
Advanced Wireless Settings D-Link DIR-615 User Manual 46 Short GI: Check this box to reduce the guard interval time therefore increasing the data capacity. However, it’s less reliable and may create higher data loss. WMM Enable: WMM is QoS for your wireless network. This will improve the quality of video and voice applications for your wireless clients. WLAN Partition: This enables 802.11d operation. 802.
D-Link DIR-615 User Manual Multicast Check the box to allow multicast traffic to pass Streams: through the router from the Internet. WAN Port Speed: You may set the port speed of the Internet port to 10Mbps, 100Mbps, or auto. Some older cable or DSL modems may require you to set the port speed to 10Mbps. WAN Ping: Unchecking the box will not allow the DIR-615 to respond to pings. Blocking the Ping may provide some extra security from hackers. Check the box to allow the Internet port to be “pinged”.
D-Link DIR-615 User Manual LAN IPv6 Address Settings: Displays the IPv6 address of the router. IPv6 Connection Type: Select the IPv6 configuration type from the drop-down box. Enable IPv6: Check to enable IPv6.
Link-Local Connectivity D-Link DIR-615 User Manual LAN Link-Local Address: Displays the Router’s LAN Link-Local Address. My IPv6 Connection: Select Link-Local Only from the drop-down menu.
Static IPv6 (Stateful) D-Link DIR-615 User Manual IPv6 Address Lifetime: Enter the IPv6 Address Lifetime (in minutes). IPv6 Address Range End: Enter the end IPv6 Address for the DHCPv6 range for your local computers. IPv6 Address Range Start: Enter the start IPv6 Address for the DHCPv6 range for your local computers. Autoconfiguration Type: Select Stateful (DHCPv6) or Stateless. Refer to the next page for Stateless. Enable Autoconfiguration: Check to enable the Autoconfiguration feature.
Static IPv6 (Stateless) D-Link DIR-615 User Manual Router Advertisement Enter the Router Advertisement Lifetime (in Lifetime: minutes). Autoconfiguration Type: Select Stateless. Refer to the previous page for Stateful. Enable Autoconfiguration: Check to enable the Autoconfiguration feature. LAN Link-Local Address: Displays the Router’s LAN Link-Local Address. LAN IPv6 Address: Enter the LAN (local) IPv6 address for the router.
DHCPv6 (Stateful) D-Link DIR-615 User Manual IPv6 Address Lifetime: Enter the IPv6 Address Lifetime (in minutes). IPv6 Address Range End: Enter the end IPv6 Address for the DHCPv6 range for your local computers. IPv6 Address Range Start: Enter the start IPv6 Address for the DHCPv6 range for your local computers. Autoconfiguration Type: Select Stateful (DHCPv6) or Stateless. Refer to the next page for Stateless. Enable Autoconfiguration: Check to enable the Autoconfiguration feature.
DHCPv6 (Stateless) D-Link DIR-615 User Manual Router Advertisement Enter the Router Advertisement Lifetime (in Lifetime: minutes). Autoconfiguration Type: Select Stateless. Refer to the previous page for Stateful. Enable Autoconfiguration: Check to enable the Autoconfiguration feature. LAN Link-Local Address: Displays the Router’s LAN Link-Local Address. LAN IPv6 Address: Enter the LAN (local) IPv6 address for the router.
IPv6 over PPPoE (Stateful) D-Link DIR-615 User Manual LAN Link-Local Address: Displays the Router’s LAN Link-Local Address. LAN IPv6 Address: Enter the LAN (local) IPv6 address for the router. Primary/Secondary DNS Enter the primary and secondary DNS server addresses. Address: IPv6 DNS Settings: Select either Obtain DNS server address automatically or Use the following DNS Address. Maximum Idle Time: Enter a maximum idle time during which the Internet connection is maintained during inactivity.
D-Link DIR-615 User Manual IPv6 Address Lifetime: Enter the IPv6 Address Lifetime (in minutes). IPv6 Address Range End: Enter the end IPv6 Address for the DHCPv6 range for your local computers. IPv6 Address Range Start: Enter the start IPv6 Address for the DHCPv6 range for your local computers. Autoconfiguration Type: Select Stateful (DHCPv6) or Stateless. Refer to the next page for Stateless. Enable Autoconfiguration: Check to enable the Autoconfiguration feature.
IPv6 over PPPoE (Stateless) D-Link DIR-615 User Manual LAN Link-Local Address: Displays the Router’s LAN Link-Local Address. LAN IPv6 Address: Enter the LAN (local) IPv6 address for the router. Primary/Secondary DNS Enter the primary and secondary DNS server addresses. Address: IPv6 DNS Settings: Select either Obtain DNS server address automatically or Use the following DNS Address. Maximum Idle Time: Enter a maximum idle time during which the Internet connection is maintained during inactivity.
D-Link DIR-615 User Manual Router Advertisement Enter the Router Advertisement Lifetime (in minutes). Lifetime: Autoconfiguration Type: Select Stateful (DHCPv6) or Stateless. Enable Autoconfiguration: Check to enable the Autoconfiguration feature.
6 to 4 Tunneling (Stateful) D-Link DIR-615 User Manual IPv6 Address Lifetime: Enter the IPv6 Address Lifetime (in minutes). IPv6 Address Range Enter the end IPv6 Address for the DHCPv6 End: range for your local computers. IPv6 Address Range Enter the start IPv6 Address for the DHCPv6 Start: range for your local computers. Autoconfiguration Type: Select Stateful (DHCPv6) or Stateless. Refer to the next page for Stateless. Enable Check to enable the Autoconfiguration Autoconfiguration: feature.
6 to 4 Tunneling (Stateless) D-Link DIR-615 User Manual Router Advertisement Enter the Router Advertisement Lifetime (in Lifetime: minutes). Autoconfiguration Type: Select Stateless. Refer to the previous page for Stateful. Enable Check to enable the Autoconfiguration Autoconfiguration: feature. LAN Link-Local Displays the Router’s LAN Link-Local Address: Address. LAN IPv6 Address: Enter the LAN (local) IPv6 address for the router.
IPv6 in IPv4 Tunneling (Stateful) D-Link DIR-615 User Manual Router Advertisement Enter the Router Advertisement Lifetime (in Lifetime: minutes). Autoconfiguration Type: Select Stateless. Refer to the previous page for Stateful. Enable Check to enable the Autoconfiguration Autoconfiguration: feature. LAN Link-Local Displays the Router’s LAN Link-Local Address: Address. LAN IPv6 Address: Enter the LAN (local) IPv6 address for the router.
IPv6 in IPv4 Tunneling (Stateless) D-Link DIR-615 User Manual IPv6 Address Lifetime: Enter the IPv6 Address Lifetime (in minutes). IPv6 Address Range Enter the end IPv6 Address for the DHCPv6 End: range for your local computers. IPv6 Address Range Enter the start IPv6 Address for the DHCPv6 Start: range for your local computers. Autoconfiguration Type: Select Stateful (DHCPv6) or Stateless. Refer to the next page for Stateless. Enable Check to enable the Autoconfiguration Autoconfiguration: feature.
Administrator Settings Inbound Filter: This section will list any rules that are created. You may click the Edit icon to change the settings or enable/disable the rule, or click the Delete icon to remove the rule. D-Link DIR-615 User Manual Remote Admin The port number used to access the DIR-615. Port: Example: http://x.x.x.x:8080 whereas x.x.x.x is the Internet IP address of the DIR-615 and 8080 is the port used for the Web Management interface.
Time Settings D-Link DIR-615 User Manual Manual: To manually input the time, enter the values in these fields for the Year, Month, Day, Hour, Minute, and Second and then click Set Time. You can also click CopyYour Computer’sTime Settings. NTP Server Used: Enter the NTP server or select one from the drop-down menu. Enable NTP NTP is short for Network Time Protocol. NTP Server: synchronizes computer clock times in a network of computers. Check this box to use a NTP server.
SysLog D-Link DIR-615 User Manual SysLog Server IP The address of the SysLog server that will be Address: used to send the logs. You may also select your computer from the drop-down menu (only if receiving an IP address from the router via DHCP). Enable Logging to Check this box to send the router logs to a SysLog Server: SysLog Server. 64 The Broadband Router keeps a running log of events and activities occurring on the Router. You may send these logs to a SysLog server on your network.
E-mail Settings D-Link DIR-615 User Manual 65 Schedule: This option is enabled when On Schedule is selected. You can select a schedule from the list of defined schedules. To create a schedule, go to Tools > Schedules. On Schedule: Selecting this option will send the logs via e-mail according to schedule. On Log Full: When this option is selected, logs will be sent via e-mail when the log is full. Password: Enter the password associated with the account. Re-type the password associated with the account.
System Settings D-Link DIR-615 User Manual Reboot Device: Click to reboot the router. Restore to Factory This option will restore all configuration settings Default Settings: back to the settings that were in effect at the time the router was shipped from the factory. Any settings that have not been saved will be lost, including any rules that you have created. If you want to save the current router configuration settings, use the Save button above.
Update Firmware D-Link DIR-615 User Manual Check Email Notification of Newer Firmware Version to have the router send an e-mail when there is a new firmware available. Notifications Check Automatically Check Online for Latest Options: Firmware Version to have the router check automatically to see if there is a new firmware upgrade. Browse: After you have downloaded the new firmware, click Browse to locate the firmware update on your hard drive. Click Upload to complete the firmware upgrade.
DDNS D-Link DIR-615 User Manual Status: Displays the current connection status to your DDNS server. Timeout: Enter a time (in hours). Password or Key: Enter the Password for your DDNS account. Username or Key: Enter the Username for your DDNS account. Host Name: Enter the Host Name that you registered with your DDNS service provider. Server Address: Choose your DDNS provider from the drop down menu.
System Check D-Link DIR-615 User Manual Ping Results: The results of your ping attempts will be displayed here. Ping Test: The Ping Test is used to send Ping packets to test if a computer is on the Internet. Enter the IP Address that you wish to Ping, and click Ping.
Schedules D-Link DIR-615 User Manual Schedule Rules The list of schedules will be listed here. Click List: the Edit icon to make changes or click the Delete icon to remove the schedule. Save: Click Save to save your schedule. You must click Save Settings at the top for your schedules to go into effect. Time: Check All Day - 24hrs or enter a start and end time for your schedule. Days: Select a day, a range of days, or All Week to include every day. Name: Enter a name for your new schedule.
Device Information D-Link DIR-615 User Manual See the following page for more information. If your Internet connection is set up for PPPoE, a Connect button and a Disconnect button will be displayed. Use Disconnect to drop the PPPoE connection and use Connect to establish the PPPoE connection. 71 If your Internet connection is set up for a Dynamic IP address then a Release button and a Renew button will be displayed. Use Release to disconnect from your ISP and use Renew to connect to your ISP.
D-Link DIR-615 User Manual IGMP Multicast Memberships: Displays the Multicast Group IP Address. LAN Computers: Displays computers and devices that are connected to the router via Ethernet and that are receiving an IP address assigned by the router (DHCP). Wireless LAN: Displays the wireless MAC address and your wireless settings such as SSID and Channel. LAN: Displays the MAC address and the private (local) IP settings for the router.
Log D-Link DIR-615 User Manual Save Log: This option will save the router to a log file on your computer. Email Now: This option will send a copy of the router log to the e-mail address configured in the Tools > Email Settings screen. Clear: Clears all of the log contents. Refresh: Updates the log details on the screen so it displays any recent activity. Apply Log Will filter the log results so that only the selected Settings: options appear.
Stats D-Link DIR-615 User Manual 74 The screen below displays the Traffic Statistics. Here you can view the amount of packets that pass through the DIR-615 on both the Internet and the LAN ports. The traffic counter will reset if the device is rebooted.
Internet Sessions D-Link DIR-615 User Manual Out - Initiated from LAN to WAN. In - Initiated from WAN to LAN. Dir: The direction of initiation of the conversation: 75 NO: None -- This entry is used as a placeholder for a future connection that may occur. SS: SYN Sent -- One of the systems is attempting to start a connection. EST: Established -- the connection is passing data. FW: FIN Wait -- The client system has requested that the connection be stopped.
D-Link DIR-615 User Manual 76 300 seconds - UDP connections. 240 seconds - Reset or closed TCP connections. The connection does not close instantly so that lingering packets can pass or the connection can be re-established. 7800 seconds - Established or closing TCP connections. Time Out: The number of seconds of idle time until the router considers the session terminated. The initial value of Time Out depends on the type and state of the connection.
Wireless D-Link DIR-615 User Manual 77 The wireless client table displays a list of current connected wireless clients. This table also displays the connection time and MAC address of the connected wireless clients.
D-Link DIR-615 User Manual Section 3 - Configuration Support 78
Wireless Security What is WPA? • WPA2-PSK(Pre-Shared Key) • WPA-PSK (Pre-Shared Key) D-Link DIR-615 User Manual 79 WPA/WPA2 incorporates user authentication through the Extensible Authentication Protocol (EAP). EAP is built on a more secure public key encryption system to ensure that only authorized network users can access the network. WPA-PSK/WPA2-PSK uses a passphrase or key to authenticate your wireless connection. The key is an alpha-numeric password between 8 and 63 characters long.
Wireless Connection Setup Wizard D-Link DIR-615 User Manual Click Next to continue. 80 To run the security wizard, browse to the Setup page and then click the Wireless Connection Setup Wizard button.
D-Link DIR-615 User Manual Click Next to continue. If you selected Good, enter 13 characters or 26 Hex digits. If you selected Best or Better, enter a password between 8-63 characters. Click Next to continue. • Best - WPA2 Authentication • Better - WPA Authentication • None - No security Select the level of security for your wireless network: Enter the SSID (Service Set Identifier). The SSID is the name of your wireless network. Create a name using up to 32 characters. The SSID is case-sensitive.
D-Link DIR-615 User Manual 82 If you selected WPA-Enterprise, the RADIUS information will be displayed. Click Save to finish the Security Wizard. Click Save to finish the Security Wizard. If you selected Best, the following screen will show you your Pre-Shared Key to enter on your wireless clients. Click Save to finish the Security Wizard. If you selected Better, the following screen will show you your Pre-Shared Key to enter on your wireless clients.
Add Wireless Device with WPS Wizard D-Link DIR-615 User Manual PBC: Select this option to use PBC (Push Button) method to add a wireless client. Click Connect. PIN: Select this option to use PIN method. In order to use this method you must know the wireless client’s 8 digit PIN and click Connect. If you select Manual, a settings summary screen will appear. Write down the security key and enter this on your wireless clients. Select Auto to add a wireless client using WPS (Wi-Fi Protected Setup).
Configure WPA-Personal (PSK) D-Link DIR-615 User Manual 84 7. Click Save Settings to save your settings. If you are configuring the router with a wireless adapter, you will lose connectivity until you enable WPA-PSK on your adapter and enter the same passphrase as you did on the router. 6. Next to Pre-Shared Key, enter a key (passphrase). The key is entered as a pass-phrase in ASCII format at both ends of the wireless connection. The pass-phrase must be between 8-63 characters. 5.
Configure WPA-Enterprise (RADIUS) D-Link DIR-615 User Manual 9. Next to RADIUS Server Shared Secret, enter the security key. 8. Next to RADIUS Server Port, enter the port you are using with your RADIUS server. 1812 is the default port. 7. Next to RADIUS Server IP Address enter the IP Address of your RADIUS server. 6. Next to Authentication Timeout, enter the amount of time before a client is required to re-authenticate (60 minutes is default). 5.
D-Link DIR-615 User Manual 12. Click Apply Settings to save your settings. 11. Click Advanced to enter settings for a secondary RADIUS Server. 10. If the MAC Address Authentication box is selected then the user will need to connect from the same computer whenever logging into the wireless network.
D-Link DIR-615 User Manual If you get a good signal but cannot access the Internet, check you TCP/IP settings for your wireless adapter. Refer to the Networking Basics section in this manual for more information. The utility will display any available wireless networks in your area. Click on a network (displayed using the SSID) and click the Connect button. Right-click on the wireless computer icon in your system tray (lower-right corner next to the time). Select Connect to a network.
Configure WPA/WPA2 D-Link DIR-615 User Manual 2. Highlight the wireless network (SSID) you would like to connect to and click Connect. 1. Open the Windows Vista® Wireless Utility by right-clicking on the wireless computer icon in your system tray (lower right corner of screen). Select Connect to a network. 88 It is recommended to enable wireless security (WPA/WPA2) on your wireless router or access point before configuring your wireless adapter.
D-Link DIR-615 User Manual It may take 20-30 seconds to connect to the wireless network. If the connection fails, please verify that the security settings are correct. The key or passphrase must be exactly the same as on the wireless router. 3. Enter the same security key or passphrase that is on your router and click Connect.
Connect Using WCN 2.0 D-Link DIR-615 User Manual 90 If you are using third party software to set up Wi-Fi Protection, carefully follow the directions. When you are finished, proceed to the next section to set up the newly-configured router. If you are running Windows Vista®, log into the router and click the Enable checkbox in the Basic > Wireless section.
Using Windows® XP D-Link DIR-615 User Manual If you get a good signal but cannot access the Internet, check you TCP/IP settings for your wireless adapter. Refer to the Networking Basics section in this manual for more information. The utility will display any available wireless networks in your area. Click on a network (displayed using the SSID) and click the Connect button. Right-click on the wireless computer icon in your system tray (lower-right corner next to the time).
Configure WPA-PSK D-Link DIR-615 User Manual 2. Highlight the wireless network (SSID) you would like to connect to and click Connect. 1. Open the Windows® XP Wireless Utility by right-clicking on the wireless computer icon in your system tray (lower-right corner of screen). Select View Available Wireless Networks. 92 It is recommended to enable WEP on your wireless router or access point before configuring your wireless adapter.
D-Link DIR-615 User Manual It may take 20-30 seconds to connect to the wireless network. If the connection fails, please verify that the WPA-PSK settings are correct. The WPA-PSK passphrase must be exactly the same as on the wireless router. 3. The Wireless Network Connection box will appear. Enter the WPA-PSK passphrase and click Connect.
Troubleshooting D-Link DIR-615 User Manual 94 • Disable any Internet security software running on the computer. Software firewalls such as Zone Alarm, Black Ice, Sygate, Norton Personal Firewall, and Windows® XP firewall may block access to the configuration pages. Check the help files included with your firewall software for more information on disabling or configuring it. • Verify physical connectivity by checking for solid link lights on the device.
D-Link DIR-615 User Manual 95 To reset the router, locate the reset button (hole) on the rear panel of the unit. With the router powered on, use a paperclip to hold the button down for 10 seconds. Release the button and the router will go through its reboot process. Wait about 30 seconds to access the router. The default IP address is 192.168.0.1. When logging in, the username is admin and leave the password box empty. If you forgot your password, you must reset your router.
D-Link DIR-615 User Manual Example: ping yahoo.com -f -l 1472 ping [url] [-f] [-l] [MTU value] • Once the window opens, you’ll need to do a special ping. Use the following syntax: • Windows® 95, 98, and Me users type in command (Windows® NT, 2000, and XP users type in cmd) and press Enter (or click OK). • Click on Start and then click Run. 96 To find the proper MTU Size, you’ll have to do a special ping of the destination you’re trying to go to. A destination could be another computer, or a URL.
D-Link DIR-615 User Manual • Test your e-mail. If changing the MTU does not resolve the problem, continue changing the MTU in increments of ten. • To change the MTU enter the number in the MTU field and click Save Settings to save your settings. • Click on Setup and then click Manual Configure. • Enter your username (admin) and password (blank by default). Click OK to enter the web configuration page for the device. • Open your browser, enter the IP address of your router (192.168.0.1) and click OK.
Wireless Basics D-Link DIR-615 User Manual 98 Under many circumstances, it may be desirable for mobile network devices to link to a conventional Ethernet LAN in order to use servers, printers or an Internet connection supplied through the wired LAN. A Wireless Router is a device used to provide this link. Wireless users can use the same applications they use on a wired network. Wireless adapter cards used on laptop and desktop systems support the same protocols as Ethernet adapter cards.
D-Link DIR-615 User Manual In a wireless local area network, a device called an Access Point (AP) connects computers to the network. The access point has a small antenna attached to it, which allows it to transmit data back and forth over radio signals. With an indoor access point as seen in the picture, the signal can travel up to 300 feet.
D-Link DIR-615 User Manual Small Office and Home Office • Stay on top of everything at home as you would at office • Remotely access your office network from home • Share Internet connection and printer with multiple computers • No need to dedicate office space Home • Gives everyone at home broadband access • Surf the web, check e-mail, instant message, and etc • Gets rid of the cables around the house • Simple and easy to use Wireless technology as become so popular in recent years that almost everyone is us
D-Link DIR-615 User Manual Place home appliances such as cordless telephones, microwaves, and televisions as far away as possible from the router/access point. This would significantly reduce any interference that the appliances might cause since they operate on same frequency. Eliminate Interference Make sure you place the router/access point in a centralized location within your network for the best performance.
D-Link DIR-615 User Manual 102 An Ad-Hoc network contains only clients, such as laptops with wireless cardbus adapters. All the adapters must be in Ad-Hoc mode to communicate. An Infrastructure network contains an Access Point or wireless router. All the wireless devices, or clients, will connect to the wireless router or access point.
Networking Basics D-Link DIR-615 User Manual If the address is 0.0.0.0, check your adapter installation, security settings, and the settings on your router. Some firewall software programs may block a DHCP request on newly installed adapters. This will display the IP address, subnet mask, and the default gateway of your adapter. At the prompt, type ipconfig and press Enter. 103 Click on Start > Run. In the run box type cmd and click OK. (Windows Vista® users type cmd in the Start Search box.
D-Link DIR-615 User Manual Step 5 Click OK twice to save your settings. Set Primary DNS the same as the LAN IP address of your router (192.168.0.1). The Secondary DNS is not needed or you may enter a DNS server from your ISP. Example: If the router´s LAN IP address is 192.168.0.1, make your IP address 192.168.0.X where X is a number between 2 and 99. Make sure that the number you choose is not in use on the network. Set Default Gateway the same as the LAN IP address of your router (192.168.0.1).
s -BPS s -BPS s -BPS s -BPS s -BPS s -BPS s Power s WLAN s )NTErNET s ,!.
Phone Support: (800) 361-5265 Internet Support: http://support.dlink.com Phone Support: (877) 453-5465 Internet Support: http://support.dlink.com D-Link DIR-615 User Manual For customers within Canada: For customers within the United States: 106 You can find software updates and user documentation on the D-Link website as well as frequently asked questions and answers to technical issues. • Model number of the product (e.g.
Warranty D-Link DIR-615 User Manual 107 The customer’s sole and exclusive remedy and the entire liability of D-Link and its suppliers under this Limited Warranty will be, at D-Link’s option, to repair or replace the defective Hardware during the Warranty Period at no charge to the original owner or to refund the actual purchase price paid. Any repair or replacement will be rendered by D-Link at an Authorized D-Link Service Office.
D-Link DIR-615 User Manual • The customer must obtain a Case ID Number from D-Link Technical Support at 1-877-453-5465, who will attempt to assist the customer in resolving any suspected defects with the product. If the product is considered defective, the customer must obtain a Return Material Authorization (“RMA”) number by completing the RMA form and entering the assigned Case ID Number at https://rma.dlink.com/.
D-Link DIR-615 User Manual 109 EXCEPT FOR THE LIMITED WARRANTY SPECIFIED HEREIN, THE PRODUCT IS PROVIDED “AS-IS” WITHOUT ANY WARRANTY OF ANY KIND WHATSOEVER INCLUDING, WITHOUT LIMITATION, ANY WARRANTY OF MERCHANTABILITY, FITNESS FOR A PARTICULAR PURPOSE AND NONINFRINGEMENT. Disclaimer of Other Warranties: While necessary maintenance or repairs on your Product can be performed by any company, we recommend that you use only an Authorized D-Link Service Office.
D-Link DIR-615 User Manual Copyright ©2008 by D-Link Corporation/D-Link Systems, Inc. All rights reserved. 110 No part of this publication or documentation accompanying this product may be reproduced in any form or by any means or used to make any derivative such as translation, transformation, or adaptation without permission from D-Link Corporation/D-Link Systems, Inc., as stipulated by the United States Copyright Act of 1976 and any amendments thereto.
D-Link DIR-615 User Manual We declare that the product is limited in CH1~CH11 by specified firmware controlled in the USA. This transmitter must not be co-located or operating in conjunction with any other antenna or transmitter. 111 FCC Radiation Exposure Statement: This equipment complies with FCC radiation exposure limits set forth for an uncontrolled environment. This equipment should be installed and operated with minimum distance 20cm between the radiator & your body.
D-Link DIR-615 User Manual Cet appareil numerique de la class [B] respecte toutes les exigences du Reglement sur le materiel brouilleur du Canada. The Class [B] digital apparatus meets all requirements of the Canadian Interference-Causing Equipment Regulation. 112 Règlement d’Industry Canada Les conditions de fonctionnement sont sujettes à deux conditions: 1) Ce périphérique ne doit pas causer d’interférence et.
Registration D-Link DIR-615 User Manual Version 3.0 July 23, 2008 113 Product registration is entirely voluntary and failure to complete or return this form will not diminish your warranty rights.