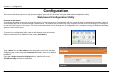
Section 3 – Configuration Configuration This section will show you how to set up and configure your new D-Link router using the Web-based configuration utility. Web-based Configuration Utility Connect to the Router To configure the WAN connection used by the router it is first necessary to communicate with the router through its management interface, which is HTML-based and can be accessed using a web browser.
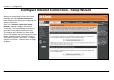
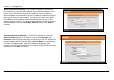
Section 3 – Configuration Configure Internet Connection - Setup Wizard When you successfully connect to the web manager, the main Internet Connection menu displays two options for configuring the Internet connection. Click on he Internet Connection Setup Wizard to quickly configure the Internet connection. The Setup Wizard procedure is described in the pages following this one. To configure the connection in more detail, click on the Manual Internet Connection Setup button.
Section 3 – Configuration Internet Connection Setup Wizard Use the Internet Connection Setup Wizard to quickly configure the Internet connection. Setup Wizard Click the Internet Connection Setup Wizard button and follow the instructions in the menus that appear. The initial window summarizes the setup process. These steps are as follows: 1. Set the new password. 2. Select the time zone. 3. Configure the connection to the Internet. 4. Save settings and reboot the router. Click the Next button to proceed.
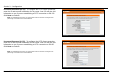
Section 3 – Configuration Choose the time zone you are in from the pull-down menu and click Next. This sets the system time used for the router. If you wish to return to the previous window during the setup process, click the Prev button. Select the Internet Connection Type used for the Internet connection. Your ISP has given this information to you.
Section 3 – Configuration DHCP (Dynamic IP Address) - For Dynamic IP Address connections, you may want to copy the MAC address of your Ethernet adapter to the router. Some ISPs use the unique MAC address of your computer’s Ethernet adapter for identification and for IP address assignment (DHCP) when you first access their network. This can prevent the router (which has a different MAC address) from being allowed access to the ISP’s network (and the Internet).
Section 3 – Configuration Username/Password (PPTP) - To configure the PPTP client connection, enter the IP and account information for the router. Your ISP will give this information to you if you are establishing a PPTP connection to the ISP. Click Next to continue. NOTE: The broadband device used for your Cable or ADSL network connection must support PPTP pass-through so the VPN session can be established.
Section 3 – Configuration Username/Password (Bigpond) - BigPond Cable connections use this Enter the account and server information, as provided to you by BigPond. Click Next to continue. Static IP Address Connection - For Static IP Address connection types, you must type in the IP Address, Subnet Mask, Gateway Address, Primary DNS Address and Secondary DNS Address (optional). Your ISP should provide this information to you. Click Next to continue.
Section 3 – Configuration Russia PPTP (Dual Access) - To configure the PPTP client connection, enter the IP and account information for the router. Your ISP will give this information to you if you are establishing a PPTP connection to the ISP. Click Next to continue. NOTE: The broadband device used for your Cable or ADSL network connection must support PPTP pass-through so the VPN session can be established.
Section 3 – Configuration When you are satisfied that the settings have been entered correctly click on the Connect button to save the new configuration settings. During the save and restart procedure, the display informs that it is rebooting. Once the reboot is complete, begin to use the router.
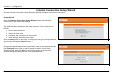
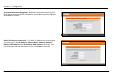
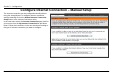
Section 3 – Configuration Configure Internet Connection – Manual Setup The Internet connection can be configured manually without using the Setup Wizard. To configure Internet connection settings manually click on the Manual Internet Connection Setup button in the Internet Connection menu. In the new menu select the Internet Connection type used for your service from the My Internet Connection is: pull-down menu.
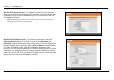
Section 3 – Configuration Dynamic IP Address A Dynamic IP Address connection configures the Router to To configure a Dynamic IP Address Internet connection, follow these automatically obtain its global IP address from a DHCP server on the steps: ISP’s network. 1. Select the Dynamic IP (DHCP) option from the My Internet Connection is: pull-down menu. 2. Under the Dynamic IP heading, type a Host Name if needed, and DNS IP address information.
Section 3 – Configuration Static IP Address To configure a Static IP type Internet connection, follow these steps: 1. Select the Static IP option from the My Internet Connection is: pull-down menu. 2. Under the Static IP heading, type IP address information provided by your ISP, type an IP Address, Subnet Mask and ISP Gateway Address. The Primary DNS Address will be normally be required, the Secondary DNS Address is used for a back up DNS server. 3.
Section 3 – Configuration PPPoE PPP or Point-to-Point protocol is a standard method of establishing a network connection/session between networked devices. Different forms of PPP include PPPoA and PPPoE (discussed below) involve an authentication process that requires a username and password to gain access to the network. PPPoE (PPP over Ethernet), as described in RFC 2516, is a method of using PPP through the Ethernet network. To configure a PPPoE Internet connection, follow these steps: 1.
Section 3 – Configuration Some of the settings do not need to be changed the first time the device is set up, but can be changed later if you choose. The information that is to be provided in this window must be given to you by your ISP and must be carefully configured. Any small discrepancy will send the wrong message to your ISP’s server and inhibit your connection.
Section 3 – Configuration PPTP The Point to Point Tunneling Protocol is used to transfer information securely between VPNs (Virtual Private Routers). Encryption methods are employed in the transfer of information between you and your ISP using a key encryption. This option is specific for European users where ISPs support the PPTP protocol for the uplink connection.
Section 3 – Configuration PPTP/L2TP Description IP Address Enter the IP address of the router into this field. This address must be supplied to you by your ISP. This field will not be necessary to configure if the Dynamic IP option is chosen above the configuring field. Subnet Mask Enter the IP address of the Subnet Mask into this field. This address must be supplied to you by your ISP. This field will not be necessary to configure if the Dynamic IP option is chosen above the configuring field.
Section 3 – Configuration L2TP L2PT, or Layer 2 Tunneling Protocol is a VPN protocol that will ensure a direct connection to the server using an authentication process that guarantees the data originated from the claimed sender and was not damaged or altered in transit. Once connected to the VPN tunnel, it seems to the user that the client computer is directly connected to the internal network. To set up your L2PT connection, enter the data that was provided to you by your ISP.
Section 3 – Configuration BigPond BigPond Cable connections use this menu to configure account and connection information. Enter the account information, as provided to you by BigPond. Click Next to continue. BigPond Connection Setting Description Auth Server Enter the name of the Authentication Server as provided to you by BigPond. User Name The account name of the account that has been assigned to you by BigPond. Password The password of the account that was supplied to you by BigPond.
Section 3 – Configuration PPTP Russia The PPTP Russia setup is identical to the previously described PPTP setup on page 23 except an option to use a MAC address that will always be associated with the connection. The MAC address is entered manually or copied form the computer. To configure a PPTP Russia Internet connection, configure as previously described for PPTP connections and type in the MAC address that will be used or clone the computer’s MAC address by clicking on the Clone MAC Address button.
Section 3 – Configuration PPPoE Russia Some PPPoE connections use a static IP route to the ISP in addition to the global IP settings for the connection. This requires an added step to define IP settings for the physical WAN port. To configure a PPPoE Russia Internet connection, configure as previously described for PPPoE connections on page 21 and add the WAN Physical IP settings as instructed from the ISP.
Section 3 – Configuration Configure Wireless Connection - Setup Wizard Configure the router’s wireless access point with the Wireless Connection Setup Wizard and follow the instructions that follow. Or use the manual configuration option. To configure basic wireless and wireless security settings manually click on the Manual Wireless Connection Setup button.
Section 3 – Configuration Wireless Connection Setup Wizard Use the Wireless Connection Setup Wizard to quickly configure the Internet connection. Click on the Wireless Connection Setup Wizard button in the Wireless Connection menu to begin using the wizard. The first wizard menu provides a summary of the setup procedure. The procedure is the same for all security types used. If you want to make specific changes to wireless security settings, use the manual wireless connection setup option.
Section 3 – Configuration Select the level of security for the wireless network. The choice will determine the method used for security. The security options are: • Best – using WPA2 • Better – using WPA • Good – using WEP • None – no security for the wireless connection Remember that all wireless clients that will associate with the router must use the same security settings. Click Next to continue to proceed. Type the password used for security.
Section 3 – Configuration Wireless setup is completed. Review the wireless settings SSID and security information. It is a good idea to keep a record of the wireless settings in order to configure clients that will associate with the router. Click Next to continue to save the new wireless settings and restart the router. Restarting will take several seconds. Once the router has restarted the wireless settings just configured will be applied.
Section 3 – Configuration Wireless Connection – Manual Setup The wireless connection can be configured manually without using the Setup Wizard. To configure wireless connection settings manually click on the Manual Wireless Connection Setup button in the Wireless Connection menu. The two essential settings for wireless LAN operation are the Wireless Network Name or SSID and Wireless Channel number. The SSID (Service Set Identifier) is used to identify a group of wireless LAN components.
Section 3 – Configuration Wireless Network Settings Use the Enable Wireless check box to disable or enable the wireless interface. Wireless function is enabled by default. The Wireless Network Name or SSID can be changed to suit your wireless network. Remember that any wireless device using the access point must have the same SSID and use the same channel. The SSID can be a continuous character string (i.e. no spaces) of up to 16 characters in length.
Section 3 – Configuration Wi-Fi Protected Setup Wi-Fi Protected Setup or WPS makes wireless security configuration much quicker simpler for wireless stations that support this feature. NOTE: The Generate New PIN button is for the Router’s own PIN. This is used when the Router needs to connect to other WPS enabled access points. To connect a new wireless station with WPS, click on the Add Wireless Device with WPS button. A new menu appears.
Section 3 – Configuration Wireless Security - WEP WEP security requires the following parameters be defined: • Authentication: Select Open Key or Shared Key. • Encryption: Select the encryption level, 64-bit or 128-bit. • Default WEP Key: Up to four keys can be configured. Choose the key being configured. • WEP Key: Type an ASCII or Hex key of appropriate length for the encryption level, 10 characters for 64-bit Hex or 26 characters for 128-bit Hex.
Section 3 – Configuration Wireless Security – WPA/EAP Wi-Fi Protected Access was designed to provide improved data encryption, perceived as weak in WEP, and to provide user authentication, largely nonexistent in WEP. Enter the appropriate parameters for the type of security selected from this menu. WPA EAP or WPA2 EAP must enter the following: • Cypher Type: Choose TKIP, AES or Both. • PSK/EAP: Choose EAP. • RADIUS Server IP Address: The IP address of the RADIUS server.
Section 3 – Configuration Wireless Security – WPA/PSK Enter the appropriate parameters for the type of security from this menu. WPA-PSK or WPA2-PSK must enter the following: • Cypher Type: Choose TKIP, AES or Both. • PSK/EAP: Choose PSK. • Network Key: The password or character string used for wireless station authentication (10 characters for 64-bit Hex).