DES-1228P 24-Port 10/100Mbps PoE Web Smart Switch with 4-Port 10/100/1000Base-T and 2-Port Combo SFP User Manual V1.
TABLE OF CONTENTS About This Guide................................................................................. 1 Purpose ............................................................................................ 1 Terms/Usage .................................................................................... 1 Introduction.......................................................................................... 2 Gigabit Ethernet Technology ...........................................................
Installing the SmartConsole Utility................................................ 22 SmartConsole Utility Features ....................................................... 23 Menu Toolbar............................................................................. 23 Discovery List............................................................................ 25 Monitor List ............................................................................... 26 Device Setting.......................................
Security > Broadcast Storm Control .......................................... 54 Security > 802.1X Setting.......................................................... 54 Security > Mac Address Table > Static Mac ............................. 56 Security > Mac Address Table > Dynamic Forwarding Table .. 57 Monitoring > Statistics...............................................................
ABOUT THIS GUIDE Thank you and congratulations on your purchase of the DES-1228P 24-Port 10/100Mbps Fast Ethernet + 4 10/100/1000Base-T Ports and 2 Combo SFP PoE Web-Smart Switch. This device integrates 1000Mbps Gigabit Ethernet, 100Mbps Fast Ethernet and 10Mbps Ethernet network capabilities in a highly flexible package. Since Ports 1~24 of this Switch are Power over Ethernet (PoE) ports, it will automatically detect the presence of IEEE 802.
INTRODUCTION This chapter will describe the features of the DES-1228P and provide some background information about Ethernet/Fast Ethernet/Gigabit Ethernet switching technology. Gigabit Ethernet Technology Gigabit Ethernet is an extension of IEEE 802.
In addition, the phenomenal bandwidth delivered by Gigabit Ethernet is the most cost-effective method to take advantage of today and tomorrow’s rapidly improving switching and routing internetworking technologies.
Switching Technology Another approach to push beyond the limits of Ethernet technology is the development of switching technology. A switch bridges Ethernet packets at the MAC address level of the Ethernet protocol transmitting among connected Ethernet or Fast Ethernet LAN segments. Switching is a cost-effective way of increasing the total network capacity available to users on a local area network.
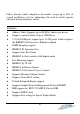
PoE is already widely adopted in the market, saving up to 50% of overall installation costs by eliminating the need to install separate electrical wiring and power outlets. Features ♦ Address Table: Supports up to 8K MAC address per device ♦ Supports a packet buffer of up to 128K Bytes ♦ 1-24 10/100M ports support up to 15.4W power which complies the IEEE802.3af Power over Ethernet standard. ♦ IGMP Snooping support ♦ IEEE802.1D Spanning Tree ♦ Support static Port Trunk ♦ IEEE802.
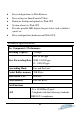
♦ Easy configuration via Web Browser ♦ Easy setting via SmartConsole Utility ♦ Firmware backup and upload via Web GUI ♦ System reboot via Web GUI ♦ Provides parallel LED display for port status such as link/act, speed, etc. ♦ Reset configuration (hardware and Web GUI) Technical Specifications Key Components / Performance Switching Capacity 12.8Gbps 10M: 14,880 pps Max.
1. IEEE 802.3u compliance 2. Supports Full-Duplex operations at 10/100Mbps, and 1000Mbps only on SFP ports - 2 Combo 1000Base-T/SFP ports -1000Base-T ports compliant to the following standards: 1. IEEE 802.3 compliance 2. IEEE 802.3u compliance 3. IEEE 802.3ab compliance 4. Support Full-Duplex operations - SFP Transceivers Supported: Combo ports in the front panel 1. 2. 3. 4. 5.
4. DEM-331R (TX-1310/RX-1550nm), up to 40km, Single-Mode - Compliant to following standards: 1. IEEE 802.3z compliance 2. IEEE 802.3u compliance 2 1000Base-T ports 1000Mbps Copper ports in the front panel 1000Base-T ports compliant to following standards: 1. 2. 3. 4. IEEE 802.3 compliance IEEE 802.3u compliance IEEE 802.3ab compliance Support Full-Duplex operations Power over Ethernet PoE Capable Ports Port 1-24 PoE Specification 1. Supplies power to PD device up to 15.4W per port, meeting IEEE802.
6. Provide the power following the classification below Class Usage 0 1 2 3 4 Default Optional Optional Optional Reserved Minimum power levels at output of PSE 15.4W 4.0W 7.0W 15.4W 15.4W 7.
Humidity Operation: 10%~90% RH Storage: 5%~90% RH Power consumption 222 watts Heat Dissipation 750.
UNPACKING AND INSTALLATION This chapter provides unpacking and installation information for the Web-Smart Switch.
Install the Switch in a site free from strong electromagnetic field generators (such as motors), vibration, dust, and direct exposure to sunlight. Leave at least 10cm (about 4 inches) of space to the front and rear of the Switch for ventilation. Install the Switch on a sturdy, level surface that can support its weight, or in an EIA standard-size equipment rack. For information on rack installation, see the next section, Rack Mounting.
Figure 2 – Attach the mounting brackets to the Switch Use the screws provided with the equipment rack or chassis to mount the Switch in the rack. Figure 3 – Mount the Switch in the rack or chassis Connecting Network Cables The DES-1228P has 24 ports that support 10/100Mbps Fast Ethernet; it also has 4 10/100/1000Base-T Ports and 2 Combo SFPs. Each port on the DES-1228P supports Auto-MDI/MDI-X.
AC Power The Switch utilizes an AC power supply 100~240V AC, 50~60Hz. The power switch is located at the rear of the unit adjacent to the AC power connector and the system fan. The switch’s power supply will adjust to the local power source automatically and may be turned on without having any or all LAN segment cables connected.
IDENTIFYING EXTERNAL COMPONENTS This chapter describes the front panel, rear panel, and LED indicators of the Switch. Front Panel The figure below shows the front panel of the Switch. Figure 4 – Front panel of the 28-port Web-Smart Switch LED Indicator: Comprehensive LED indicators display the status of the switch and the network (see the Understanding LED Indicators section).
10/100/1000 BASE-T / Mini GBIC Combo Ports (Option Port 25~26) The Switch is also equipped with two combo 10/100/1000 Base-T / Mini GBIC ports, supporting optional 100BASE-FX or 1000BASESX/LX Mini GBIC modules for fiber uplinks. 10/100/1000 BASE-T Twisted Pair Ports (Port 27~28) Finally there are 2 Gigabit twisted pair ports that are auto negotiable 10/100/1000Mbps with auto MDI/MDIX crossover detection support that can also operate in half- and full- duplex modes.
Rear Panel AC Power Connector Figure 5 – Rear panel of the Switch AC Power Connector: Plug in the female connector of the provided power cord into this connector, and the male into a power outlet. Supported input voltages range from 100-240V AC, and 50-60Hz. Understanding LED Indicators The front panel LEDs provides instant status feedback and simplifies monitoring and troubleshooting tasks.
default. Note: Be sure that to record all custom settings of the Switch before pressing the reset button. Resetting the Switch back to factory default settings will erase all custom configurations. Power and System LEDs Power LEDs On When the Power LED light is on, the Switch is receiving power. Off When the Power LED light is off, the power cord is not or improperly connected. CPU LEDs ( Management Indicator) Blinking When the CPU is working, the CPU LED is blinking. Off The CPU is idle.
100Mbps On When the 100Mbps LED light is on, the respective port is connected to a 100Mbps Fast Ethernet network. Off When the respective port is connected to a 10Mbps Ethernet or no link. PoE Green Light When the Green light is on, the respective port is providing 48V of power. Off When the light is off, either the respective port is receiving power from an AC power source or no 802.3af PD is found. Red Light When the Red light is on, an error has occurred at the respective port.
Link/Act On When the respective combo port is connected to a network, the Link/Act LED light is on. Blinking When the LED is blinking, the respective combo port is transmitting or receiving data on a network. Off No link. 1000Mbps On When the 1000Mbps LED light’s on, the respective port is connected to a 1000Mbps Gigabit Ethernet network. Off When the respective port is connected to a 100Mbps Fast Ethernet or no link.
Blinking When the Link/Act LED is blinking, the port is transmitting or receiving data on the Ethernet network. Off No link. 1000Mbps On When the 1000Mbps LED light is on, the respective port is connected to a 1000Mbps Gigabit Ethernet network. Off When the respective port is connected to a 10Mbps Ethernet or 100Mbps Fast Ethernet network, or no link. 100Mbps On When the 100Mbps LED light is on, the respective port is connected to a 100Mbps Fast Ethernet network.
CONFIGURATION Through a web browser, the features and functions of the DES-1228P Switch can be configured for optimum use. Supported web browsers The embedded Web-based Utility currently supports the following web browsers: • • • • • • Microsoft Internet Explorer ver. 6.0, 5.5 Mozilla ver. 1.7.12, 1.6 Firefox ver. 1.5, 1.0.7 Netscape ver. 8.0.4, 7.2 Opera ver. 8.5, 7.6 Safari ver. 2.0.
SmartConsole Utility Features The SmartConsole Utility is divided into four parts, a Menu Toolbar of functions at the top, Discovery List, Monitor List, and Device Setting. Figure 7 – SmartConsole Utility Menu Toolbar The Menu Toolbar in the SmartConsole Utility has four main tabs, File, View, Option, and Help. File includes: Monitor save, Monitor save as, Monitor load and Exit. • Monitor Save: To record the setting of the Monitor List as default for the next time the SmartConsole Utility is used.
• Monitor Load: To manually load a Monitor List setting file. • Exit: To exit the SmartConsole Utility. View includes: View log and Clear Log functions, which provide trap setting list operations. • View Log: To show the event of the SmartConsole Utility and the device. • Clear Log: To clear all log entries. Option includes: Refresh Time and Group Interval functions. • Refresh time refreshes the monitoring time of the device.
Help includes: information About the SmartConsole Utility, such as the software version. Discovery List This is the list where all Web-Smart devices on the network are discovered. By pressing the Discovery button, all the Web-Smart devices are listed in the discovery list. Double click or press the Add to monitor list button to select a device from the Discovery List to the Monitor List. Definitions of the Discovery List features: MAC Address: Shows the device MAC Address.
DHCP: Uses a client/server model to obtain lease of an IP address from a DHCP server as part of the network boot process. Location: Shows where the appointed device location. Trap IP: Shows the IP where the Trap information will be sent. Subnet Mask: Shows the Subnet Mask set of the device. Gateway: Shows the Gateway set of the device. Group Interval: Shows the Group Interval of the device.
Group Interval: Shows the Group Interval of the device. View Trap: The view trap function receives trap events from the Web-Smart Switch. There is a light indicator following the “View Trap” button. A green light indicates that the monitor has not received any new traps, while a red light indicates that there are new traps received by the monitor available to view.
Delete Item: Deletes the device from the Monitor List. Device Setting Function buttons of the Device Setting section provide several options. Configuration Setting: In the Configuration Setting, the following settings are available: Product Name, MAC Address, IP Address, Subnet Mask, Gateway, Set Trap to (Trapping IP Address), System name, Location, Password and DHCP ON/OFF (OFF is default).
Firmware Upgrade: To update the device firmware, enter the firmware path and password (if necessary), and click “Start”.). Figure 12 – Firmware Upgrade Web Access: Double click the device in the Monitor List or select a device in the Monitor List and press the “Web Access” button to open the Web-based Utility. To see the list of web browsers the Web-based Utility supports, see Supported web browsers on page 22.
Web-based Utility The DES-1228P Web-Smart Switch has a web browser GUI interface for configuring the Switch through a web browser. To see the list of web browsers the Web-based Utility supports, see Supported web browsers on page 22. A network administrator can manage, control and monitor the switch from the local LAN. This section indicates how to configure the Switch to enable its smart functions.
Figure 15 – Log in screen Once you have successfully logged in, the device status page will appear. In the top right corner the user name (default ‘admin’) is displayed with the IP address of the Switch. Below this is a Logout option for use when the session is complete.
Tool Menu The Tool Menu offers global function controls such as Reset, Configuring Backup and Restoration, Firmware Backup and Upload, and System Reboot. Figure 17 – Tool Menu Reset: Provides a safe reset option for the Switch. All configurations will be reset to default. Figure 18 – Tool Menu > Reset Configure Backup and Restore: Allows the current configuration settings to be saved to a file (not including the password), and if necessary, to be restored from a backup.
Firmware Backup and Upload: Allows for the firmware to be saved, or for an existing firmware file to be uploaded to the Switch. Figure 20 – Tool Menu > Firmware Backup and Upload System Reboot: Provides a safe way to reboot the system. Ensure the configuration has been saved, or all the changes you just made may be lost after system reboot.
Figure 22 –Setup Menu System > System Setting The System Setting includes IP Information and System information. There are two ways for the switch to attain IP: Static and DHCP (Dynamic Host Configuration Protocol). When using static mode, the IP Address, Subnet Mask and Gateway can be manually configured. When using DHCP mode, the Switch will first look for a DHCP server to provide it with an IP address, network mask, and default gateway before using the default or previously entered settings.
Interval send IGMP v1 report packet by switch, it is for SmartConsole Utility to discovery our switch when we in IGMP protocol, zero means disable Group Interval, and 120~1225 means send IGMP v1 report according the value which unit is seconds. Figure 23 – System > System Setting System > Trap Setting By configuring the Trap Setting, it allows SmartConsole Utility to monitor specified events on this Web-Smart Switch. By default, Trap Setting is Disabled.
Figure 24 – System > Trap Setting System Event: Monitors the system’s trapping information. Device Bootup: Traps system boot-up information. Illegal Login: Traps events of incorrect password logins, recording the IP of the originating PC. Fiber Port Events: Monitors the fiber port status. Link Up/Link Down: Traps fiber connection information. Twisted pair Port Events: Monitors the copper cable port status. Link Up/Link Down: Traps copper connection information.
System > Port Setting In the Port Setting page, the status of all ports can be monitored and adjusted for optimum configuration. By selecting a range of ports (“From Port” and “To Port”), the Speed can be set for all such ports, by clicking Apply. To refresh the information table to view the latest Link Status and Priority, press the Refresh button. Figure 25 – System > Port Setting Speed: Fiber connections can operate in Forced Mode settings (1000M Full), Auto, or Disable.
Link Status: Reporting Down indicates the port is disconnected. Priority: Displays each port’s 802.1p QoS priority level for received data packet handling. Default setting for all ports is Middle. You can change the priority settings in Qos > 802.1p Default Priority NOTE: When the Combo Gigabit Fiber port and the Copper ports are both connected, the Fiber port will take precedence over the Copper ports, meaning the Fiber port will be the only connection.
string. SNMP packets from a station that are not authenticated are ignored (dropped). Figure 26 – System > SNMP Setting Enabled / Disabled: Default setting is Disabled. Click Enable, then Apply, to set Community Settings. The default community strings for the Switch used for SNMP v.1 management access are: Public: The community with read-only privilege allows authorized management stations to retrieve MIB objects.
events such as a port status change. The Switch can generate traps and send them to the trap recipient (i.e. network administrator). Setting up a Trap: Select Enable, enter a Trap Name (i.e. Trap Name must be selected from a Community Name), add the IP of the device to be monitored, and choose the event(s) to trap.
help to simplify network management by allowing users to move devices to a new VLAN without having to change any physical connections. The IEEE 802.1Q VLAN Configuration page provides powerful VID management functions. The original settings have the VID as 01, named “default”, and all 28 ports as “Untagged” (see Figure 29). Rename: Click to rename the VLAN group. Delete VID: Click to delete the VLAN group.
Figure 29 – Configuration > 802.1Q VLAN > Add VID Figure 30 – Configuration > 802.1Q VLAN > Example VIDs Figure 31 – Configuration > 802.
Configuration > Trunking The Trunking function enables the cascading of two or more ports for a combined larger bandwidth. Up to six Trunk groups may be created, each supporting up to 8 ports. Add a Trunking Name and select the ports to be trunked together, and click Apply to activate the selected Trunking groups. Figure 32 – Configuration > Trunking NOTE: Each combined trunk port must be connected to devices within the same VLAN group.
decisions by examining the contents of each frame’s Layer 2 MAC header. IGMP snooping can help reduce cluttered traffic on the LAN. With IGMP snooping enabled globally, the Web-Smart Switch will forward multicast traffic only to connections that have group members attached. Please note that IGMP will not alter or route IP multicast packets. To send IP multicast packets across subnetworks a multicast routing protocol will be necessary.
Max Response Time (10-25 sec): The Max Response Time specifies the maximum allowed time before sending a responding report. Adjusting this setting effects the "leave latency", or the time between the moment the last host leaves a group and when the routing protocol is notified that there are no more members. It also allows adjustments for controlling the frequency of IGMP traffic on a subnet. Default is 10 seconds.
'RouterPortPurgeInterval' time, the learnt router port entry will be purged. Default is 125 seconds. Leave Timer (0-25 sec): This is the interval after which a Leave message is forwarded on a port. When a leave message from a host for a group is received, a group-specific query is sent to the port on which the leave message is received. A timer is started with a time interval equal to IgsLeaveProcessInterval. If a report message is received before above timer expires, the Leave message is dropped.
To view the Multicast Entry Table for a given VLAN, press the View button. Figure 35 – Configuration > IGMP Multicast Entry Table Configuration > 802.1D Spanning Tree 802.1D Spanning Tree Protocol (STP) implementation is a backup link(s) between switches, bridges or routers designed to prevent network loops that could cause a broadcast storm. When physical links forming a loop provide redundancy, only a single path will be forwarding frames. If the link fails, STP activates a redundant link automatically.
By default, Spanning Tree is Disabled. If Enabled, the Switch will listen for BPDU packets and its accompanying Hello packet. BPDU packets are sent even if a BPDU packet was not received. Therefore, each link between bridges is sensitive to the status of the link. Ultimately this difference results in faster detection of failed links, and thus faster topology adjustment. A draw-back of 802.1D is this absence of immediate feedback from adjacent bridges.
Root Bridge: Displays the MAC address of the Root Bridge. Root port: Displays the root port. Root Path Cost: Shows the root path cost. Path Cost: This defines a metric that indicates the relative cost of forwarding packets to specified port list. The lower the number, the greater the probability the port will be chosen to forward packets. The default value is 19.
Selection options for the Source Ports are as follows: TX (transmit) mode: Duplicates the data transmitted from the source port and forwards it to the Target Port. RX (receive) mode: Duplicates the data that gets sent to the source and forwards it to the Target Port. Both (transmit and receive) mode: Duplicate both the data transmitted from and data sent to the source port, and forwards all the data to the assigned Target Port. None: Turns off the mirroring of the port.
When you click on the PoE Setting, the PoE Status will appear on the screen. It will display the PoE status including, Port Enable, Power Limit, Power (W), Voltage (V), Current (mA), Classification, Port Status. Note: The PoE Status information of Power current, Power Voltage, and Current is the power usage information of the connected PD; please "Refresh" to renew the information. Figure 39 – PoE > PoE Port Setting PoE Enable: Select to enable or disable the PoE function.
Power over Ethernet (PoE) > PoE System Setting Select "PoE System Setting" to configure the global PoE Settings. Figure 40 – PoE > PoE System Setting This page will display the PoE status including System Budget Power, Support Total Power, Remainder Power, and The ratio of system power supply. System Power Threshold: When the ratio of the system power supply is larger than or smaller than the System Power Threshold Setting, the Switch will send trap events to the Management Station.
Figure 41 – QoS > 802.1p Default Priority Security > Safeguard Engine D-Link’s Safeguard Engine is a robust and innovative technology that automatically throttles the impact of packet flooding into the switch's CPU. This function helps protect the Web-Smart Switch from being interrupted by malicious viruses or worm attacks. By default this is Enabled.
Security > Broadcast Storm Control The Broadcast Storm Control feature provides the ability to control the receive rate of broadcasted packets. If Enabled (default is Disabled), threshold settings of 8,000 ~ 4,096,000 bytes per second can be assigned. Press Apply for the settings to take effect. Figure 43 – Security > Broadcast Storm Control Security > 802.1X Setting Network switches provide easy and open access to resources by simply attaching a client PC.
available to the user, or the user is denied access to the network. The RADIUS servers make the network a lot easier to manage for the administrator by gathering and storing the user lists. Figure 44 – Security > 802.1X Setting By default, 802.1X is Disabled. To use EAP for security, select Enabled and set the 802.1X Global Settings for the Radius Server and applicable authentication information. Authentication Port: sets primary port for security monitoring. Default is 1812.
ReAuthEnabled: This Enables or Disables the periodic ReAuthentication control. When the 802.1X function is Enabled, the ReAuthEnabled function is by default also Enabled. QuietPeriod: Sets the number of seconds that the switch remains in the quiet state following a failed authentication exchange with the client. Default 80 seconds SuppTimeout: Sets the switch-to-client retransmission time for the EAP-request frame. Default is 12 seconds.
Figure 45 – Security > Static Mac Address To initiate the removal of auto-learning for any of the uplink ports, press On to enable this feature, and select the port(s) for auto learning to be disabled. The Static Mac Address Setting table displays the static Mac addresses connected, as well as the VID. Press Delete to remove a device. To add a new Mac address assignment, press Add Mac, then select the assigned Port number, enter both the Mac Address and VID and press Apply.
Figure 46 – Security > Dynamic Forwarding Table Monitoring > Statistics The Statistics screen displays the status of each port packet count.
Refresh: To renew the details collected and displayed. Clear Counter: To reset the details displayed. TxOK: Number of packets transmitted successfully. RxOK: Number of packets received successfully. TxError: Number of transmitted packets resulting in error. RxError: Number of received packets resulting in error. To view the statistics of individual ports, click one of the linked Port numbers for details.
Warranties/Registration LIMITED WARRANTY D-Link provides this limited warranty for its product only to the person or entity who originally purchased the product from DLink or its authorized reseller or distributor. D-Link would fulfill the warranty obligation according to the local warranty policy in which you purchased our products.
PROPERLY COMPLETE AND TIMELY RETURN THE REGISTRATION CARD MAY AFFECT THE WARRANTY FOR THIS PRODUCT. Submitting A Claim. Any claim under this limited warranty must be submitted in writing before the end of the Warranty Period to an Authorized D-Link Service Office. The claim must include a written description of the Hardware defect or Software nonconformance in sufficient detail to allow D-Link to confirm the same.
GOVERNING LAW: This Limited Warranty shall be governed by the laws of the state of California. Some states do not allow exclusion or limitation of incidental or consequential damages, or limitations on how long an implied warranty lasts, so the foregoing limitations and exclusions may not apply. This limited warranty provides specific legal rights and the product owner may also have other rights which vary from state to state. Trademarks Copyright 2006 D-Link Corporation.
Registration Card (All Countries and Regions excluding USA) Print, type or use block letters. Your name: Mr./Ms______________________________________________________________________ Organization: ________________________________________Dept.
Subject to the terms and conditions set forth herein, D-Link Systems, Inc. (“D-Link”) provides this Limited Warranty: • • Only to the person or entity that originally purchased the product from D-Link or its authorized reseller or distributor, and Only for products purchased and delivered within the fifty states of the United States, the District of Columbia, U.S. Possessions or Protectorates, U.S. Military Installations, or addresses with an APO or FPO.
WARRANTY PERIOD SET FORTH ABOVE. EXCEPT AS EXPRESSLY COVERED UNDER THE LIMITED WARRANTY PROVIDED HEREIN, THE ENTIRE RISK AS TO THE QUALITY, SELECTION AND PERFORMANCE OF THE PRODUCT IS WITH THE PURCHASER OF THE PRODUCT.
Product Registration: Register online your D-Link product at http://support.dlink.com/register/ Product registration is entirely voluntary and failure to complete or return this form will not diminish your warranty rights.
Tech Support Technical Support You can find software updates and user documentation on the D-Link website. Tech Support for customers within Australia: D-Link Technical Support over the Telephone: 1300-766-868 Monday to Friday 8:00am to 8:00pm EST Saturday 9:00am to 1:00pm EST D-Link Technical Support over the Internet: http://www.dlink.com.au email:support@dlink.com.
Technical Support You can find software updates and user documentation on the D-Link website. Tech Support for customers within South Eastern Asia and Korea: D-Link South Eastern Asia and Korea Technical Support over the Telephone: +65-6895-5355 Monday to Friday 9:00am to 12:30pm, 2:00pm-6:00pm Singapore Time D-Link Technical Support over the Internet: email:support@dlink.com.
Technical Support You can find software updates and user documentation on the D-Link website. Tech Support for customers within India D-Link Technical Support over the Telephone: +91-22-26526741 +91-22-26526696 –ext 161 to 167 Monday to Friday 9:30am to 7:00pm D-Link Technical Support over the Internet: http://ww.dlink.co.in http://www.dlink.co.in/dlink/drivers/support.asp ftp://support.dlink.co.in email: techsupport@dlink.co.
Technical Support You can find software updates and user documentation on the D-Link website. D-Link provides free technical support for customers for the duration of the warranty period on this product. Customers can contact D-Link technical support through our web site or by phone. Tech Support for customers within the Russia D-Link Technical Support over the Telephone: (495) 744-00-99 Monday to Friday 10:00am to 6:30pm D-Link Technical Support over the Internet: http://www.dlink.ru email: support@dlink.
Technical Support You can find software updates and user documentation on the D-Link website. Tech Support for customers within the U.A.E & North Africa: D-Link Technical Support over the Telephone: (971) 4-391-6480 (U.A.E) Sunday to Wednesday 9:00am to 6:00pm GMT+4 Thursday 9:00am to 1:00pm GMT+4 D-Link Middle East & North Africa D-Link Technical Support over the Internet: http://support.dlink-me.com email:support@dlink-me.
Technical Support You can find software updates and user documentation on the D-Link website. Tech Support for customers within South Africa and Sub Sahara Region: D-Link South Africa and Sub Sahara Technical Support over the Telephone: +27-12-665-2165 08600 DLINK ( For South Africa only ) Monday to Friday 8:30am to 9:00pm South Africa Time D-Link Technical Support over the Internet: http://www.d-link.co.za email:support@d-link.co.
Technical Support You can find software updates and user documentation on the D-Link website.
Техническая поддержка Обновления программного обеспечения и документация доступны на Интернет-сайте D-Link. D-Link предоставляет бесплатную поддержку для клиентов в течение гарантийного срока. Клиенты могут обратиться в группу технической поддержки D-Link по телефону или через Интернет. Техническая поддержка D-Link: (495) 744-00-99 Техническая поддержка через Интернет http://www.dlink.ru email: support@dlink.
Asistencia Técnica D-Link Latin América pone a disposición de sus clientes, especificaciones, documentación y software mas reciente a través de nuestro Sitio Web www.dlinkla.com El servicio de soporte técnico tiene presencia en numerosos países de la Región Latino América, y presta asistencia gratuita a todos los clientes de D-Link, en forma telefónica e internet, a través de la casilla soporte@dlinkla.
Suporte Técnico Você pode encontrar atualizações de software e documentação de usuário no site da D-Link Brasil www.dlinkbrasil.com.br. A D-Link fornece suporte técnico gratuito para clientes no Brasil durante o período de vigência da garantia deste produto. Suporte Técnico para clientes no Brasil: Telefone São Paulo (11) 2185-9301 Segunda à sexta Das 8h30 às 18h30 Demais Regiões do Brasil 0800 70 24 104 E-mail: email:suporte@dlinkbrasil.com.
D-Link 友訊科技 台灣分公司 技術支援資訊 如果您還有任何本使用手冊無法協助您解決的產品相關問題,台灣地區用 戶可以透過我們的網站、電子郵件或電話等方式與D-Link台灣地區技術支 援工程師聯絡。 D-Link 免付費技術諮詢專線 0800-002-615 服務時間:週一至週五,早上8:30 到 晚上7:00 (不含周六、日及國定假日) 網 站:http://www.dlink.com.tw 電子郵件 :dssqa_service@dlink.com.tw 如果您是台灣地區以外的用戶,請參考D-Link網站 全球各地分公司 的聯絡資訊以取得相關支援服務。 產品保固期限、台灣區維修據點查詢,請參考以下網頁說明: http://www.dlink.com.
Technical Support You can find software updates and user documentation on the D-Link website. D-Link provides free technical support for customers within the United States and within Canada for the duration of the service period, and warranty confirmation service, during the warranty period on this product. U.S. and Canadian customers can contact D-Link technical support through our website, or by phone.
Technical Support You can find software updates and user documentation on the D-Link websites. If you require product support, we encourage you to browse our FAQ section on the Web Site before contacting the Support line. We have many FAQ’s which we hope will provide you a speedy resolution for your problem. For Customers within The United Kingdom & Ireland: D-Link UK & Ireland Technical Support over the Internet: http://www.dlink.co.uk ftp://ftp.dlink.co.
Technische Unterstützung Aktualisierte Versionen von Software und Benutzerhandbuch finden Sie auf der Website von D-Link. D-Link bietet kostenfreie technische Unterstützung für Kunden innerhalb Deutschlands, Österreichs, der Schweiz und Osteuropas. Unsere Kunden können technische Unterstützung über unsere Website, per E-Mail oder telefonisch anfordern. Web: http://www.dlink.de E-Mail: support@dlink.de Telefon: +49 (1805)2787 0,12€/Min aus dem Festnetz der Deutschen Telekom.
Assistance technique Vous trouverez la documentation et les logiciels les plus récents sur le site web D-Link. Vous pouvez contacter le service technique de D-Link par notre site internet ou par téléphone. Support technique destiné aux clients établis en France: Assistance technique D-Link par téléphone : 0820 0803 03 N° INDIGO - 0,12€ TTC/min* *Prix en France Métropolitaine au 3 mars 2005 Du lundi au samedi – de 9h00 à 19h00 Assistance technique D-Link sur internet : http://www.dlink.
Asistencia Técnica Puede encontrar las últimas versiones de software así como documentación técnica en el sitio web de D-Link. D-Link ofrece asistencia técnica gratuita para clientes residentes en España durante el periodo de garantía del producto. Asistencia Técnica de D-Link por teléfono: +34 902 30 45 45 Lunes a Viernes de 9:00 a 14:00 y de 15:00 a 18:00 Asistencia Técnica de D-Link a través de Internet: http://www.dlink.es/support/ e-mail: soporte@dlink.
Supporto tecnico Gli ultimi aggiornamenti e la documentazione sono disponibili sul sito D-Link. Supporto tecnico per i clienti residenti in Italia D-Link Mediterraneo S.r.L. Via N. Bonnet 6/B 20154 Milano Supporto Tecnico dal lunedì al venerdì dalle ore 9.00 alle ore 19.00 con orario continuato Telefono: 02-39607160 URL : http://www.dlink.it/supporto.html Email: tech@dlink.
Technical Support You can find software updates and user documentation on the D-Link website. D-Link provides free technical support for customers within Benelux for the duration of the warranty period on this product. Benelux customers can contact D-Link technical support through our website, or by phone. Tech Support for customers within the Netherlands: D-Link Technical Support over the Telephone: 0900 501 2007 Monday to Friday 9:00 am to 10:00 pm D-Link Technical Support over the Internet: www.dlink.
Pomoc techniczna Najnowsze wersje oprogramowania i dokumentacji użytkownika można znaleźć w serwisie internetowym firmy D-Link. D-Link zapewnia bezpłatną pomoc techniczną klientom w Polsce w okresie gwarancyjnym produktu. Klienci z Polski mogą się kontaktować z działem pomocy technicznej firmy D-Link za pośrednictwem Internetu lub telefonicznie. Telefoniczna pomoc techniczna firmy D-Link: (+48 12) 25-44-000 Pomoc techniczna firmy D-Link świadczona przez Internet: URL: http://www.dlink.
Technická podpora Aktualizované verze software a uživatelských příruček najdete na webové stránce firmy D-Link. D-Link poskytuje svým zákazníkům bezplatnou technickou podporu Zákazníci mohou kontaktovat oddělení technické podpory přes webové stránky, mailem nebo telefonicky Web: http://www.dlink.cz/suppport/ E-mail: support@dlink.cz Telefon: 224 247 503 Telefonická podpora je v provozu: PO- PÁ od 09.00 do 17.
Technikai Támogatás Meghajtó programokat és frissítéseket a D-Link Magyarország weblapjáról tölthet le. Telefonon technikai segítséget munkanapokon hétfőtől-csütörtökig 9.00 – 16.00 óráig és pénteken 9.00 – 14.00 óráig kérhet a (1) 461-3001 telefonszámon vagy a support@dlink.hu emailcímen. Magyarországi technikai támogatás : D-Link Magyarország 1074 Budapest, Alsóerdősor u. 6. – R70 Irodaház 1 em. Tel. : 06 1 461-3001 Fax : 06 1 461-3004 email : support@dlink.hu URL : http://www.dlink.
Teknisk Support Du kan finne programvare oppdateringer og bruker dokumentasjon på D-Links web sider. D-Link tilbyr sine kunder gratis teknisk support under produktets garantitid. Kunder kan kontakte D-Links teknisk support via våre hjemmesider, eller på tlf. Teknisk Support: D-Link Teknisk telefon Support: 800 10 610 (Hverdager 08:00-20:00) D-Link Teknisk Support over Internett: http://www.dlink.
Teknisk Support Du finder software opdateringer og brugerdokumentation på D-Link’s hjemmeside. D-Link tilbyder gratis teknisk support til kunder i Danmark i hele produktets garantiperiode. Danske kunder kan kontakte D-Link’s tekniske support via vores hjemmeside eller telefonisk. D-Link teknisk support over telefonen: D-Link teknisk support over telefonen: Tlf. 7026 9040 Åbningstider: kl. 08:00 – 20:00 D-Link teknisk support på Internettet: http://www.dlink.
Teknistä tukea asiakkaille Suomessa: D-Link tarjoaa teknistä tukea asiakkailleen. Tuotteen takuun voimassaoloajan. Tekninen tuki palvelee seuraavasti: Arkisin klo. 9 - 21 numerosta 0800-114 677 Internetin kautta Ajurit ja lisätietoja tuotteista. http://www.dlink.fi Sähköpostin kautta voit myös tehdä kyselyitä.
Teknisk Support På vår hemsida kan du hitta mer information om mjukvaru uppdateringar och annan användarinformation. D-Link tillhandahåller teknisk support till kunder i Sverige under hela garantitiden för denna produkt. Teknisk Support för kunder i Sverige: D-Link Teknisk Support via telefon: 0770-33 00 35 Vardagar 08.00-20.00 D-Link Teknisk Support via Internet: http://www.dlink.
Suporte Técnico Você pode encontrar atualizações de software e documentação de utilizador no site de D-Link Portugal http://www.dlink.pt. A D-Link fornece suporte técnico gratuito para clientes no Portugal durante o período de vigência de garantia deste produto. Suporte Técnico para clientes no Portugal: Assistência Técnica: Email: soporte@dlink.es http://www.dlink.pt/support/ ftp://ftp.dlink.
Τεχνική Υποστήριξη Μπορείτε να βρείτε software updates και πληροφορίες για τη χρήση των προϊόντων στις ιστοσελίδες της D-Link Η D-Link προσφέρει στους πελάτες της δωρεάν υποστήριξη στον Ελλαδικό χώρο Μπορείτε να επικοινωνείτε με το τμήμα τεχνικής υποστήριξης μέσω της ιστοσελίδας ή μέσω τηλεφώνου Για πελάτες εντός του Ελλαδικού χώρου: Τηλεφωνική υποστήριξη D-Link : Τηλ: 210 86 11 114 Φαξ: 210 86 53 172 (Δευτέρα-Παρασκευή 09:00-17:00) e-mail: support@dlink.
技术支持 办公地址:北京市朝阳区建国路71号惠通时代广场C1座 202室 邮编: 100025 技术支持中心电话:8008296688/ (028) 66052968 技术支持中心传真:(028) 85176948 维修中心地址:北京市朝阳区建国路71号惠通时代广场C1座 202室 邮编: 100025 维修中心电话:(010) 58635800 维修中心传真:(010) 58635799 网址:http://www.dlink.com.
International Offices U.S.A 17595 Mt. Herrmann Street Fountain Valley, CA. 92708 TEL: 1-800-326-1688 URL: www.dlink.com Canada 2180 Winston Park Drive Oakville, Ontario, L6H 5W1 Canada TEL: 1-905-8295033 FAX: 1-905-8295223 URL: www.dlink.ca European HQ & UK & I D-Link House, Abbey Road Park Royal, London NW10 7BX UK TEL: 44-20-8955-9000 FAX: 44-20-8955-9003 URL: www.dlink.co.uk URL: www.dlink.eu Germany Schwalbacher Strasse 74 D-65760 Eschborn Germany TEL: 49-6196-77990 FAX: 49-6196-7799300 URL: www.dlink.