Table of Contents Table of Contents Safety Information ....................................................... 4 Product Overview ........................................................ 7 Package Contents.................................................... 7 Minimum System Requirements.............................. 8 Introduction .............................................................. 9 Features................................................................. 10 Hardware Overview ..................
Table of Contents Windows Media Center Menu................................ 63 TV + Movies..................................................... 64 Music ............................................................... 65 Pictures + Videos ............................................. 66 Online Media.................................................... 66 Tasks > Settings............................................... 67 Settings Menu........................................................ 68 A/V Output .....
Table of Contents Safety Information For optimum performance, please read the following information carefully. Safety Precautions The lightning flash with arrowhead symbol, within an equilateral triangle, is intended to alert users to the presence of uninsulated “dangerous voltage” within the product’s enclosure that may be of sufficient magnitude to constitute a risk of electric shock to persons.
Table of Contents CAUTION! • DO NOT INSTALL OR PLACE THIS UNIT IN A BOOKCASE, BUILT-IN CABINET OR IN ANOTHER CONFINED SPACE. ENSURE THE UNIT IS WELL VENTILATED. TO PREVENT RISK OF ELECTRIC SHOCK OR FIRE HAZARD DUE TO OVERHEATING, ENSURE THAT CURTAINS AND ANY OTHER MATERIALS DO NOT OBSTRUCT THE VENTILATION VENTS. • DO NOT OBSTRUCT THE UNIT’S VENTILATION OPENINGS WITH NEWSPAPERS, TABLECLOTHS, CURTAINS, AND SIMILAR ITEMS. • DO NOT PLACE SOURCES OF NAKED FLAMES, SUCH AS LIGHTED CANDLES, ON THE UNIT.
Table of Contents Radio and TV Interference: This equipment has been tested and found to comply with the limits for a Class B digital device, pursuant to Part 15 of the FCC Rules. These limits are designed to provide reasonable protection against harmful interference in a residential installation. This equipment generates, uses and can radiate radio frequency energy and, if not installed and used in accordance with the instructions, may cause harmful interference to radio communications.
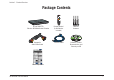
Section 1 - Product Overview Product PackageOverview Contents OK Channel Page Recorded TV Options Guide Live TV ABC DEF 1 2 3 GHI JKL MNO 4 5 6 PQRS TUV 7 8 WXYZ 9 0 CLEAR ENTER AUDIO REPEAT SHUFFLE TRACK SEARCH DSM-750 D-Link DSM-750 Wireless HD Media Center Extender Composite Audio/Video Cable Remote Control (2 AA Batteries Included) Wireless Antennas Ethernet Cable Software, Product Documentation, and Warranty on CD Quick Setup Guide D-Link DSM-750 User Manual 7
Section 1 - Product Overview Minimum System Requirements • Standard or HD Television with HDMI, Component Video, S-Video, or Composite Video Input • TV, Stereo, or A/V Receiver with Optical Digital, Coaxial Digital, or Composite Audio Input • Wired or Wireless Network (100Mbps Ethernet or Wireless Draft 802.
Section 1 - Product Overview Introduction D-Link® introduces the latest addition to its multimedia family of slave products: the D-Link DSM-750 Wireless High-Definition (HD) Media Center Extender. Using your home entertainment center from the comfort of the living room, the DSM-750 includes everything you need to instantly access and play music, videos, and photos.
Section 1 - Product Overview Features • Stream media content from a PC or D-Link Network Attached Storage to your entertainment center. • Stream live TV from a Vista® Home Premium/Ultimate PC that has a TV tuner. • Experience Windows Media Center on your TV from your Windows Vista Ultimate or Home Premium PC. • Access Windows Media Center’s Online Media, Video, Photo, Music, Internet TV, and more... • Supports WMV9 video files, as well as H.264, VC-1, MPEG 1/2/4, XVID, and AVI.
Section 1 - Product Overview Hardware Overview Front Panel USB Port Insert a USB thumb drive to view additional videos, music, and photos. Power Button Press the Power button on your remote control and the device’s power button will illuminate. You may also press the power button located here on the DSM-750 front panel.
Section 1 - Product Overview Back Panel Antennas Attach the three supplied antennas for wireless communication with your network. RJ-45 Ethernet Connector Connect the supplied Ethernet cable to the network cable connector, and attach the other end to a router or hub on your network. Optical Digital Audio HDMI* Coaxial Digital Audio Reset Using a small pointed object, depress the reset switch for 10 seconds to restore the DSM-750 to factory default settings.
Section 1 - Product Overview Using the Remote Control 1 (1) POWER 2 Turn the DSM-750 ON or OFF.
Section 1 - Product Overview (15) ENTER (16) CLEAR (17) SEARCH (18) REPEAT (19) AUDIO TRACK (20) SHUFFLE (21) Teletext Mode Selects currently highlighted selection. Same as OK button above. Clears any text that was entered by the On Screen Keyboard or number keys. (Works in MediaLounge mode only) Jumps to the Search page when in My Media to search for music, photos or videos. (Works in MediaLounge mode only) Repeats playback of a single selected music track or multiple music tracks.
Section 3 - Configuration Connecting the DSM-750 All audio, video, and networking connections are located on the rear panel of the DSM-750. Video Connections Select one of four ways to connect video to your DSM-750: • Composite Video Connector Plug the supplied yellow video cable into the VIDEO connector on the DSM-750 and the matching opposite end of the cable to your television input.
Section 3 - Configuration • Component Video Connectors Match the color coded cables to the matching COMPONENT connectors on the DSM-750 and the opposite end into the component video input of your television. This connection supports HD video resolution up to 1080i. Note: This cable is not supplied. • HDMI Plug the HDMI cable into the HDMI connector on the back panel of the DSM-750. Plug the opposite end to the matching HDMI connector on your television or audio/video system.
Section 3 - Configuration Audio Connections Select one of three ways to connect audio to your DSM-750: • Composite Audio Plug the supplied red and white connectors into the AUDIO (color-coded matching) connectors on the DSM-750. Plug the opposite ends to the matching connectors on your television or audio/video system. • Optical Digital Audio Connect an optical audio connector into the OPTICAL connector on the DSM-750 and the matching opposite end of the cable to the audio input of your audio system.
Section 3 - Configuration • Coaxial Digital Audio Connect a coaxial digital audio connector into the COAX connector on the DSM-750 and the matching opposite end of the cable to the audio input of your audio system. Note: This cable is not supplied.
Section 3 - Configuration Network Connections Select one of two ways to connect your DSM-750 to your network: • RJ-45 Ethernet Connector Connect the supplied Ethernet cable to the network cable connector, and attach the other end to a router or hub on your network. • Wireless Antennas Attach the supplied three antennas by threading them onto the “gold” antenna connectors located on the back of the DSM-750. Be sure the antennas are secure and in an upright position.
Section 3 - Configuration Setup If you have Windows Vista® Ultimate, Home Premium or later, and want to use your DSM-750 as a Media Center Extender, you will need to get the Media Center Extender Update for the Windows Vista PC by either: • Using Windows Update from your Windows Vista PC. or • Insert the setup CD into your PC’s CD-ROM drive and click on the Install Media Center Extender Update option on the setup CD.
Section 3 - Configuration Wired Setup Note: If you choose to connect to a wireless network, please skip to the Wireless Setup section on page 26. For the quickest and easiest installation, it is highly recommended that DHCP is enabled. Most networks have DHCP enabled to allow new devices on the network to connect automatically. Make sure the DSM-750 is properly connected to your router with the supplied Ethernet cable.
Section 3 - Configuration Media Center Extender Optional Set Up If you are NOT using your DSM-750 as a Media Center Extender, click Cancel. If you have Windows Vista® Home Premium or Ultimate, and you want to set up the Extender, skip to the following page. Setting up the DSM750 as a Media Center Extender allows a Windows Vista Home Premium or Ultimate based PC to share the Media Center experience on your TV.
Section 3 - Configuration If you ARE using your DSM-750 as a Media Center Extender, click Next. Click Next On the following screen, click Next again to continue. Note: You can also setup your DSM-750 as a Media Center Extender at a later time. Note: If DHCP is enabled, please skip to the “8-Digit Setup Key” section on page 37. If DHCP is NOT enabled, please continue to the “Configure Your Network Settings Manually” section on the following page.
Section 3 - Configuration Configure Your Network Settings Manually Use your remote control number keypad, or select the numbers from the on screen number pad, to enter your wired network’s IP address. Once you have entered your IP address, use your remote control to navigate to the Next option and press OK. Click Next Use your remote control number keypad, or select the numbers from the on screen number pad, to enter your wired network’s Subnet mask.
Section 3 - Configuration Use your remote control number keypad, or select the numbers from the on screen number pad, to enter your wired network’s Internet gateway. Once you have entered your Internet gateway, use your remote control to navigate to the Next option and press OK. Click Next Use your remote control number keypad, or select the numbers from the on screen number pad, to enter your wired network’s DNS server.
Section 3 - Configuration Wireless Setup Make sure the supplied three antennas are properly attached onto the “gold” antenna connectors located on the back of the DSM-750, and that the antennas are secure and in an upright position. For the quickest and easiest installation, it is highly recommended that DHCP and SSID broadcast are enabled. Most networks have DHCP and SSID broadcast enabled to allow new devices to find the wireless network and connect automatically.
Section 3 - Configuration Media Center Extender Optional Set Up If you are NOT using your DSM-750 as a Media Center Extender, click Cancel. If you have Windows Vista® Home Premium or Ultimate, and you want to set up the Extender, skip to the following page. Setting up the DSM750 as a Media Center Extender allows a Windows Vista Home Premium or Ultimate based PC to share the Media Center experience on your TV.
Section 3 - Configuration If you ARE using your DSM-750 as a Media Center Extender, click Next. Click Next On the following screen, click Next again to continue. Note: You can also setup your DSM-750 as a Media Center Extender at a later time. Note: If DHCP is NOT enabled, you will have to enter your network settings manually to complete the Setup Wizard. DHCP (Dynamic Host Configuration Protocol) allows network settings required by the DSM-750 to be set automatically.
Section 3 - Configuration Setup Wizard Follow the on screen instructions to continue with the wireless network setup. Click Next to begin the Wireless Setup Wizard. Click Next Please wait while the DSM-750 searches for available wireless networks. Note: If your router’s SSID broadcast is turned off, please use your remote control to select Manual Setup. If you clicked Manual Setup, please continue to the following page. If you did not click Manual Setup, please skip to page 31.
Section 3 - Configuration Manual Setup Note: This page can be skipped by most users if SSID broadcast is enabled. By using the remote control’s alphanumeric keypad, or the On Screen Keyboard, you may enter your wireless network’s name. When you have completed entering the network name, use the down arrow to select Next.
Section 3 - Configuration Select your wireless network from the list of networks that appear. Note: If you do not see your wireless network, refer to the “Wireless Installation Considerations and Troubleshooting” section starting on page 95 for information as to why this may have happened. Encryption If your wireless home network is using wireless encryption, you will need to provide the DSM-750 with the network security passphrase.
Section 3 - Configuration When you have completed entering the network security passphrase, use the down arrow to select Next. Note: This passphrase must exactly match the network security passphrase, consult your network administrator for more information. Click Next If DHCP is enabled on your network, select Auto (Recommended). If DHCP is not enabled on your network, select Advanced Setup to enter the wireless network settings manually.
Section 3 - Configuration Configure Your Network Settings Manually Note: Skip this section if DHCP is enabled on your network. Use your remote control number keypad, or select the numbers from the on screen number pad, to enter your wireless network’s IP address. Once you have entered your IP address, use your remote control to navigate to the Next option and press Enter.
Section 3 - Configuration Use your remote control number keypad, or select the numbers from the on screen number pad, to enter your wireless network’s Internet gateway. Once you have entered your Internet gateway, use your remote control to navigate to the Next option and press Enter. Click Next Use your remote control number keypad, or select the numbers from the on screen number pad, to enter your wireless network’s DNS server.
Section 3 - Configuration Completing the Setup Wizard Connecting to the wireless network may take up to a minute. The “You have successfully set up your device on your home network” message should appear. If you chose NOT to setup the DSM-750 as a Windows Media Center Extender, click Finish. Your wireless setup is complete and the DSM-750 MediaLounge™ home screen will appear. Please skip to page 38.
Section 3 - Configuration If you ARE using the DSM-750 as a Media Center Extender, click Next to continue. Click Next On the Extender Setup screen, click Next again.
Section 3 - Configuration 8-Digit Setup Key An 8-digit Setup Key will appear on the TV. Please write down or remember this 8-digit Setup Key and then go to your PC to finish the setup. Complete Extender Setup While at your PC, click Start and select Windows Media Center. Select Tasks by scrolling down the menu. Once you are in Tasks, scroll right and click on Add Extender. Follow the on screen instructions to enter the 8-digit Setup Key and to configure Windows® Media Center for your DSM-750.
Section 3 - Configuration Windows® Media Player 11 Setup To get the most out of the DSM-750 Media Center Extender, and to enjoy the Windows Media Center experience on your TV by using the DSM-750, a PC with Windows Vista Home Premium or Ultimate is required. If you are not yet ready to experience Windows Media Center from your DSM-750, you can still view photos or videos, or listen to music, from a Windows Vista Basic or Windows XP computer.
Section 3 - Configuration In order to share media to your DSM-750 using Windows® Media Player 11, you must first allow your media player access in the software. Click the down arrow under Library and select Media Sharing. Click the Share my media to: check box. Select your D-Link DSM-750 media player from the Media Sharing box and then click the Allow button.
Section 3 - Configuration Your device will now have a green check mark. Click Apply and then click OK. Now you need to add the folders containing media you want shared with your DSM-750. Click on Library and then click on Add to Library.
Section 3 - Configuration Click the Advanced Options button in the bottom left-hand corner. Click Add and choose the folders with media you wish to be shared. If you have folders in other areas of your hard drive or on other drives in your PC or network, you will need to select the Add button and select each folder manually. Once you have added the folder(s) you want to share click OK. Windows® Media Player 11 will now search for supported media files in the folders you selected to share.
Section 3 - Configuration Click Close and you are ready to use Windows® Media Player 11 as your server. You can now return to your TV and select the Windows Media Server from My Media on the DSM-750 Home Page.
Section 3 - Configuration Once you have confirmed that your Windows® Media Player sharing has been enabled and is showing on your D-Link DSM-750 you can select your Music, Photos or Videos after selecting the Windows Media Player 11 media server.
Section 3 - Configuration If you are using Windows Vista® and Media Sharing is disabled, follow these steps to enable media sharing: Open Windows Media Player 11. Click the down arrow under Library and select Media Sharing. Click the Networking button.
Section 3 - Configuration Click the Customize button. Select Private under Location Type. Click the Next button.
Section 3 - Configuration Click the Close button. Media sharing should now be accessible from your Windows Vista® PC.
Section 3 - Configuration Using Your DSM-750 MediaLounge™ Home Page The MediaLounge Home Page will appear after you have successfully configured your DSM-750 with your network. The following options are available: • My Media • USB Direct • Windows Media Center (Operational only if the DSM-750 is setup as an Extender) • Settings My Media The folder names and their order that are displayed in the My Media menu are dependant on the media server you are connected to.
Section 3 - Configuration Video The following video file formats are supported: • MPEG-1 • MPEG-2 • MPEG-4 (ASP - Advanced Simple Profile) • AVI (MPEG4 layer only, does not support uncompressed AVI, Resolution up to 1080i) • XVID (with MP3 and PCM) • WMV9 (Resolution up to 1080i) • DVR-MS (Record TV from Windows Media Center) • H.
Section 3 - Configuration Viewing a Video Once you enter the Video menu, you will see a list of video folders and/or video files. Use the Navigation Arrows on your DSM-750 remote control to navigate to the video file you wish to view. Once you have made your choice, highlight the video and press OK, or press Play to view the video. If your video is located within a folder, highlight the folder and press OK. Then highlight the video and press OK again, or press Play to view the video. Play - To play video.
Section 3 - Configuration Subtitles Your media player supports the display of the SRT subtitle file format. To use it, make sure that it is in the same folder as your movie file and that they are both named exactly the same. Simply start the video file and the subtitles will show at the bottom of the screen. Note: Tools to generate SRT files can be found online.
Section 3 - Configuration Music Your music listening experience on the media player depends upon the quality of your digital music files on your PC. Avoid quality settings below 48kbps as they are unsupported. For CD quality music, rip your MP3s at 128kbps or higher, with a sample rate of 44.1kHz. The following music file formats are supported: • MP3 (up to 320 kbps) MPEG-1, Layer 3 Audio file -The standard Internet music file format. This is the most commonly used audio format.
Section 3 - Configuration Organizing Music Files Music files are located on your PC, or on a compatible Network Attached Storage (NAS) drive. They can be contained in one directory folder, or organized in several subfolders. The DSM-750 displays your music files by genres, artists, albums, and tracks. This information is obtained from the ID3 tags in each of your music files. The ID3 tag is created for you when you rip (copy) your music from your CD.
Section 3 - Configuration Listening to Music Once you enter the Music menu, you will see a list of your music folders. Use the Navigation Arrows on your DSM-750 remote control to navigate to the music file you wish to listen to. Once you have made your choice, highlight the music file and press OK, or press Play. The DSM-750 music player will appear and your song selection will begin. Note: The album art will only display if the song you downloaded or ripped from your CD is from an actual album.
Section 3 - Configuration Browsing for Music There are many ways to browse for a music track. For example, let’s use the following music file located in the default music folder. (...\Beethoven\Ode to joy.mp3) Ode to joy.mp3 Artist: Ludwig van Beethoven Album: Beethoven Genre: Classical To browse for this track in the track list: 1. Select All Tracks 2. Highlight Ode to joy To browse by folder: 1. Select Folders 2. Select My Music 3. Select Beethoven 4. Select Ode to joy To browse by artist: 1.
Section 3 - Configuration Photo The following photo file formats are supported: • BMP (non-compressed) Windows bitmap file. Widely used in Microsoft Windows for pictures and backgrounds. • JPEG (grayscale, RGB, YCbCy) (Does not support CMYK, YCCK.) The JPEG format is the Internet and digital photo format standard used by most digital cameras. • GIF (Animated GIF’s are not supported) Older format still widely available on the internet for photos, web pages, and clip art.
Section 3 - Configuration Organizing Photo Albums Unlike music files, photos contain little information about their content. Therefore, photos are organized by their filename and by the folder they are in. Many digital cameras will organize your photos into folders when you connect and unload them to your PC. Each time you dock or connect, a new folder is created using the current date and time, and all photos are copied into that folder.
Section 3 - Configuration Viewing a Photo Once you enter the Photo menu, you will see a list of folders and pictures. Use the Navigation Arrows on your DSM-750 remote control to navigate to the photo file you wish to view. Once you have made your choice, highlight the photo file and press OK. When viewing a photo you can change the on-screen appearance by applying rotate, pan, and zoom effects. These on-screen effects are only for enhancing the on-screen view and are not saved to the actual file.
Section 3 - Configuration Viewing a Slideshow Once you enter the Photo menu, you will see a list of folders and pictures. To start playing a photo slideshow, highlight a folder and press the Play button. The first photo will be displayed and then followed by the next photo in the folder. All photos in the folder will be displayed. Please continue to the Slideshow section on page 83 to setup your slideshow settings.
Section 3 - Configuration Search Click the SEARCH button on the DSM-750 remote control and the following screen will appear. This screen allows you to search for music tracks, videos, and/or photos. The search function only works in MediaLounge™ mode, and you must be in the My Media section before conducting a search. Select between All, Photo, Video, or Music. After making a selection, click OK on your DSM-750 remote control. Note: The search function only works for MediaLounge™ mode.
Section 3 - Configuration The next screen that follows will have an On Screen Keyboard with a search box. You MUST use the On Screen Keyboard to enter alphanumeric characters in the search box. Click Search to begin your search. If you want to remove the last character entered, use the DSM-750 remote control’s Navigation Arrows to toggle down and select the Delete option. While Delete is highlighted, click OK on the remote control to actually delete the last character.
Section 3 - Configuration USB Direct Menu Insert your USB thumb drive into the USB port on the front panel of the DSM-750. The DSM-750 will automatically detect if there is a USB drive, and the USB Direct option will be available to you on the MediaLounge™ menu. The DSM-750 currently supports NTFS, FAT, and FAT32 formats. You can play music from your USB drive, and view photos from a listed server by accessing My Media.
Section 3 - Configuration Supported Formats The following file formats are supported using USB Direct: MUSIC VIDEO PHOTO • MPEG-1 • H.264 (.avi) • JPEG (.jpg & .jpeg) • MPEG-2 • WMV9 (up to 720p) • GIF • MP3 • VC-1 • PNG • OGG • MPEG-1 • TIF (.tif & .tiff) • WAV • MPEG-2 TS (up to 8Mbps) • WMA • MPEG-2 PS (up to 8Mbps) • AIF (.aif only) • M2V • AC3 • MPEG-4 (.mp4) • LPCM (.lpcm only) • XVID • M4V Note: You are able to play music while viewing a slideshow.