
Data Sheet


ROBOT.HEADtoTOE
ProductUser’sManual–ESPWiFiShieldRev2.0
6.0HARDWAREINSTALLATION
This section will show example installation of ESPWiFi Shield with Arduino Uno as a main
controller. Besides Arduino Uno, other Arduino main boards such as Arduino Duemilanove,
CTUNO,ArduinoMega2560andCIKUarealsocompatiblewiththisshield.
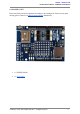
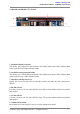
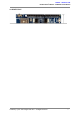
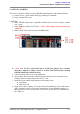
6.1ArduinoUno
Arduino is an opensource physical computing platform based on a simple I/O board and a
development environment that implements the Processing/Wiring language. ESPWiFi Shield
can be used together with Arduino Uno. Figure below shows example hardware connection
between Arduino Uno and ESPWiFi Shield; it is simply stacking up the shield onto the
Arduinomainboard.
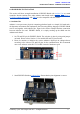
1. Set TX and RX pin for ESPWiFi Shield. The selection is done by using mini jumper
onboard.PleaserefertoSection5.1forsuitableRXandTXpinselection.
2. Please be cautious to initialize the correct Arduino’s digital pin in coding/software
according to the selected TX and RX pins for the communication. We recommend
usertousesoftwareserial(D3TX,D2RX)insteadofhardwareserial.
3. StackESPWiFiShieldonArduinoUno.Ensurethatthepinsalignmentiscorrect.
CreatedbyCytronTechnologiesSdn.Bhd.–AllRightReserved 9