
Data Sheet


ROBOT.HEADtoTOE
ProductUser’sManual–ESPWiFiShieldRev2.0
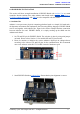
5. ConnectArduinoboardtoPCusingUSBcable.
6. OpenArduinoIDE.DeterminewhichCOMportArduinoUnoisconnectedtoand
configuretheportsettingsundermenuTools>Port.
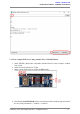
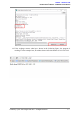
7. Go to File > Examples > CytronWiFiShield and open example sketch
CytronWiFiDemo.
8. Changessidfrom“...”toyournetworknameand“pass”tocorrespondingpassword.
Forexample,yournetworkrouterSSIDisWiFlyandpasswordisabcd.
constchar*ssid="WiFly";
constchar*pass="abcd";
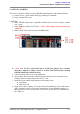
9. Check the line wifi.begin(2, 3). 1st argument for this function refers to RX of Arduino
and 2nd refers to TX. If D2 is selected for RX and D3 for TX on ESPWiFi Shield, the
configurationiscorrect.
10. UploadtheprogramtoArduinoboard.
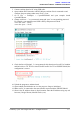
11. OpenArduinoSerialMonitortoviewtheprogress.Setupto9600baud.
12. MakesurePCisconnectedtothesameinternetnetworkwiththeESPWiFiShield.
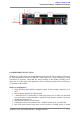
13. Observe the IP Address shown in Serial monitor. Enter the IP Address using any web
browsers(GoogleChrome,MozillaFirefox,etc.)
CreatedbyCytronTechnologiesSdn.Bhd.–AllRightReserved 12