
Data Sheet


ROBOT.HEADtoTOE
ProductUser’sManual–ESPWiFiShieldRev2.0
7.0GETTINGSTARTED
ThissectionwillshowexamplesofusingESPWiFiShieldtogetherwithArduinoBoardto
1) performATtestbasicmoduletestingbysendingATcommands
2) createasimpleWiFiserver
7.1ATTest
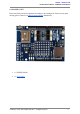
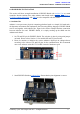
1. Stack ESPWiFi Shield onto compatible Arduino Board. For this example, Arduino
Unoisused.
2. Select USB for both RX and TX pins. **Note: This setting is only for entering AT
command.
3. MakesuretheslideswitchisswitchedtoRUNmode.
4. **Note: For AT Test, connect RST pin to GND using jumper wire. (Another
alternative, upload an empty sketch to Arduino main board before stacking
ESPWiFiShieldontoArduinoboard.)
5. ConnectArduinoboardtoPCusingUSBcable.
6. OpenArduinoIDE.DeterminewhichCOMportArduinoUnoisconnectedtoand
configuretheportsettingsundermenuTools>Port.
7. OpenandsetupArduinoSerialMonitorwithsettingsbelow.
● 9600Baud
● BothNL&CR
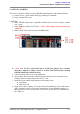
8. Figurebelowshowssending“AT”usingArduinoSerialMonitor.Iftheresultreturns
“OK”,itmeansyouhavesuccessfullycommunicatewiththeESP8266moduleon
ESPWiFiShield,ATtestissuccessful.UsercanalsotryoutotherATcommandslike
AT+GMR,etc.
CreatedbyCytronTechnologiesSdn.Bhd.–AllRightReserved 10