ROBOT . HEAD to TOE Product User’s Manual – ESPWiFi Shield Rev2.0 ESPWiFi Shield SHIELDESPWIFI Rev2.0 User's Manual V2.0 April 2016 Created by Cytron Technologies Sdn. Bhd.
ROBOT . HEAD to TOE Product User’s Manual – ESPWiFi Shield Rev2.0 Index 1. Introduction 3 2. Packing List 4 3. Board or Product Layout 5 4. Dimension 7 5. UART/Serial Communication 8 6. Hardware Installation 9 7. Getting Started 10 8. Firmware Installation 14 9. Warranty 14 Created by Cytron Technologies Sdn. Bhd.
ROBOT . HEAD to TOE Product User’s Manual – ESPWiFi Shield Rev2.0 1.0 INTRODUCTION ESPWiFi Shield Rev2.0 is an Arduino shield which integrates famous ESPWROOM02 WiFi module and provides low cost WiFi solution with any Arduino projects. It is compatible with Arduino Uno, Arduino Duemilanove, Arduino Mega2560, Arduino Leonardo and possibly other pin compatible main boards. ESP8266 WiFi shield provides easy and stable UART interface for users to communicate with onboard WiFi module using Arduino boards.
ROBOT . HEAD to TOE Product User’s Manual – ESPWiFi Shield Rev2.0 2.0 PACKING LIST Please check the parts and components according to the packing lists. If there are any parts missing, please contact us at sales@cytron.com.my immediately. 1. 1 x ESPWiFi Shield 2. 2 x mini jumper Created by Cytron Technologies Sdn. Bhd.
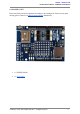
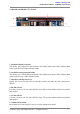
ROBOT . HEAD to TOE Product User’s Manual – ESPWiFi Shield Rev2.0 3.0 BOARD OR PRODUCT LAYOUT 1. Stackable Digital I/O header This header pin is Digital I/O pin stacked to the Arduino main board. Other Arduino shield can be stacked on top of this stackable header. 2. Stackable Analog Input pin header This header pin is Analog Input pin stacked to the Arduino main board. Other Arduino shield can be stacked on top of this stackable header. 3.
ROBOT . HEAD to TOE Product User’s Manual – ESPWiFi Shield Rev2.0 7. ESP Reset button Reset button is for convenience of user to reset the onboard ESP8266 module. 8. Flash/Run slide switch Slide switch is for convenience of user to select which mode ESP8266 module will enter once powered up. Flash mode the mode which ESP8266 module wait for firmware installation/update Run mode the mode which ESP8266 module run the installed firmware 9.
ROBOT . HEAD to TOE Product User’s Manual – ESPWiFi Shield Rev2.0 4.0 DIMENSION Created by Cytron Technologies Sdn. Bhd.
ROBOT . HEAD to TOE Product User’s Manual – ESPWiFi Shield Rev2.0 5.0 UART/SERIAL COMMUNICATION AT firmware of the ESP8266 WiFi module on ESPWiFi shield allows users to communicate with the module using UART communication. Default settings are 9600 kbps baudrate, 8 bit data, 1 stop bit and no parity. 5.1 Guideline for setting up TX and RX pin with Arduino Boards The following table shows suitable RX and TX pins to be chosen for compatible Arduino boards.
ROBOT . HEAD to TOE Product User’s Manual – ESPWiFi Shield Rev2.0 6.0 HARDWARE INSTALLATION This section will show example installation of ESPWiFi Shield with Arduino Uno as a main controller. Besides Arduino Uno, other Arduino main boards such as Arduino Duemilanove, CTUNO, Arduino Mega2560 and CIKU are also compatible with this shield. 6.
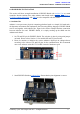
ROBOT . HEAD to TOE Product User’s Manual – ESPWiFi Shield Rev2.0 7.0 GETTING STARTED This section will show examples of using ESPWiFi Shield together with Arduino Board to 1) perform AT test basic module testing by sending AT commands 2) create a simple WiFi server 7.1 AT Test 1. Stack ESPWiFi Shield onto compatible Arduino Board. For this example, Arduino Uno is used. 2. Select USB for both RX and TX pins. **Note: This setting is only for entering AT command. 3.
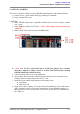
ROBOT . HEAD to TOE Product User’s Manual – ESPWiFi Shield Rev2.0 7.2 Create a simple WiFi server using Arduino Uno + ESPWiFi Shield 1. Stack ESPWiFi Shield onto compatible Arduino Board. For this example, Arduino Uno is used. 2. Select D2 for RX and D3 for TX pin. 3. Make sure the slide switch is switched to RUN mode. 4. Download CytronWiFiShield library from link provided at product page and extract the files to My Documents > Arduino > Libraries. Created by Cytron Technologies Sdn. Bhd.
ROBOT . HEAD to TOE Product User’s Manual – ESPWiFi Shield Rev2.0 5. Connect Arduino board to PC using USB cable. 6. Open Arduino IDE. Determine which COM port Arduino Uno is connected to and configure the port settings under menu Tools > Port. 7. Go to File > Examples > CytronWiFiShield and open example sketch CytronWiFiDemo. 8. Change ssid from “...” to your network name and “pass” to corresponding password. For example, your network router SSID is WiFly and password is abcd.
ROBOT . HEAD to TOE Product User’s Manual – ESPWiFi Shield Rev2.0 14. If the webpage returns what have shown in the following figure, the program is working. For the example here, IP address shown in Serial monitor is 192.168.1.242. Created by Cytron Technologies Sdn. Bhd.
ROBOT . HEAD to TOE Product User’s Manual – ESPWiFi Shield Rev2.0 8.0 FIRMWARE INSTALLATION ESP8266 3V3 GPIO Input and Output function has deprecated with preloaded AT firmware on ESPWROOM02 module on ESPWiFi Shield. However, Cytron Technologies offers customised AT firmware which adds the stated capibility to the module, allowing user to utilise the 3V3 GPIO fully in the applications. User can follow the guide below to install new AT firmware to the module. Hardware configuration 1.
ROBOT . HEAD to TOE Product User’s Manual – ESPWiFi Shield Rev2.0 FLASH mode of ESPWROOM02 module. Install AT Firmware ● Windows (for Windows user only) 1. Download latest ESPWIFI_Shield_Firmware from link provided at product page. Extract it. Enter the folder, go to install_firmware > windows. 2. Open ESP_DOWNLOAD_TOOL_V2.4.exe. 3. Choose the COM port Arduino Uno + ESPWiFi shield connecting to. 4. Make sure ESPWROOM02 module is in FLASH mode (step 4 and 6 in Hardware Configuration) 5.
ROBOT . HEAD to TOE Product User’s Manual – ESPWiFi Shield Rev2.0 9.0 WARRANTY Product warranty is valid for 6 months. ● Warranty only applies to manufacturing defect. ● Damaged caused by misuse is not covered under warranty ● Warranty does not cover freight cost for both ways. ● Prepared by Cytron Technologies Sdn. Bhd. No. 16, Jalan Industri Ringan Permatang Tinggi 2, Kawasan Industri Ringan Permatang Tinggi, 14100 Simpang Ampat, Penang, Malaysia.
ROBOT . HEAD to TOE Product User’s Manual – ESPWiFi Shield Rev2.0 URL: www.cytron.com.my Email: support@cytron.com.my sales@cytron.com.my Created by Cytron Technologies Sdn. Bhd.