ROBOT . HEAD to TOE Product User’s Manual – SHIELDMD10 SHIELDMD10 Cytron 10A Motor Driver Shield User's Manual V1.0 JUNE 2015 Created by Cytron Technologies Sdn. Bhd.
ROBOT . HEAD to TOE Product User’s Manual – SHIELDMD10 Index 1. Introduction 3 2. Packing List 4 3. Product Specification and Limitations 5 4. Board Layout 6 5. Dimension 8 6. Hardware Installation 9 7. Warranty 11 Created by Cytron Technologies Sdn. Bhd.
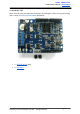
ROBOT . HEAD to TOE Product User’s Manual – SHIELDMD10 1.0 INTRODUCTION SHIELDMD10 is an Arduino shield for controlling high current brushed DC motor up to 10A continuously. It is compatible with Arduino UNO , Arduino Duemilanove , Arduino Mega , Arduino Leonardo and possibly other pin compatible main boards. SHIELDMD10 uses full solid state components which results in faster response time and eliminates the wear and tear of the mechanical relay.
ROBOT . HEAD to TOE Product User’s Manual – SHIELDMD10 Created by Cytron Technologies Sdn. Bhd.
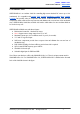
ROBOT . HEAD to TOE Product User’s Manual – SHIELDMD10 2.0 PACKING LIST Please check the parts and components according to the packing lists. If there are any parts missing, please contact us at s ales@cytron.com.my immediately. 1. 1 x SHIELDMD10 shield 2. 2 x mini jumper Created by Cytron Technologies Sdn. Bhd.
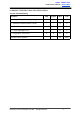
ROBOT . HEAD to TOE Product User’s Manual – SHIELDMD10 3.0 PRODUCT SPECIFICATION AND LIMITATIONS Absolute Maximum Rating Parameter Min Typical Max Unit Power Input Voltage (Motor supply voltage) 7 25 V I MAX (Maximum Continuous Motor Current) 10 A I P EAK (Peak Motor Current)* 15 A V I OH (Logic InputHigh Level) 3 5.5 V V I OL(Logic Input Low Level) 0 0 0.
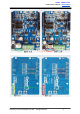
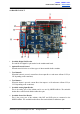
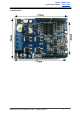
ROBOT . HEAD to TOE Product User’s Manual – SHIELDMD10 4.0 BOARD LAYOUT 1. Stackable Digital I/O Headers JP4 and JP6 are Digital I/O pins stacked to the Arduino main board. 2. Optional External Control External control is for the use of other types of microcontroller besides Arduino. 3. Test Button B When this button is pressed, current flows from output B to A and motor will turn CCW (or CW depending on the connection). 4.
ROBOT . HEAD to TOE Product User’s Manual – SHIELDMD10 7. Reset Button Reset button is for the convenience of user to reset the Arduino main board. 8. Red LED B Turns ON when the output A is low and output B is high. Indicates the current flows from output B to A. 9. Red LED A. Turns ON when the output B is low and output A is high. Indicates the current flows from output A to B. 10. Green Power LED Turn on when the SHIELDMD10 is powered up. 11. Terminal Block Connect to motor and power source.
ROBOT . HEAD to TOE Product User’s Manual – SHIELDMD10 5.0 DIMENSION Created by Cytron Technologies Sdn. Bhd.
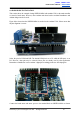
ROBOT . HEAD to TOE Product User’s Manual – SHIELDMD10 6.0 HARDWARE INSTALLATION This section shows the example of using SHIELDMD10 with Arduino UNO as the main controller to control a brush motor. However, other Arduino main board such as Arduino Duemilanove and Arduino Mega can also be used. Figure below shows that the SHIELDMD10 is stacked on the Arduino UNO. Please ensure that the pins alignment is correct. Select the pins for PWM and DIR.
ROBOT . HEAD to TOE Product User’s Manual – SHIELDMD10 Don’t forget about the power source for the Arduino main board too. Power up the Arduino main board and load the sketch/program first before powering up the SHIELDMD10 motor driver shield. Example source code can be downloaded from the SHIELDMD10 product page at Cytron website. Created by Cytron Technologies Sdn. Bhd.
ROBOT . HEAD to TOE Product User’s Manual – SHIELDMD10 7.0 WARRANTY Product warranty is valid for 12 months. ● Warranty only applies to manufacturing defect. ● Damaged caused by misuse is not covered under warranty ● Warranty does not cover freight cost for both ways. ● Created by Cytron Technologies Sdn. Bhd.