Smart Bike Trainer User Manual
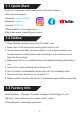
1.1 Quick Sta Find us on Instagram and Facebook for instruction videos, FAQ and more suppo . Instagram: cycplus_o cial Facebook: cycplus Youtube: CYCPLUS O cial website: www.cycplus.com After-sales email: steven@cycplus.com 1.2 Notice 1. Keep children and pets away from T2 while in use. 2. Keep clear of the motor and moving pa s while in use. 3. The enclosure will heat up when subject to prolonged, extreme use. Always keep the cooling holes clear and plug it in for extreme use to keep the fan working. 4.
1.
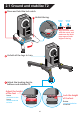
2.1 Ground and stabilize T2 1 Press and hold the lock catch. 2 Unfold the leg. Press to unlock Release to lock Align the lock catch with the notch, and make sure the latch pops up and locks angle of the leg. 3 Unfold all the legs in turn. 4 Adjust the leveling feet to balance and stabilize T2.
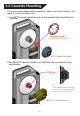
2.2 Cassette Mounting T2 comes preinstalled with a cassette. Read instruction below if you need to mount another one. 1. For 8/9/10 speed cassettes, put on the spacer before installing the cassette. Cassette spacer With notch outward 8/9/10 speed cassette 2.For SRAM 12 speed cassettes, an XDR hub will be needed to buy additionally. XDR hub Tip Use cassette removal tools to secure the cassette after pushing it into the hub.
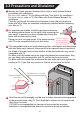
2.3 Precautions and Disclaimer 1 Identify the frame type and standard (thru-axle or quick release) before proceeding with installation. For thru-axle, refer to "2.4 For Bikes with Rear Thru-Axles" for installation. For quick release, refer to "2.5 For Bikes with Quick Release Skewers" for installation. Carefully go through the manual and compare it with the actual pa s to make sure all of them are complete and properly installed before mounting your bike to T2.
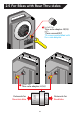
2.5 For Bikes with Rear Thru-Axles 1 Install the Thru-axle adapter-R(03) with 17mm wrench(07) T2 comes preinstalled with thru-axle adapter.
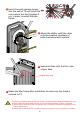
3 Inse the quick release skewer into the axle of T2 and install the nut in place, but don't tighten it yet, in order to install the bike frame. 4 Adjust the shifter untill the chain is on the smallest sprockets of both chainwheel and cassette. 5 Secure the bike with the thru-axle of your bike. Original thru-axle 6 Shake the bike frame after installation to make sure the frame is secured to T2. ① Failure to properly secure the bike can result in serious prope y damage and personal inju .
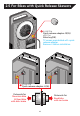
2.5 For Bikes with Quick Release Skewers 1 Install the Quick release adapter-R(05) with the Allen key(08). T2 comes preinstalled with quick release adapter. Remove it before installation.
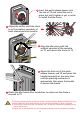
3 Inse the quick release skewer into the axle of T2 and install the nut in place, but don't tighten it yet, in order to install the bike frame. 4 Adjust the shifter untill the chain is on the smallest sprockets of both chainwheel and cassette. 5 Align the bike chain with the smallest sprocket of the cassette on T2, and mount the frame to T2.
2.6 Power Connection Please use the AC adapter only that comes with T2 to power the device. The AC cable can be replaced as you like. AC cable AC adapter 3 Working Status 1. Working modes T2 has 2 working modes, unplugged mode and plug-in mode. Plug-in mode can provide a better riding experience. The main functional di erences between the two modes are as follows. Unplugged mode Plug-in mode Signal connection When you sta riding, you need to pedal to generate power for wireless connection.
4 Application 1. Please download "CYCPLUS" App in App Store or Google Play. CYCPLUS APP App Store Google Play 2. T2 is a true direct-drive trainer and requires no calibration. 3. T2 suppo s both Bluetooth and ANT+ wireless connection protocols when using indoor cycling Apps. We recommend using Bluetooth connection in preference, for more stable signal. For ANT+ connection, place the ANT receiver as close as possible to the indicator spot on of T2.
5 Spacers(for possible noise and friction) 5.1 Cassette adjustment spacer(for loud chain noise) If the chain noise becomes too loud while training, it may be because the distance between the T2 cassette and the rear fork (A) and the distance between your original cassette and the rear fork (B) are di erent, and the bike chain and cassette do not t well. 1. AB Contact us directly for more help. 5.
5 Speci cations Model CYCPLUS T2 Type Intelligent Direct - Drive Trainer Magnet 50 neodymium magnets + 45 sets of electromagnets Structure Foldable X-shape Dimension(unfolded) 520*699*510 mm Dimension(folded) 300*257*510 mm 33.5lbs(15.2kg) Net Weight(with cassette) Power supply 48V/1.25A(Unplugged mode suppo ed) Max power 2200 W 1600 W Output power(40km/h) Accuracy ±1% Calibration No calibration needed Max gradient 15% Downhill simulation Plug-in mode only Max torque 60 N.
FCC Statement This device complies with part 15 of the FCC Rules. Operation is subject to the following two conditions:(1) This device may not cause harmful interference, and (2) this device must accept any interference received, including interference that may cause undesired operation. Any Changes or modifications not expressly approved by the party responsible for compliance could void the user's authority to operate the equipment.