Indoor Cycle Assembly Service Manual Pro Series: 400 Pro 300 Pro 200 Pro 100 Pro Chapters: 1. Unpacking the CycleOps Indoor Cycle.......1 2. Bike Assembly.............................................................1 Attach Stabilizer Feet Attach Handlebars Seat Assembly Attach Pedals Attach Console Bracket and Console Leveling the Bike 3. GENERAL USE...............................................................5 4. COMMON ADJUSTMENTS........................................
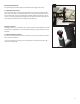
CHAPTER 1:Unpacking the CycleOps Indoor Cycle Place the box upright and cut the plastic binding straps. Lift the top of the box to expose the Indoor Cycle and packaging.
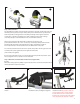
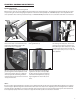
Step 2: Attach Handlebars Insert the Handlebar post into the head tube and secure it using the L-handle. Slide the plastic shim onto the D-shaped tube on the water bottle holder. Secure the water bottle holder and spacer to handlebar assembly using 2- 4mm allen bolts arefully slide the handlebar onto the C handlebar post. Slide the water bottle holder and plastic spacer onto the handlebar assembly. Once the handlebar is in place, secure it with the L-shaped tension handle. Step 3: Seat Assembly A.
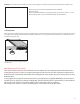
B Step 4: Attach Pedals The CycleOps IC includes a standard pedal set; however, to mimic the fit and feel of your own bike you may also attach your own pedals per the manufacturers’ specifications. Note that pedals are designed to be installed specifically on the right or left-hand side of the IC. Improper installation can result in damage to the crank. Damage caused by improper crank installation is not covered under warranty. Attach your pedals onto the bike with a pedal wrench.
Batteries: The console ships with batteries. In the event the batteries need to be replaced over time, follow these simple steps: Remove the back cover with a small Phillips-head screwdriver. Remove batteries. Replace with fresh AAA batteries, paying attention to properly line up the +/- poles. Replace battery door and secure with small Phillips-head screwdriver. Leveling the bike Once the above assembly instructions have been followed, move the bike to where it will be used and level it properly.
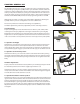
Chapter 3: GENERAL USE The CycleOps Indoor Cycle is easy to use. Simply sit on the cycle, tighten the pedal straps and begin cycling. The CycleOps indoor cycle allows the user full control over resistance by simply adjusting the resistance knob. Typically, lower resistance levels enable you to pedal at a faster pace, placing increased demand on the cardiovascular system. Higher resistance levels will typically deliver a greater muscle/endurance workout at lower RPMs.
Pedal Strap Adjustment The pedal straps should be adjusted to hold the foot snugly in the pedal. To adjust the pedal straps: Place each foot in the toe clip until the ball of the foot is over the pedal axle. The front of the shoe may not completely fill the toe cage. Rotate the pedals until one foot is within arms reach, then tighten the webbed cloth buckle until the cage of the toe clip is snug around the foot. Repeat for the other foot.
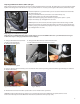
Chapter 4: common adjustments Flywheel Adjustment Chain tension/Flywheel Alignment Over time, the chain on your CycleOps IC will stretch due to the load applied to it. The following instructions will aid you in properly tensioning the chain and aligning the flywheel in the frame of the CycleOps IC. CAUTION: Improper chain adjustment will cause premature wear and may void the warranty.
Replacing Hub Batteries 400 Pro/300Pro (AA type) Over time, the batteries that power the electronics in the hub will need to be changed. The split battery cap on the Club Pro 300PT flywheel was designed to make this task as easy as possible. When it is necessary to change the hub batteries, follow these steps: Rotate the flywheel to a position where you can access the Allen bolt on the handle side of the battery cap. Using a 2.5 mm Allen wrench, remove the screw on the battery cap.
Brake Adjustment The brake mechanism on your CycleOps indoor cycle has been adjusted at the factory. However, over time due to chain stretch and brake pad wear, it may need to be adjusted. To replace/adjust brake pad, use the following procedure: Tighten clamping bolt to 50 in-lbs.
Preventative Maintenance Performing necessary preventative maintenance is key to keeping your CycleOps IC in proper working condition. Following these recommended maintenance procedures will help extend the life of your CycleOps IC. Daily Wipe Down/Cleaning: After your ride, be sure to release all tension from the resistance mechanism. Wipe down the entire unit using an absorbent cloth. A standard bicycle polish can be used on the painted parts of the IC. Focus on areas where sweat can settle.
Chapter 7: RF interference: If during use you are experiencing wireless drop out this is due to frequency interference. Wireless Internet access points, microwaves, cordless phones, or other wireless devices may cause frequency interference. To mitigate the chance of interference set wireless access points to the lowest channel possible, and keep bikes away for interfering devices.
12
16417G 0907 13