
Installation guide


Installation 23
2.Making Public Ethernet Connections
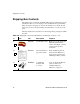
Figure 2-3: Left and right mounting brackets
T To Rackmount the OnBoard
Prepare the hardware as described under “Rackmounting the OnBoard” on
page 22 before you start.
1. Attach the right bracket to the right side and the left bracket to the left side
of the OnBoard.
a. For each bracket, insert fours screws through the holes on the bracket
into the appropriate holes at either the front or back of the OnBoard.
b. Use a Phillips screwdriver to tighten the screws.
2. Use the appropriate mounting hardware to mount the OnBoard to the
rails.
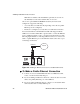
2. Making Public Ethernet Connections
The two Ethernet ports on the right back of the OnBoard are for public
connections.
The primary Ethernet port must be connected to an Ethernet switch, router, or
local area network (LAN) that provides Internet access, to enable remote
configuration of the OnBoard and remote access to connected devices.
The secondary Ethernet port can be used in the following ways:
• Not used at all
• Used to connect to a second network
• Used to connect to the same network as the primary Ethernet port for
redundancy in case of failure of the primary port (referred to as Ethernet
failover or bonding)
With a failover configuration, the OnBoard administrator needs to enable
failover as described in the AlterPath OnBoard Administrator’s Guide.
Left bracket Right bracket