
User's Manual
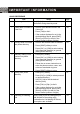

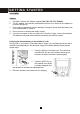
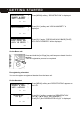
Table Of Contents
- Caller ID / Call Waiting Type 2.5 with Call Waiting ID Deluxe
- with
- VOICE ANNOUNCE
- Important Safety Instructions:
- SPECIAL FEATURES
- CHOOSING THE BEST LOCATION
- LOCATION OF CONTROLS
- LCD DISPLAY
- DATA PORT
- QUICK REFERENCE
- CHARGING THE BATTERY PACK
- CONNECTING THE BASE UNIT
- REGISTRATION & DE-REGISTRATION OF HANDSET
- CHOOSING THE DIALING MODE
- WALL MOUNTING BASE UNIT
- STRUCTURE AND OPTIONS
- Naming
- Language
- Ringer & Beep
- Answer Mode (Only available in handset menu)
- Contrast
- Call Waiting ID Deluxe (Call Waiting ID Options)
- Call Waiting ID Deluxe / Call Waiting ID Options provide options for handling a waiting call. 5 dedicated softkey labels appear when there is an incoming waiting call.
- New Call Lamp
- Audible (Voice Announce) Caller ID (Only available in base unit menu)
- Time and Date Setting
- Intercom Setup
- Message Waiting Indicator
- MAKING A CALL
- ANSWERING A CALL
- REDIALING A CALL
- ADJUSTING HANDSET RECEIVER VOLUME
- MUTING A CALL
- PAGING and INTERCOM
- SETTING ALARM
- USING HANDSET SPEAKERPHONE
- INSTALLING AND USING HEADSET
- FLASH
- PAUSE
- HOLD
- SENDING TONE SIGNALS IN PULSE DIALING MODE
- DIAL VOICE MAIL
- DIALING BACK FROM CALLER ID LIST
- DAILING FROM PHONE DIRECTORY
- CONFERENCE CALL
- ROOM MONITORING
- ABOUT CALLER IDENTIFICATION
- CALLER LIST
- VOICE ANNOUNCE CALLER ID
- CALL WAITING ID OPTIONS (CALL WAITING ID DELUXE)
- CREATING A PHONE DIRECTORY RECORD
- RECORDING VOICE ANNOUNCE NAME (Only available on base unit)
- REVIEWING PHONE DIRECTORY
- EDITING A PHONE DIRECTORY NUMBER
- DELETING AN ENTRY FROM A PHONE DIRECTORY
- Deleting all phone directory records
- DIALING FROM THE PHONE DIRECTORY
- INTERCOM
- CALL TRANSFER
- CALL CONFERENCING
- WALKIE-TALKIE OPERATION
- DIALING SERVICES
- CAPACITY
- OUT OF RANGE
- NO CONNECTION
- WHAT DOES OUR WARRANTY COVER?
- FOR HOW LONG AFTER THE ORIGINAL PURCHASE?
- HOW DOES STATE LAW OR LOCAL LAW RELATE TO THIS WARRANTY?

17
2
AC POWER
Caution:
1. Use ONLY with the AC Adaptor supplied (AC 120V, DC 7.5V, 500mA).
2. The AC adaptor must remain connected at all times (It is normal for the adaptor to
be warm during use).
3. Do not remove the battery from the handset to charge it. Never throw the battery into
a fire, disassemble it, or heat it.
4. Do not remove or damage the battery casing.
5. If you do not expect to use your phone for a month or longer, remove the batteries.
The batteries may leak chemicals that can destroy the electronic parts.
Charging the drained battery in the middle of a call
During a call, if you hear the “low battery alarm” beeps, you can swap the current call to
the base unit speakerphone first and then charge the handset battery following these
simple steps:
1. Press the [;] key on the base unit. The call is then
transferred to a 3-way call conference among the
handset, the base unit and the external party.
2. Press the [OFF] key on
the handset; the call will
be totally swapped from
the handset to the base unit speakerphone.
3. Place the handset on the base unit for charging.
GETTING STARTED
1