
User's Manual

20
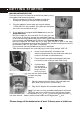
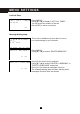
W ALLMOUNTING BASE UNIT
The base unit can be m ounted on a wall phone plate by using
the supplied wall-m ounting bracket.
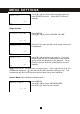
1. Bring the barrel plug of the AC adapter through the
rectangular opening of the wall-m ounting bracket.
2. Plug the adapter’s barrels plug into the jack m arked
“1000m A DC 9V” at the bottom of the base unit and press
the cord in the slot above the jack.
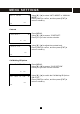
3. If your prem ise is equipped with 2 Lines com ing out of a
Single W all Jack:
Bring the telephone line cord with RJ-14 plug (you can
see 4 wires in the plug) through the rectangular opening
of the wall-m ounting bracket and plug it into the jack m arked “LINE 1/2”.
If your prem ise has 2 Lines, each com ing out of Separate W all Jacks:
Bring the telephone line cords with RJ-11 plug (you can see 2 wires in the plug)
through the rectangular opening of the wall-m ounting bracket and plug them into the
jack m arked “LINE 1/2” and “LINE 2” separately.
If your prem ise has only 1 Line com ing out of a wall plate:
Take the short telephone line cord and plug it into the jack m arked” LINE 1/2”.
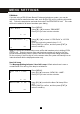
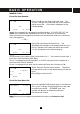
4. Insert 2 hook-tabs and 2 short tabs of the
wall-m ounting bracket into the slots at the back and
bottom of the base unit sim ultaneously.
5. Press the wall-m ounting bracket against the base
unit until they are resting on each other firm ly.
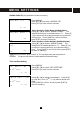
6. Hold the base
unit up next to
the wall jack and
plug in the line
cord, any loose
line cord can be hid inside
the wall-m ounting
bracket.
7. Place the base unit on the posts of the wall plate and
push down until the unit is secured firm ly.
8. Plug the AC adapter into a standard wall outlet.
Note: If you are not using a standard wall plate to m ount the
phone on wall, you m ay also m ount it with ordinary screws.
Insert 2 screws with vertical separation of 3
3
/
16
or 3
15
/
16
inches and leave the screws
1
/
8
inch from the wall. Make sure the screw heads are not bigger than
5
/
16
inch.
Please charge all the batteries for at least 15 hours prior to initial use.
G ET T IN G STAR T E D
Hook tab
Short tab