
User guide


Chapter 2: Installation 11
Installing an AutoView Switch
Installing your AutoView 200
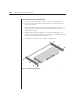
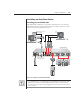
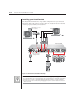
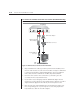
The diagram below illustrates one possible configuration for your AutoView
200 switch. Follow the step-by-step procedure To install an AutoView 200/400
switch to properly install your new switch.
Figure 2.2: AutoView 200 Installation Example
WARNING: To reduce the risk of electric shock or damage to your equipment -
- Do not disable the power cord grounding plug. The grounding plug is an important safety feature.
- Plug the power cord into a grounded (earthed) outlet that is easily accessible at all times.
- Disconnect the power from the unit by unplugging the power cord from either the electrical
outlet or the unit.
REMOTE I/O
RECEIVER
–––+
24VDC
.5A
REMOTE
USER
I/O
LOCAL USER
SETUP
SUN
AC E G
BD F H
100-240V , .1A, 50/60 Hz
Local
User
AutoView 400
DB9 serial port for
updating firmware
Servers B-H
Server A
Extended Access User
(via LongView)
For Sun Only
For PS/2 Only