
User guide


Chapter 2: Installation 9
Chapter 2: Installation
Getting Started
Before installing your AutoView system, refer to the lists below to ensure that
you have all the items that shipped with the AutoView as well as all other
items necessary for proper installation.
Supplied with the AutoView
Your AutoView switch package contains the following items:
• AutoView unit
• Local country power cord
• AutoView 200/400 Installer/User Guide
• AutoView 200 or 400 Quick Installation Guide
• Download Instructions
Optional items
• Rack Mounting Kit (RMK-34)
• Serial cable, DB9 female
• PS/2 (CIFCA), USB (CUSB) or Sun (CVSN or CWSN) cables
• LongView KVM Extender (AVRU)
• CAT 5 cable for LongView (C5T or P5T)
• Sun monitor to VGA adaptor (VAD-13) (AutoView 400 only)
• Sun adaptor kit for LongView (VAK-1) (AutoView 400 only)
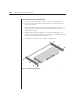
Rack Mounting your AutoView Unit
You can either place your AutoView appliance on your desktop or rack mount
your unit into an EIA standard rack.
Obtain a Rack Mounting Bracket Kit (1U) from Avocent to rack mount your
AutoView. Before installing the switch and other components in the rack,
stabilize the rack in a permanent location. Start rack mounting your
equipment at the bottom of the rack, then work to the top.
CAUTION: Rack Loading - Overloading or uneven loading of racks may result in shelf or rack
failure, causing damage to equipment and possible personal injury. Stabilize racks in a
permanent location before loading begins. Mount components beginning at the bottom of the
rack, then work to the top. Do not exceed your rack load rating.
CAUTION: Power Considerations - Connect only to the power source specifi ed on the unit.
When multiple electrical components are installed in a rack, assure the total component power
ratings do not exceed circuit capabilities. Overloaded power sources and extension cords
present fi r e a n d shock hazards.