
User's Manual


Wireless-B Broadband Router
23
Network Everywhere
®
Series
22
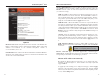
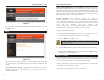
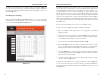
The Status screen,
shown in Figure 5-7
displays the Router’s
current status; it
reflects the data and
selections you’ve
entered using the
Setup screen.
All of the informa-
tion provided on this
screen is read-only.
To make changes,
select the Setup tab.
Host Name This field shows the Router’s name.
Firmware Version This field shows the installed version and date of the
firmware.
Login This indicates if you are using a dial-up style connection, e.g., PPPoE.
For PPPoE only, there is a Connect button to click if you are disconnected and
want to re-establish a connection.
LAN These fields display the Router’s current MAC Address, IP Address, and
Subnet Mask, as seen by users on your local area network. The DHCP Server
field shows the status of the Router’s DHCP server function, which is either
enabled or disabled.
Internet These fields display the Router’s current MAC Address, IP Address,
Subnet Mask, and Default Gateway IP Address, as seen by external users on the
Internet. The DNS (Domain Name System) fields show the IP address(es) of
Status
Figure 5-7
Note: The information provided and buttons available will vary depending on
the Router’s settings.
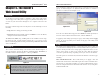
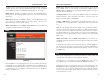
The Password screen, shown in Figure 5-6, allows you to set up a password and
UPnP Services. You can also restore default settings on the Router.
Router Password Set a password for the Router. You can use up to 64 alphanu-
meric characters. The default password is admin. If you don’t change the pass-
word, all users on your network will be able to access the Router using the
default password. For greater security, you should change the password from its
default setting.
UPnP Services Universal Plug and Play (UPnP) allows Windows XP to auto-
matically configure the Router for various Internet applications, such as gam-
ing and videoconferencing. Click the radio button next to Enable to enable
UPnP Services, or Disable to disable UPnP Services.
Restore Factory Defaults If you select the Restore Factory Defaults option
and click the Apply button, you will clear all of the Router’s settings. Do not
restore the factory defaults unless you are having difficulties with the Router
and have exhausted all other troubleshooting measures. Once the Router is
reset, you will have to re-enter all of your configuration data.
To apply any of the settings you’ve changed on this page, click the Apply but-
ton. To cancel any values you’ve entered on this page, click the Cancel button.
If you should need any further information about anything on this screen, click
the Help button.
Figure 5-6
Password