™ My Net AC Wi-Fi Bridge User Manual
WD® Service and Support Should you encounter a problem, please give us an opportunity to address it before returning this product. Most technical support questions can be answered through our knowledge base or e-mail support service at http://support.wdc.com. If the answer is not available or, if you prefer, please contact WD at the best telephone number shown below. Your product includes 30 days of free telephone support during the warranty period.
1 Important User Information . . . . . . . . . . . . . . . . . . . . 1 Important Safety Instructions . . . . . . . . . . . . . . . . . . . . . . . . . . . . . . 1 Recording Your WD Product Information . . . . . . . . . . . . . . . . . . . . 2 Registering Your WD Product . . . . . . . . . . . . . . . . . . . . . . . . . . . . . 2 2 Product Overview . . . . . . . . . . . . . . . . . . . . . . . . . . . . 3 Introduction . . . . . . . . . . . . . . . . . . . . . . . . . . . . . . . . . . . . . . . . . . .
6 Setting up the Bridge in AP Mode . . . . . . . . . . . . . . 25 Using the Bridge as an Access Point . . . . . . . . . . . . . . . . . . . . . . 26 7 Troubleshooting . . . . . . . . . . . . . . . . . . . . . . . . . . . . 27 8 Regulatory and Warranty Information. . . . . . . . . . . 28 Regulatory Compliance . . . . . . . . . . . . . . . . . . . . . . . . . . . . . . . . . 28 Warranty Information (All Regions Except Australia/New Zealand) . 32 Warranty Information (Australia/New Zealand only) . . . . .
IMPORTANT USER INFORMATION 1 Important User Information Important Safety Instructions This device is designed and manufactured to assure personal safety. Improper use can result in electric shock or fire hazard. The safeguards incorporated into this unit will protect you if you observe the following instructions for installation, use, and servicing. Read these instructions. Keep these instructions. Heed all warnings. Follow all instructions. Do not use this apparatus near water.
IMPORTANT USER INFORMATION Recording Your WD Product Information In the following table, write the serial and model numbers of your new WD product. You can find this information on the label on the bottom of the device. You should also note the date of purchase. This information may be required when requesting technical support.
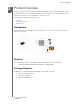
PRODUCT OVERVIEW 2 Product Overview Thank you for purchasing the My Net™ AC Wi-Fi Bridge. This user manual provides stepby-step instructions for installing and using your new bridge. For the latest WD product information and news, visit our website at www.wdc.com. This chapter contains the following topics: Features Package Contents Components Introduction The My Net™ AC Wi-Fi Bridge provides an Ethernet connection to remote devices via a wireless connection.
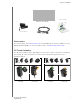
PRODUCT OVERVIEW Quick Install Guide My Net AC Wi-Fi Bridge AC power adapter Ethernet cable Accessories For U.S. residents, visit www.shopwd.com to view additional accessories available for your My Net AC Wi-Fi Bridge. For users outside the U.S., visit http://support.wdc.com. AC Power Adapters The AC power adapter varies, depending on your location. Some locations do not require a power plug clip. Units sold in those locations have a fixed power plug. Refer to the illustrations below.
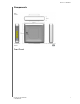
PRODUCT OVERVIEW Components Front Panel MY NET AC WI-FI BRIDGE USER MANUAL 5
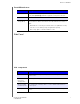
PRODUCT OVERVIEW Front LED indicators LED Description Power Steady when the bridge is powered on and operational; flashes slowly during boot-up, firmware upgrades, and system self-tests. Wireless Lit when wireless connection is active. Wi-Fi Protected Setup (WPS) When connecting the bridge and a wireless device (e.g., a printer) that you want to add to the network, the LED indicates the status of WPS: • When WPS is connecting a network device, the light blinks slowly.
PRODUCT OVERVIEW Port LED indicators Component LED Description Ethernet port Link LED (Green) Steady on when a cable connects the port to another Ethernet port. Activity LED (Yellow) Blinks to indicate network activity of that Ethernet port. Back (not shown) Component Description Reset button Press and release–Resets the bridge to factory defaults. When the reset finishes, the Power LED blinks.
GETTING STARTED 3 Getting Started This chapter contains the following topics: Setting up the Bridge with a WPS-Enabled Router Setting up Your bridge Manually 1 Setting up the Bridge with a WPS-Enabled Router You have two options for setting up the bridge. If your router is WPS enabled, follow steps 1 and 2 below. If your router is not WPS enabled or you are experiencing interference problems, go to “Setting up Your bridge Manually” on page 10. Step 1: Connect the bridge to Your Router 1.
GETTING STARTED Step 2: Step 3: Step 4: Opening My Dashboard At this point you can configure the bridge. 1. Launch a web browser.
GETTING STARTED 2. Enter http://WDbridge? or http://192.16???230 in the address field. The Welcome screen displays: Does it go through the whole thing with Setup Complete and Registration? Setting up Your bridge Manually There are cases where you may need to set up the bridge manually, for example when: Wi-Fi Protected Setup (WPS) is disabled, or the router does not support WPS. Some interference is preventing WPS from working. 1.
GETTING STARTED 2. Launch a web browser. The bridge’s My Dashboard Welcome page displays automatically. 3. Select a language in the upper right corner (defaults to English) and make sure that Mode displays bridge (the default value). 4. Click Next to display the Select an available network screen. 5. You have three options: Select an available Network Name and click Connect. Double-click a Network Name or its row to populate it. The Secure Network Connection page displays. Continue to the next step.
GETTING STARTED b. Continue to step 7. Option #2– When WPS is enabled on the router NEED GRAPHICS a. Click Use WPS to display the Wi-Fi Protected Setup page. b. Press both the WPS button on the bridge or the virtual WPS button on the screen and the WPS button on the router, -OREnter the router’s PIN. c. Click WPS to display the progress of the connection. The Setup Complete page displays.
GETTING STARTED wirelessly. 7. To register your bridge, on the Setup Complete screen, click Register Your bridge and complete the registration information requested on the Registration screen. DO YOU RETURN TO THIS SCREEN TO ADD A NEW DEVICE? 8. To add a new device to your network, click the Add a New Device to My Network link and continue with “Adding a Wireless Device to Your Network .” on page 19. IF THEY DO THIS BEFORE REGISTERING, CAN THEY GO BACK AND REGISTER.
CONFIGURING BASIC SETTINGS 4 Configuring Basic Settings This chapter contains the following topics: Opening My Dashboard After Setup Configuring Wireless Settings Configuring Advanced Settings Opening My Dashboard After Setup To open the My Net AC Wi-Fi Bridge dashboard after initial configuration: 1. Enter http://WDBridge? or http://192.168.???? in the address field of your browser. The login or Welcome? screen displays: 2.
CONFIGURING BASIC SETTINGS The icons at the top of the screen open modules and wizards for performing important tasks. The red Alert icon at the upper right of the screen displays notices concerning the bridge. Icon Name Actions See ... My Dashboard Review and change current settings. “Configuring Basic Settings” on page 14 Set up Wireless Configure wireless settings such as network name and security.
CONFIGURING BASIC SETTINGS Reviewing Current Settings The My Dashboard’s home screen is a simple snapshot of the bridge’s configuration with the most essential information in one screen. It includes summary information for wireless settings and status. NEED NEW GRAPHIC 3 1. Review the following settings: Setting Description Network Name Unique identifier of the 2.4 GHz or 5.0 GHz network, depending on your selection on the frequency switch. Password Password for accessing the wireless network.
CONFIGURING BASIC SETTINGS Configuring Wireless Settings 1. Click the Set up Wireless icon. Note: Alternatively, on the My Dashboard home screen, you can click the Set up Wireless link or arrow. 2. View or modify the required wireless settings of the bridge: Setting Description Network Name Name given to the wireless network. MUST BE SAME as the router’s network name. Network Frequency Toggle to 2.4 GHz or 5.0 GHz. MUST BE SAME as router’s frequency.
CONFIGURING BASIC SETTINGS Setting Description Connection Type Can be Static IP, Dynamic IP (DHCP), PPPoE (Username/Password), or PPTP (Username/ Password). If you select Static IP, the following additional fields display: IP address (should be capital A)–IP address of the bridge. It should be on the same network as your router. Subnet–The subnet mask is used to control how many subnetworks can exist in your local network. The more subnetworks there are, the fewer the hosts you can have per subnet.
CONFIGURING BASIC SETTINGS Adding a Wireless Device to Your Network . 1. On the Dashboard, click the Add a Device icon. 2. Follow the appropriate procedure below: a. Setup 1: Press the WPS button on the front of the bridge or click the virtual button on this screen. On your wireless device, press the physical WPS button or click the virtual WPS button. b. Setup 2: If prompted by your wireless device, enter the bridge’s WPS PIN shown on the screen into your wireless device.
CONFIGURING BASIC SETTINGS invalid unless you reset the bridge to default values.If your device requests the bridge’s PIN, enter the PIN shown on the screen. 3. Click WPS. WHAT DO YOU SEE? 4. To confirm that the device has been added, click Confirm. 5. The Confirmation screen displays the attached devices in the Client Table. NEED COMPLETED EXAMPLE. 6. Click OK to return to the My Dashboard home screen.
CONFIGURING ADVANCED SETTINGS 5 Configuring Advanced Settings The Advanced Settings icon takes you to screens where you can change the administrative password, update the bridge’s firmware, restore factory settings, and reboot the bridge. This chapter contains the following topics: Changing the Administrator Password Updating the Bridge’s Firmware Setting up the Bridge in AP Mode Note: To close an Advanced Settings screen, click the Close button at the top of the screen.
CONFIGURING ADVANCED SETTINGS 1. Click the Advanced Settings icon and then the Administrator tab (link) on the left to display the Admin/Administrator screen. 2. Enter the existing administrator password in Original Password and the new administrator password in the Password and Verify Password fields. Click Save.
CONFIGURING ADVANCED SETTINGS Resetting and Rebooting the Bridge Resetting to Factory Defaults You may want to reset the bridge to how it was when you bought it. You have two options for restoring factory defaults: through the user interface or through the Reset button on the bottom of the bridge. To use the user interface: 1. Click the Advanced Settings icon and then the System tab (link). 2. Click Reset to the right of Reset to Factory Default Settings. 3. When a confirmation message displays, click OK.
CONFIGURING ADVANCED SETTINGS Updating the Bridge’s Firmware Check for bridge firmware updates and upload new firmware. Note: For best results, upload the firmware using a wired connection. 1. Click the Advanced Settings icon and then the Administrator icon. 2. Click the Firmware Update tab. To check for the latest firmware version: Important: Do not disconnect or turn off the bridge while the update is in process. 1. Click Check Now. The bridge searches the WD website for a new firmware file.
SETTING UP THE BRIDGE IN AP MODE 6 Setting up the Bridge in AP Mode The difference between bridge mode and access point mode is that an bridge has a wireless uplink to the router and an access point has a wired uplink to the router. To use the bridge in AP mode, connect it using an Internet cable as described in “Setting up Your bridge Manually” on page 10.
SETTING UP THE BRIDGE IN AP MODE 9. Click Save. The Setup Complete screen displays. 10. Do one of the following: Click Register Your bridge and follow the registration wizard. Click I’m Done. What displays? 11. To add a new wireless device to your network, click the Add a New Device to My Network link. See “Configuring Advanced Settings” on page 21.
TROUBLESHOOTING DO THESE APPLY? 8 Troubleshooting DO THESE APPLY? Problem Solution The power LED does not illuminate. 1. Ensure that the power cord is correctly connected to the bridge. 2. Ensure that the electrical outlet is working properly. To do this, plug a different electronic device into the outlet and try to power it on. 3. Ensure that you are using the AC adapter provided with the bridge. A port number LED does not illuminate. 1. Ensure that the connected device is powered on. 2.
REGULATORY AND WARRANTY INFORMATION 9 Regulatory and Warranty Information This chapter contains the following topics: Regulatory Compliance Warranty Information (All Regions Except Australia/New Zealand) Warranty Information (Australia/New Zealand only) GNU General Public License (“GPL”) Regulatory Compliance Federal Communication Commission Interference Statement This device complies with Part 15 of the FCC Rules.
For product available in the USA/Canada market, only channel 1~11 can be operated. Selection of other channels is not possible. Pour les produits disponibles aux États-Unis / Canada du marché, seul le canal 1 à 11 peuvent être exploités. Sélection d'autres canaux n'est pas possible. This device and its antenna(s) must not be co-located or operation in conjunction with any other antenna or transmitter.
REGULATORY AND WARRANTY INFORMATION 以下警語適用台灣地區 經型式認證合格之低功率射頻電機,非經許可,公司、商號或使用者均不得擅自變更頻率、 加大功率或變更原設計之特性及功能。 低功率射頻電機之使用不得影響飛航安全及干擾合法通信;經發現有干擾現象時,應立即 停用,並改善至無干擾時方得繼續使用。前項合法通信,指依電信法規定作業之無線電通 信。低功率射頻電機須忍受合法通信或工業、科學及醫療用電波輻射性電機設備之干擾。 For Mexico Only La operación de este equipo está sujeta a las siguientes dos condiciones: (1) es posible que este equipo o dispositivo no cause interferencia perjudicial y (2) este equipo o dispositivo debe aceptar cualquier interferencia, incluyendo la que pueda causar su operación
REGULATORY AND WARRANTY INFORMATION (2006/95/EC) och EuP-direktivet (2005/32/EC). En "Konformitetsdeklaration" i enlighet med gällande direktiv har gjorts och finns arkiverad hos Western Digital Europe. Merking med CE-symbolet indikerer at dette systemet samsvarer med gjeldende direktiver (council directives) for EU, inkludert EMC-direktiv (2004/108/EF), (1999/5/EF), Lavspenningsdirektiv (2006/95/EF) og EuP-direktiv (2005/32/EF).
REGULATORY AND WARRANTY INFORMATION Environmental Compliance (China) ѻકЁ᳝↦᳝ᆇ⠽䋼ܗ㋴ⱘৡ⿄ঞ䞣 䚼ӊৡ⿄ ᴎ ᴎㆅ ⬉䏃ᵓ㒘ড় ᵓव ⬉⑤বय़఼ ⬉⑤կᑨ఼ ⹀Ⲹ ᳝↦᳝ᆇ⠽䋼ܗ㋴ 䪙 ∲ 䬝 ݁Ӌ䫀 ; ; ; ; 2 2 2 2 2 2 2 2 2 2 2 2 ⒈㘨㣃 ⒈Ѡ㣃䝮 2 2 2 2 2 2 2 2 2 ҷ㸼ℸ⾡䚼ӊⱘ᠔᳝ഛ䋼ᴤ᭭Ё᠔ⱘ䆹⾡᳝↦᳝ᆇ⠽䋼ഛԢѢЁढҎ⇥ֵ݅ᙃѻϮ䚼᠔乕Ꮧⱘlj⬉ᄤ ֵᙃѻકЁ᳝↦᳝ᆇ⠽䋼ⱘ䰤䞣㽕∖NJ 6- 7 㾘ᅮⱘ䰤䞣DŽ ; ҷ㸼ℸ⾡䚼ӊ᠔⫼ⱘഛ䋼ᴤ᭭Ё 㟇ᇥ᳝ϔ㉏ᴤ᭭݊᠔ⱘ᳝↦᳝ᆇ⠽䋼催ѢЁढҎ⇥ֵ݅ᙃѻϮ䚼᠔ 乕Ꮧⱘlj⬉ᄤֵᙃѻકЁ᳝↦᳝ᆇ⠽䋼ⱘ䰤䞣㽕∖NJ 6- 7 㾘ᅮⱘ䰤䞣 䰸䴲ѻકϞ᳝ᷛ䆄ˈ᠔᳝ݙ䰘ѻકঞ݊䚼ӊⱘþ⦃ֱՓ⫼ᳳ䰤
REGULATORY AND WARRANTY INFORMATION Warranty Information (Australia/New Zealand only) For consumers purchasing products in Australia and New Zealand, please refer to this warranty information. Nothing in this warranty modifies or excludes your legal rights under the Australian Competition and Consumer Act or the New Zealand Consumer Guarantees Act. This warranty identifies WD's preferred approach to resolving warranty claims which is likely to be quick and simple for all parties.
REGULATORY AND WARRANTY INFORMATION addition to other rights and remedies available to you under the Australian Competition and Consumer Act or the New Zealand Consumer Guarantees Act. Your original box and packaging materials should be kept for storing or shipping your WD product. To conclusively establish the period of warranty, check the warranty expiration (serial number required) via http://support.wdc.com. Western Digital Technologies, Inc.
REGULATORY AND WARRANTY INFORMATION MY NET AC WI-FI BRIDGE USER MANUAL 35
REGULATORY AND WARRANTY INFORMATION MY NET AC WI-FI BRIDGE USER MANUAL 36
REGULATORY AND WARRANTY INFORMATION MY NET AC WI-FI BRIDGE USER MANUAL 37
REGULATORY AND WARRANTY INFORMATION MY NET AC WI-FI BRIDGE USER MANUAL 38
REGULATORY AND WARRANTY INFORMATION MY NET AC WI-FI BRIDGE USER MANUAL 39
REGULATORY AND WARRANTY INFORMATION MY NET AC WI-FI BRIDGE USER MANUAL 40
REGULATORY AND WARRANTY INFORMATION MY NET AC WI-FI BRIDGE USER MANUAL 41
REGULATORY AND WARRANTY INFORMATION MY NET AC WI-FI BRIDGE USER MANUAL 42
REGULATORY AND WARRANTY INFORMATION MY NET AC WI-FI BRIDGE USER MANUAL 43
REGULATORY AND WARRANTY INFORMATION MY NET AC WI-FI BRIDGE USER MANUAL 44
REGULATORY AND WARRANTY INFORMATION MY NET AC WI-FI BRIDGE USER MANUAL 45
REGULATORY AND WARRANTY INFORMATION MY NET AC WI-FI BRIDGE USER MANUAL 46
REGULATORY AND WARRANTY INFORMATION MY NET AC WI-FI BRIDGE USER MANUAL 47
REGULATORY AND WARRANTY INFORMATION MY NET AC WI-FI BRIDGE USER MANUAL 48
REGULATORY AND WARRANTY INFORMATION MY NET AC WI-FI BRIDGE USER MANUAL 49
REGULATORY AND WARRANTY INFORMATION MY NET AC WI-FI BRIDGE USER MANUAL 50
REGULATORY AND WARRANTY INFORMATION MY NET AC WI-FI BRIDGE USER MANUAL 51
REGULATORY AND WARRANTY INFORMATION MY NET AC WI-FI BRIDGE USER MANUAL 52
REGULATORY AND WARRANTY INFORMATION MY NET AC WI-FI BRIDGE USER MANUAL 53
REGULATORY AND WARRANTY INFORMATION MY NET AC WI-FI BRIDGE USER MANUAL 54
REGULATORY AND WARRANTY INFORMATION MY NET AC WI-FI BRIDGE USER MANUAL 55
REGULATORY AND WARRANTY INFORMATION MY NET AC WI-FI BRIDGE USER MANUAL 56
REGULATORY AND WARRANTY INFORMATION MY NET AC WI-FI BRIDGE USER MANUAL 57
REGULATORY AND WARRANTY INFORMATION MY NET AC WI-FI BRIDGE USER MANUAL 58
REGULATORY AND WARRANTY INFORMATION MY NET AC WI-FI BRIDGE USER MANUAL 59
REGULATORY AND WARRANTY INFORMATION MY NET AC WI-FI BRIDGE USER MANUAL 60
REGULATORY AND WARRANTY INFORMATION MY NET AC WI-FI BRIDGE USER MANUAL 61
REGULATORY AND WARRANTY INFORMATION MY NET AC WI-FI BRIDGE USER MANUAL 62
REGULATORY AND WARRANTY INFORMATION MY NET AC WI-FI BRIDGE USER MANUAL 63
REGULATORY AND WARRANTY INFORMATION MY NET AC WI-FI BRIDGE USER MANUAL 64
REGULATORY AND WARRANTY INFORMATION MY NET AC WI-FI BRIDGE USER MANUAL 65
REGULATORY AND WARRANTY INFORMATION MY NET AC WI-FI BRIDGE USER MANUAL 66
REGULATORY AND WARRANTY INFORMATION MY NET AC WI-FI BRIDGE USER MANUAL 67
REGULATORY AND WARRANTY INFORMATION MY NET AC WI-FI BRIDGE USER MANUAL 68
REGULATORY AND WARRANTY INFORMATION MY NET AC WI-FI BRIDGE USER MANUAL 69
REGULATORY AND WARRANTY INFORMATION MY NET AC WI-FI BRIDGE USER MANUAL 70
REGULATORY AND WARRANTY INFORMATION MY NET AC WI-FI BRIDGE USER MANUAL 71
REGULATORY AND WARRANTY INFORMATION MY NET AC WI-FI BRIDGE USER MANUAL 72
REGULATORY AND WARRANTY INFORMATION MY NET AC WI-FI BRIDGE USER MANUAL 73
REGULATORY AND WARRANTY INFORMATION MY NET AC WI-FI BRIDGE USER MANUAL 74
REGULATORY AND WARRANTY INFORMATION MY NET AC WI-FI BRIDGE USER MANUAL 75
REGULATORY AND WARRANTY INFORMATION MY NET AC WI-FI BRIDGE USER MANUAL 76
REGULATORY AND WARRANTY INFORMATION MY NET AC WI-FI BRIDGE USER MANUAL 77
REGULATORY AND WARRANTY INFORMATION MY NET AC WI-FI BRIDGE USER MANUAL 78
APPENDIX: TECHNICAL SPECIFICATIONS Appendix: Technical Specifications Specification Value Wireless standard IEEE 802.11n client Ethernet 1 x Gigabit Ethernet I/O ports (4) Ethernet (RJ-45) ports Bands 2.4 GHz and 5.0 GHz selectable dual mode MIMO mode? 3x3 (2.
Specification Value Supported operating systems Windows XP with Service Pack 3 Windows Vista with Service Pack 2 Windows 7 with Service Pack 1 Mac OS X Leopard Mac OS X Snow Leopard Mac OS X Lion Supported web browsers Internet Explorer 7 and later Safari 2 and later Firefox 2 and later Chrome 7 and later Physical dimensions Length: ??" (??? mm) Width: ??" (??? mm) Height: ??" (?? mm) Weight: 0.?? lb (0.
INDEX Index F A AC power adapters 6 access point setup 74 accessing files remotely 4 accessing internal drive and external USB storage 68 accessories 5 adding a wireless device 28 Additional Features screens 48 additional software 4 Admin screens 56 administrator password 67 Advanced LAN screens 43 Advanced Settings screens 35 advanced tasks 61 Advanced WAN (Internet) screens 36 Advanced Wireless screens 41 attached storage, accessing files on 68 B back panel of extender 7 basic wireless settings 24 bot
INDEX recording information registration 2 safety information 1 warranty 88 2 Network UPnP 55 Parental Controls 49 Port Forwarding 53 Registration 59 Routing 53 System 58 Time Settings 57 Wi-Fi Protected Setup (WPS) 42 Wireless Setup 41 service 88 service (Australia /New Zealand) 89 settings advanced 35 basic 20 storage 26 settup PC) 10 setup options 10 Windows Vista/Win7 9 Windows XP 9 sharing a printer on the network 80 software, GPL 90 speed, wired 3 storage attached USB drive 68 capacity 4 internal d
INDEX WD Smartware 5 Wi-Fi Protected Security(WPS) 4 wireless adding devices 28 settings 24 speed, simultaneous dual band 3 WPS LED 7 WPS-enabled device, connecting 28 1 Index1 WD® Service and Support5 2 7 Setting up the Bridge in AP Mode25 8 Troubleshooting DO THESE APPLY?27 9 Regulatory and Warranty Information28 Regulatory Compliance28 Important User Information1 Warranty Information (All Regions Except Australia/New Zealand)32 Important Safety Instructions1 Warranty Information (Australia/New Z
Information furnished by WD is believed to be accurate and reliable; however, no responsibility is assumed by WD for its use nor for any infringement of patents or other rights of third parties which may result from its use. No license is granted by implication or otherwise under any patent or patent rights of WD. WD reserves the right to change specifications at any time without notice. Western Digital, WD and the WD logo are registered trademarks in the U.S.