
User's Manual
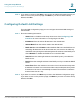
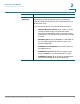
Table Of Contents
- Federal Communication Commission Interference Statement
- Getting Started
- Using the Setup Wizard
- Viewing System Status
- Port Management
- Networking
- VPN
- Quality of Service (QoS)
- Security
- System Management
- Where to Go From Here

Using the Setup Wizard
Configuring Default LAN Settings
Cisco RV315W Broadband Wireless VPN Router Administration Guide 21
2
STEP 6 If you want to continue, click Next to proceed to the LAN Configuration page. If you
want to return to the previous page, click Back. If you want to exit the Setup
Wizard, click Exit.
Configuring Default LAN Settings
From the LAN Configuration page you can configure the default LAN settings of
the RV315W.
STEP 7 Enter the following information:
• VLAN: Select a VLAN from the drop-down menu. See Configuring LAN
Interfaces for more information on configuring the VLANs.
• IP Address: Enter the subnet IP address of the default LAN.
• Subnet Mask: Enter the subnet mask of the default LAN.
• DHCP Service: Check Enable to allow the RV315W to act as a DHCP server
and assign IP addresses to all devices that are connected to the LAN. Any
new DHCP client joining the LAN is assigned an IP address of the DHCP pool.
Check Disable to disable the DHCP server on the RV315W.
• Start IP: Enter the starting IP address of the DHCP pool if you enable the
DHCP server.
• End IP: Enter the ending IP address of the DHCP pool if you enable the DHCP
server.
• Lease Time: Enter the maximum connection time in minutes that a dynamic
IP address is “leased” to a network user. When the time elapses, the dynamic
IP address of the user is automatically renewed. The default is 0, indicates
that the lease time is 1 day.
STEP 8 If you want to continue, click Next to proceed to the Wireless Configuration page.
If you want to return to the previous page, click Back. If you want to exit the Setup
Wizard, click Exit.