
User's Manual


Introduction
Getting Started in the Cisco RV 110W Device Manager
Cisco RV 110W Administration Guide 18
1
STEP 3 Choose the type of encryption and enter the security key that you chose when
setting up the Cisco RV 110W. If you did not enable security (not recommended),
leave these fields blank.
STEP 4 Verify your wireless connection and save your settings.
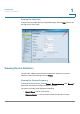
Getting Started in the Cisco RV 110W Device Manager
The Device Manager allows you to configure and manage your Cisco RV 110W,
including the following tasks:
• View system status information
• Configure local and wide-area network settings
• Configure wireless security, firewall, and VPN settings
• Configure quality of service
• Perform software upgrades
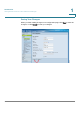
Logging In
To use the Device Manager:
STEP 1 On a PC connected to a LAN port on the back panel of the Cisco RV 110W, start
your web browser. (If you have performed the initial configuration using the Setup
Wizard, you can connect using the Cisco RV 110W’s wireless connection.)
STEP 2 To connect to the Device Manager, enter
http://192.168.1.1
in your browser’s address field, and press E
Enter
. A password
request page appears.
NOTE The default IP address is 192.168.1.1. If there is another device connected to
the network that is acting as a DHCP server, that device may assign a
different address to the Cisco RV 110W. You must use the assigned IP
address to connect to the Cisco RV 110W.