
User's Manual


Introduction
Connecting the Equipment
Cisco RV 110W Administration Guide 16
1
STEP 4 The security settings for your network are shown. To save these settings in a text
file on your PC, check the box provided. To print, click P
Print these settings
. Click
Next
to confirm these settings. (If you chose to save these settings to your
desktop, then click O
OK
.)
NOTE You must enter this security information on each device that connects to your
network. Save this information!
STEP 5 The Cisco RV 110W configures your connection and displays a status message if
the configuration is successful. Click N
Next
.
STEP 6 The Cisco RV 110W displays a message if it has been configured and is
successfully connected to the Internet. Click F
Finish
.
Manually Connecting Your System
Use these procedures if you do not want to use the Setup Wizard.
NOTE You must connect one PC with an Ethernet cable for the purpose of the initial
configuration. After you complete the initial configuration, administrative tasks can
be performed using a wireless connection.
STEP 1 Connect your equipment as described in “Connecting Your Hardware” section
on page 9.
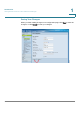
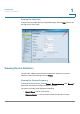
STEP 2 Connect to the Device Manager to view and configure your Cisco RV 110W
settings. When you connect to the Device Manager, the Getting Started page
shows links that you can click to perform basic tasks. At a minimum, we
recommend that you:
• Change the Cisco RV 110W password (see Configuring User Accounts,
page 127.)
• Review wireless profile and set security settings (see Configuring the
Wireless Radio Properties, page 70.)