
User's Manual


Introduction
Connecting the Equipment
Cisco RV 110W Administration Guide 13
1
Entering Login and Internet Connection Information
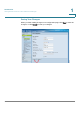
STEP 1 Enter the username and password for your Cisco RV 110W. The default username
and password are both a
admin
. Click N
Next
.
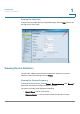
STEP 2 Choose your Internet connection type:
• Telephone (DSL)
• Cable broadband
• I don’t know
Click N
Next
.
STEP 3 The Setup Wizard confirms your Internet connection settings. If it cannot detect or
confirm your settings, you might need to provide information about your Internet
connection type. You can get this information from your ISP.
The types of Internet connections are:
•
Dynamic (DHCP)
—Your PC receives its IP address from your cable or DSL
modem. This address can change.
•
Static IP Connection
—Your Internet Service Provider (ISP) has assigned you
an IP address that does not change. You will need this address and some
additional information (see Step 4) to proceed with installation.
•
PPPoE
—You have a point-to-point connection to the Internet (used mainly
with asymmetric DSL).
•
PPTP
—Your provider uses point-to-point tunneling protocol (used in
Europe).
•
LT2P
—Your provider uses layer 2 tunneling protocol (used in Europe).
After selecting your connection type, click N
Next
.
STEP 4 If you chose:
•
Dynamic (DHCP)
—Proceed to Step 5.
•
Static IP Connection
—Provide your Static IP Address, Subnet Mask,
Gateway IP, DNS, and secondary DNS (optional). This information comes
from your ISP. Click N
Next
after entering the information.
•
PPPoE
—Provide your account name (for example,
john@ISPname.net
), and
password. Click N
Next
after entering the information.