
Technical data
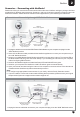
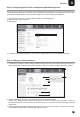

Internet
ADSL/Cable Modem
Laptop
Desktop Computer
Wifi Router
Modem
Power
Cable
Power
Cable
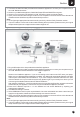
Internet
ADSL/Cable Modem
+ Wireless Router
Laptop
Desktop Computer
Modem
Power
Cable
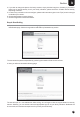
Getting your NetGenie Ready
Identify your Home Internet Set up
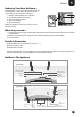
Before you begin surfing the Internet through NetGenie, you first need to assemble the appliance.
1. Screw in detachable WiFi antennas in their respective jacks provided in the back panel.
2. Look out for a sticker at the bottom of the appliance containing the default wireless network name, technically
known as SSID and a pass key specific for your appliance. These details pre-secure your wireless network
from any unauthorized access attempts. Please note down your pass key for future reference.
3. Plug one end of the power adapter into the socket on the back of the NetGenie Base Unit.
4. Plug the other end of the power adapter into the nearest mains socket.
5. Before you access the Internet through NetGenie, make sure the power is switched on. The Power LED on the
front panel should turn green.
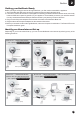
Depending on your home network set-up, you can connect NetGenie to the Internet by referring to any of the
following scenarios:
3
2
Section
Phone Line → ADSL Cable Modem
→ PC / Laptop
/
: Refer to Scenario 1
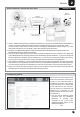
Internet
Desktop Computer
Internet
ADSL/Cable Modem
Desktop Computer
Modem
Power
Cable
Desktop Computer
Internet
Phone Line → ADSL Cable Modem
which is also your WiFi access point
→ PC / Laptop
/
: Refer to Scenario 4
Direct Cable → PC / Laptop:
Refer to Scenario 2
USB Modem:
Refer to Scenario 3
Phone Line → ADSL Cable Modem → WiFi access point
→ PC / Laptop
/
: Refer to Scenario 4