
Operation Manual

41
Producing a M ovie Disc
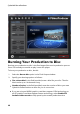
3. Click to configure the burn settings as follows:
Recording drive: if required, select the burning drive CyberLink
PowerProducer will use to burn the production to disc.
Recording speed: set the recording speed used when burning the disc. If you
encounter errors during the burning process, try lowering the burning speed.
Include buffer under-run protection: select this option to ensure that video is
written to disc without interruption. An interruption in video burning can
result in an unusable disc.
Set disc protection: select this option to protect a DVD-VR from being over
written by accident.
Click OK to set you changes.
4. If you are using a rewritable disc that is not blank, click to erase the
disc. See Erasing a Disc for details on using this feature.
5. Click Burn. CyberLink PowerProducer will proceed to burn your movie
production to the disc.
Note: the burning process may take at least a few minutes, depending on the
length and quality of your video, and your computer's processing power. Be
prepared for a short wait while CyberLink PowerProducer renders your production.
When the task is complete a window appears displaying a congratulatory message
and offering several options:
Click Play Disc to play the disc in CyberLink PowerDVD, if it's installed on your
computer.
Click Go to Main Window to return to the home page of CyberLink
PowerProducer.
Click Launch LabelPrint to create a disc label for your disc in CyberLink
LabelPrint. See the help file in that program for detailed information about
creating disc labels.
Note: CyberLink PowerProducer sends the title and author information from your
created disc to LabelPrint. This information is added to the title and artist fields
respectively, so you do not have to reenter this information when creating your disc
label.
Click Exit PowerProducer to close the program.