
Operation Manual


29
Producing a M ovie Disc
Use the and buttons to select a slideshow album and then set the duration
as follows:
To set the length of time each individual slide (photo) is displayed, select the
Slides option and then enter a duration in seconds.
To set the duration of the entire slideshow album, select the Album option
and then enter a duration in minutes and seconds in the fields provided.
To match the length of the slideshow to the duration of the background
music you imported, select the Match music duration option. This option is
only enabled if you imported background music previously.
Adding Slideshow Effects
In the Effects section you can set the type of effects that appear in your photo
slideshow, including transitions between slides and adding motion to your photos.
Use the and buttons to select a slideshow album and then set the effects as
follows:
Automatic Pan & Zoom: select this option to make your slideshow more
engaging by adding motion. When selected it adds a pan and zoom effect to
the photos in your slideshow.
Transition Effect: from this drop-down choose a transition you'd like between
each of the photos in your slideshow album.
Note: select Random to have many different transitions between your slides,
instead of the same transition between each.
Duration: in the field provided enter in the amount of time, in seconds, it will
take for the transition to occur.
Once you are done adding the slideshow effects, click the Apply to all albums
button if you want all the slideshow albums on your disc to have the same effects.
Setting Photo as TitleThumbnail
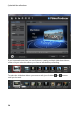
In the Photo Slideshow window you can set any slide in a slideshow album as its
title thumbnail. This thumbnail will display on the slideshow album in CyberLink
PowerProducer, and more importantly, in the disc menu after it is burned to a disc.
To set a slide as the title thumbnail, do this: