
Operation Manual


27
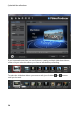
Producing a M ovie Disc
Adding More Photos to a Slideshow
At any time you can add additional photos to the slideshow album created by
CyberLink PowerProducer.
Note: if you want to add photos into a new slideshow, creating a new slideshow
album, you must import them in the disc authoring window. See Importing Media for
more information.
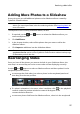
To add photos to an existing slideshow album, do this:
1. If required, use the and buttons to select the slideshow album you
want to add photos to.
2. Click Add Photos.
3. In the Import window, select all the photos that you want to add to the
slideshow album.
4. Click Import to add them into the slideshow album.
Note: once you are done adding all the photos to your slideshow, select the Back
up photos on disc option to have CyberLink PowerProducer make a backup copy
of them when you burn the disc.
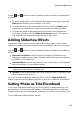
Rearranging Slides
Once you have all the photos you want to include in your slideshow album, the
next step is to ensure they are in the correct order and are displaying correctly.
Use the and buttons to select a slideshow album and then update it in the
storyboard panel as follows:
to rearrange the slide order, just select a photo in the storyboard panel and
then drag it to the new position.
if a photo's orientation is incorrect, select it and then click in the playback
controls under the preview window to rotate it 90 degrees in the
counterclockwise direction.
to remove a photo slide from the slideshow album, select it in the storyboard