
Operation Manual

13
Producing a M ovie Disc
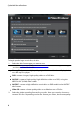
3. If you have more than one disc drive installed in your computer, select the
Drive from the drop-down that contains the disc you want to import from.
4. If the disc contains any Playlists, make sure you select one from the drop-
down so you can extract scenes from it.
5. In the Scenes section, select the check boxes next to all the content you want
to extract and import into CyberLink PowerProducer.
Note: if required, double-click on a scene and then use the playback controls on
the right of the window to watch selected scenes in the preview window.
6. Click . CyberLink PowerProducer will extract the selected scenes from the
disc and then import them into the thumbnail panel at the bottom of the
window.
Note: the extracted video files are saved in the MPEG-2 format to the Working
directory folder specified in Preferences.
7. When you are done, click OK to return to the author window.
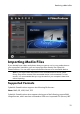
Capturing Video
In CyberLink PowerProducer you can capture video (including the audio) from:
a DV camcorder
an HDV camcorder
a TV
a PC webcam
a VCR
To begin capturing video, do this:
1. In the Capture section of the Content panel, click the Video button.
Note: make sure that your DV or HDV camcorder is turned on and set to VCR
mode in order for it to be detected by CyberLink PowerProducer. If your camcorder
connects to your computer via a USB connection, just import the video files directly
from your camcorder, as if it was another hard drive on your computer. See
Importing Media Files for information on importing video files from your computer.
2. In the Capture Video window, select the source device in the drop-down that
you want to capture video from.