CyberLink PowerProducer User's Guide
Copyright and Disclaimer All rights reserved. No part of this publication may be reproduced, stored in a retrieval system, or transmitted in any form or by any means electronic, mechanical, photocopying, recording, or otherwise without the prior written permission of CyberLink Corporation.
Contents Introduction ....................................................1 Welcome................................................................................................1 Lastest Features .........................................................................................1 DirectorZone .........................................................................................2 PowerProducer .........................................................................................
CyberLink Po w erPro ducer Commercial ................................................................................................23 Cut Detecting .........................................................................................23 and Removing Commercials Automatically Manually.........................................................................................24 Editing Out Commercials Editing Photo ...........................................................................................
Copying................................................................................................52 a Disc Making ................................................................................................53 a Disc DVD Player-Compatible Finalizing/Unfinalizing ................................................................................................54 a Disc Burning................................................................................................
CyberLink Po w erPro ducer iv
Intro ductio n Chapter 1: Introduction This chapter introduces CyberLink PowerProducer and the digital movie production process. It also outlines all of the latest features, available versions, and reviews the minimum system requirements for the program. Note: this document is for reference and informational use only. Its content and the corresponding program are subject to change without notice. Welcome Welcome to the CyberLink family of digital video tools.
CyberLink Po w erPro ducer openings. Latest disc menu engine and video encoding performance improvements to speed up authoring and burning tasks. Improved H.264 (MPEG-4) encoding performance, and support for the latest GPGPU and CPU hardware encoding technologies. Complete disc authoring with the inclusion of the CyberLink LabelPrint program. Note: * optional feature in CyberLink PowerProducer. Check the version table on our web site for detailed versioning information.
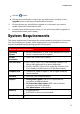
Intro ductio n click the button. click on the PowerProducer logo in the top right corner, and then on the Upgrade button in the About PowerProducer window. 2. Click the feature you would like to upgrade to, or the patch you want to update CyberLink PowerProducer with. 3. A web browser window opens, where you can purchase product upgrades or download the latest patch update. System Requirements The system requirements listed below are recommended as minimums for burning.
CyberLink Po w erPro ducer (Installation) 4 Hard Disk Space (Burning) 1 GB free for VCD production. 10 GB (20 GB recommended) free for DVD production. 60 GB (100 GB recommended) free for Blu-ray Disc/ AVCHD/AVCREC production. Burning Drive A CD or DVD burner (CD-R/RW, DVD+R/RW or DVD-R/RW) is required to burn VCD/SVCD/DVD/+VR/-VR/AVCHD/ AVCREC titles. A Blu-ray Disc recordable drive is required to burn Bluray Discs.
Po w erPro ducer Overview Chapter 2: PowerProducer Overview CyberLink PowerProducer consists of four main modules: Produce Movie Disc, Right-to-Disc, Edit Disc, and Disc Utilities. In these modules you can perform a wide variety of tasks, including the import and edit of videos and photos, the customization of disc menus, burn video from a device right-to-disc, edit previously burned discs, and a whole lot more with the disc utilities.
CyberLink Po w erPro ducer PowerProducer Projects When your are creating a new disc, you can click the button at the top of the window to save it as a .ppp file, a project file format that is used exclusively by CyberLink PowerProducer. This project file contains a list of the media (video clips, photos, background music) in your project, the disc type and menu template selected, and a log of any edits you want to make to the imported media.
Pro ducing a M o vie Disc Chapter 3: Producing a Movie Disc This chapter leads you through the process of creating a movie disc, from capturing content to burning your finished production to a disc. It includes instructions for creating a full-feature video production or photo slideshow, and details on how to customize a disc menu. To begin, open CyberLink PowerProducer, and then on the home page click the Produce Movie Disc option to start using this feature.
CyberLink Po w erPro ducer To begin producing a movie disc, do this: 1. Select the disc format type you want to use: Note: see Supported Disc Types and File Formats for list of the support disc types and the associated file formats. Blu-ray Disc*: creates a high-quality, high definition video that will play back on a Blu-ray Disc player. DVD: creates a longer, high-quality video on a DVD disc. AVCHD*: creates a high-quality, high definition video on a DVD, using the MPEG-4 AVC (H.264) video codec.
Pro ducing a M o vie Disc and available options will vary. For example, your selection will determine whether your disc has a menu or not. Note: for more information about 3D* discs, see Selecting 3D Discs. 3. Select the capacity of the disc you are using to burn your movie production. 4. Set the playback aspect ratio for your disc. 5. Click Next to continue. Note: * optional feature in CyberLink PowerProducer. Check the version table on our web site for detailed versioning information.
CyberLink Po w erPro ducer To ensure your movie production is burned in 3D, do this: if producing a 3D Blu-ray Disc, select BDMV (Side by side 3D without menu) from the recording format drop-down. if producing a 3D DVD, select DVD-Video (Side by side 3D without menu) from the recording format drop-down. if producing a 3D AVCHD, select AVCHD (Side by side 3D without menu) from the recording format drop-down. Note: CyberLink PowerProducer does not currently support the creation of 3D discs with disc menus.
Pro ducing a M o vie Disc Importing Media Files If you already have videos and photos that you want to use in your production on your computer's hard drive, you can import the files directly into CyberLink PowerProducer. You can also import media files that are on a removable device. Note: if you import media files that are on a removable device into the media library, they will be removed if the removable device is disconnected.
CyberLink Po w erPro ducer (Nikon), NRW (Nikon) Video: 3G2, 3GP, ASF, AVI, DAT, DV-AVI, DVR-MS*, FLV (H.264), HD MPEG-2, M2T*, M2TS, MKV (H.264), MOD*, MOV, MOV (H.264), MP4, MPE, MPEG-1*, MPEG-2*, MPEG4 AVC (H.264), MTS, TOD*, TPD, TRP, TS, VOB*, VRO*, WMV, WMV-HD, WTV* 3D Video Format: Dual-stream AVI, MVC*, Side-by-Side Video*, Over/Under Video Note: * optional feature in CyberLink PowerProducer. Check the version table on our web site for detailed versioning information.
Pro ducing a M o vie Disc 3. If you have more than one disc drive installed in your computer, select the Drive from the drop-down that contains the disc you want to import from. 4. If the disc contains any Playlists, make sure you select one from the dropdown so you can extract scenes from it. 5. In the Scenes section, select the check boxes next to all the content you want to extract and import into CyberLink PowerProducer.
CyberLink Po w erPro ducer Note: before you begin capturing, be sure to click to configure the capture settings, or set the capture options if capturing from a camcorder. See Configure Capture Settings for more information. 3. If required, locate the content you want to capture in either of these ways: when capturing from an HDV or DV camcorder you can use the playback controls under the Preview window to find the content.
Pro ducing a M o vie Disc DV timecode: displays the video timecode at the current position. to add a text remark, date stamp, or time stamp to the video being captured, click on the button. On the Overlay Text tab, select which type and display format of text overlay you want to include on your recorded video. Select the Overlay Format tab to set the font and text position for the text. 3D Video CyberLink PowerProducer supports various 3D* video formats that you can use to create 3D discs.
CyberLink Po w erPro ducer To set the 3D source format of your 3D videos, do this: Note: if you selected the Detect 3D video formats option when importing the video, it is not necessary to perform this step. However, if you find the video is not displaying correctly in 3D, then you can follow these steps to change the source format. 1.
Pro ducing a M o vie Disc 3. Select Set 3D Source Format, and then one of the following: 2D: select this option if the selected media file is actually 2D content. Side by Side Format (Left Eye First): select this option if the 3D content has two different images side by side. In 2D, CyberLink PowerProducer will display the left eye image only. Side by Side Format (Right Eye First): select this option if the 3D content has two different images side by side.
CyberLink Po w erPro ducer To disable 3D mode, just select the button. Editing Media Clips CyberLink PowerProducer lets you perform minor editing tasks on your imported and captured video clips. You can also edit created photo slideshows, which are treated like video clips in the edit function. To edit the media clips in your production, click Video Clips in the Edit section of CyberLink PowerProducer's disc authoring window.
Pro ducing a M o vie Disc to rearrange the video clips, just select a video in the storyboard panel and then drag it to the new position. to remove a video clip from the movie production, select it in the storyboard panel and then click the button. Adjusting a Video Clip's Aspect Ratio When you import or capture a video clip, CyberLink PowerProducer automatically detects its aspect ratio.
CyberLink Po w erPro ducer 4. Drag the playback slider to the position where you want to end the cut, and then click .
Pro ducing a M o vie Disc end the cut. 5. Next, select: Keep selected to keep the video segment indicated in blue. Delete selected to delete the video segment indicated in blue. Doing this will merge the two gray segments together. 6. Click . The edited clip/slideshow appears in the storyboard panel. Merging Clips You can merge video clips in the storyboard together into one longer clip using the Merge function. You can also merge two or more photo slideshows into a single slideshow in this function.
CyberLink Po w erPro ducer 1. In the Edit Clips window, click the Split tab. 2. Select the video clip or slideshow in the storyboard panel that you want to split. 3. Drag the timeline slider (or use the player controls) to the position in the clip where you want to split it. 4. Click panel. to split the clip. Two clips will be displayed in the storyboard Setting Video Title Thumbnail In the Edit Clips window you can set any frame in a video clip as its title thumbnail.
Pro ducing a M o vie Disc 3. Click on the button to set the title thumbnail. Commercial Cut You can use the Commercial Cut function to edit out television commercials in captured video. To edit out the television commercials in your video clips, click Commercial Cut in the Edit section of CyberLink PowerProducer's disc authoring window. Detecting and Removing Commercials Automatically CyberLink PowerProducer can automatically detect the commercials in a video clip.
CyberLink Po w erPro ducer To auto detect and remove the commercials in a video clip, do this: 1. Select the video clip in the storyboard panel that you want to remove commercials from. 2. Click the button. CyberLink PowerProducer will proceed to detect all the commercials in the video clip, which are highlighted in blue on the video timeline under the preview window. The commercials are also placed in the storyboard panel. 3.
Pro ducing a M o vie Disc 6. Click the button, and then ensure that Delete selected is selected. Note: doing the above will edit out the content that you just selected, i.e. the commercials. If you want to keep the part you selected, ensure that Keep selected is selected. 7. Click to edit out the selected commercial. 8. If your video clip contains more commercials, repeat the above steps to edit them out. 9. When you are done, click OK to return to the author window.
CyberLink Po w erPro ducer If you imported more than one set of photos, creating multiple slideshow albums, make sure you select the album you want to edit before proceeding. To select the slideshow album you want to edit, just click the until you locate it.
Pro ducing a M o vie Disc Adding More Photos to a Slideshow At any time you can add additional photos to the slideshow album created by CyberLink PowerProducer. Note: if you want to add photos into a new slideshow, creating a new slideshow album, you must import them in the disc authoring window. See Importing Media for more information. To add photos to an existing slideshow album, do this: 1. If required, use the and want to add photos to. buttons to select the slideshow album you 2.
CyberLink Po w erPro ducer panel and then click the button. Setting Background Music for a Slideshow To set the background music for a photo slideshow, do this: 1. If required, use the and buttons to select the slideshow album you want to set the background music for. 2. Click Set Background Music. The Background Music window displays, and then takes you to the import window. 3. Select all the audio files you want to use as the background music in your slideshow, and then click Open.
Pro ducing a M o vie Disc Use the and as follows: buttons to select a slideshow album and then set the duration To set the length of time each individual slide (photo) is displayed, select the Slides option and then enter a duration in seconds. To set the duration of the entire slideshow album, select the Album option and then enter a duration in minutes and seconds in the fields provided.
CyberLink Po w erPro ducer 1. Use the and buttons to select a slideshow album you want to set the title thumbnail for. 2. Select the photo/slide in the storyboard panel that you want to use as its title thumbnail. 3. Click on the button to set the title thumbnail. Creating a Browsable Slideshow When creating a disc in the BDMV (Standard 2D with menu)* format, you can create a browsable* slideshow.
Pro ducing a M o vie Disc modify text and overall layout of buttons and text. add a first play video and background music To start customizing your menu, click Menu in the Edit section of the CyberLink PowerProducer's disc authoring window. Applying Pre-Defined Templates CyberLink PowerProducer provides you with several stylish menu templates that you can choose from. These menus have already been customized for you and may include such features as motion and menu music.
CyberLink Po w erPro ducer Scenes in a menu refers to the video clips (titles) and photo slideshows (albums) you added while creating your disc. Chapters you can add to the video clips in your movie production, to make your disc more easily browsable. See Setting Chapters for more information. To navigate a multi-layered menu in the Customize Menu window, click on Scenes or Chapters, and then to view the clips and slideshow albums on your disc.
Pro ducing a M o vie Disc 3. Next, select: Apply to Current Page to set the imported background to the current menu page you are viewing in the disc menu preview window. Apply to All Pages to set the imported background to all the pages in your disc menu, i.e. home, scenes, chapters. 4. Click to return to previous window.
CyberLink Po w erPro ducer Setting Menu Background Music Some menu templates have default background music, but you can add your own music or modify the existing music if you prefer. To set the menu background music, do this: 1. Click . The Background Music window opens. 2. If you want to change the music file being used in the menu, click to select a different music file. 3. Next, select: Fade in if you want the background music to fade in gradually.
Pro ducing a M o vie Disc To set a video clip as the first play video, do this: click video. and then select the video that you want to use as the first play click to remove the video set as the first play video. click to preview the first play video. Customizing the Menu Layout You can rearrange the clip/album thumbnails and text on each menu page, giving your disc menu a custom layout.
CyberLink Po w erPro ducer Setting Chapters Automatically To set chapters automatically, do this: 1. If required, use the to add chapters to. and buttons to select the video clip (title) you want 2. Set the chapters in one of the following ways: If you want your video to have a specific number of chapters, select the Set chapters evenly option, and then enter the number in corresponding box.
Pro ducing a M o vie Disc panel as thumbnails. 4. Click OK to save your changes. Note: if required, use the playback controls and then click to set a frame in the video as the chapter thumbnail. This thumbnail displays on the chapter in the storyboard panel and on your final disc. Setting Chapters Manually To set chapters manually, do this: 1. If required, use the to add chapters to. and buttons to select the video clip (title) you want 2.
CyberLink Po w erPro ducer Note: playlists are available only when you create DVD-VR or BDAV* discs. * Optional feature in CyberLink PowerProducer. Check the version table on our web site for detailed versioning information. To add playlists, do this: 1. Click Playlist in the Edit section of the CyberLink PowerProducer's disc authoring window. 2. If required, click to a disc. 3. In the Original titles section, select the check boxes under the video clips you to create a new playlist.
Pro ducing a M o vie Disc can add a video clip to a playlist more than once. 6. Repeat these steps for each new playlist as required. 7. Click OK to save your changes. Finalizing Your Disc After you have imported your media, rearranged it on the storyboard, edited your videos and photos, customized your disc menu, set chapters, then it's time to finalize your production. Finalizing your production entails burning your movie production to a disc, or outputting it as a disc image or a folder.
CyberLink Po w erPro ducer Burning Your Production to Disc Burning your production to disc is the final stage of the movie production process. Once it is burned you are able to play it on a disc player. To burn your production to disc, do this: 1. Select the Burn to disc option in the Final Output window. 2. Specify your burning options as follows: Disc volume label: in the field provided, enter a label for your disc. The disc label can be up to 16 characters long.
Pro ducing a M o vie Disc 3. Click to configure the burn settings as follows: Recording drive: if required, select the burning drive CyberLink PowerProducer will use to burn the production to disc. Recording speed: set the recording speed used when burning the disc. If you encounter errors during the burning process, try lowering the burning speed. Include buffer under-run protection: select this option to ensure that video is written to disc without interruption.
CyberLink Po w erPro ducer Saving Your Production as a Disc Image You can save your production on your hard drive as a disc image for later burning. This option is particularly useful if your computer currently does not have a disc burning drive installed. To save your production as a disc image, do this: 1. Select the Save as disc image option in the Final Output window. 2. If required, click to select the location on your computer's hard drive where you want the disc image saved.
Pro ducing a M o vie Disc 1. Check the Create a folder option in the Final Output window. 2. If required, click to select the location on your computer's hard drive where you want the folder saved. 3. If you are using an NVIDIA graphics card that supports CUDA technology or an ATI graphics card that supports Stream technology, select Enable GPU hardware video encoder to help speed up the overall production time. 4. Click Burn.
CyberLink Po w erPro ducer 44
Right-to -Disc Chapter 4: Right-to-Disc You can burn video content from a DV camcorder, HDV camcorder, TV, webcam, or VCR directly onto a DVD or Blu-ray Disc* without the intermediary step of first writing to your hard drive. This can save you a lot of time when you want to transfer video to a disc. Note: some camcorders are recognized as external disk drives on your PC, and therefore the Right-to-Disc feature is not available.
CyberLink Po w erPro ducer Burning Video Right to Disc You can use CyberLink PowerProducer to perform the following Right-to-Disc tasks: Burn video from a DV camcorder directly to a DVD or Blu-ray Disc*. Burn video from an HDV camcorder directly to a Blu-ray Disc*. Burn video from TV directly to DVD or Blu-ray Disc*. Burn video from a PC webcam directly to DVD or Blu-ray Disc*. Burn video from a VCR directly to a DVD or Blu-ray Disc*. Note: * optional feature in CyberLink PowerProducer.
Right-to -Disc Select the location where the disc will be played: select the TV format (NTSC or PAL) or location where the disc will be played. The location should correspond to the region in which you plan to play your video. Disc volume label: in the field provided, enter a label for your disc. The disc label can be up to 16 characters long. Disc name: in the field provided, enter a name for your disc. This disc name displays in the disc player when playing the disc. 9. Click Record to begin burning.
CyberLink Po w erPro ducer Set mark in/mark out times: if you know the timecodes for the segment of video you want to capture, enter them in these fields. to add a text remark, date stamp, or time stamp to the video being captured, click on the button. On the Overlay Text tab, select which type and display format of text overlay you want to include on your recorded video. Select the Overlay Format tab to set the font and text position for the text.
Editing a Disc After Burning Chapter 5: Editing a Disc After Burning If you burned your movie production onto a rewritable disc in the +VR, -VR, or BDAV* format, you can go back and edit the content on the disc at a later time. Note: * optional feature in CyberLink PowerProducer. Check the version table on our web site for detailed versioning information. To begin, open CyberLink PowerProducer, and then on the home page click the Edit Disc option to start using this feature. To edit a disc, do this: 1.
CyberLink Po w erPro ducer 2. Make any of the required modifications in the CyberLink PowerProducer program as follows: To import more media, see Importing Media into PowerProducer. To edit clips or slideshows, see Editing Media Clips. To edit slideshows, see Editing Photo Slideshows. To modify the disc menu, see Customizing Disc Menus. 3. When you are done your edits click Next. 4. Click Burn to re-burn your disc with the edits applied.
Disc Utilities Chapter 6: Disc Utilities CyberLink PowerProducer includes some handy disc utilities you can use to manage and format your discs. You can also create and burn disc images and folders, export discs to files, and access the CyberLink LabelPrint program. To begin, open CyberLink PowerProducer, and then on the home page click the Disc Utilities option to start using this feature.
CyberLink Po w erPro ducer 1. In the Disc Utilities window, click Erase Disc. 2. Insert your disc and then select your drive. 3. Select an erasing method: the Quick option erases the disc index contained on the disc. the Full option erases all of the content the disc contains. 4. Click Start to begin. CyberLink PowerProducer will erase the content on the disc. 5. Click Close to return to the Disc Utilities window.
Disc Utilities Delete image file after burning: select this option if you want CyberLink PowerProducer to automatically delete the image file of the source disc it creates to burn the disc after the burning is complete. Create disc image: if you only have one disc drive, click to specify the location where CyberLink PowerProducer stores the created disc image file it will burn to the blank disc. 5. Click Start to begin. CyberLink PowerProducer will copy and burn the disc. 6.
CyberLink Po w erPro ducer 5. Click Start to begin. CyberLink PowerProducer will burn the disc and make it compatible. 6. Click Close to return to the Disc Utilities window. Finalizing/Unfinalizing a Disc If you want to view a DVD-RW disc with -VR profile on a disc player, you must first finalize the disc, as unfinalized discs cannot be viewed on some home disc players. When you finalize a disc, no further data can be added to it, even if the disc contains sufficient space.
Disc Utilities disc. 6. Click Close to return to the Disc Utilities window. Saving as a Disc Image If you have previously burned a disc image to a disc, you can save that image onto your hard drive. Saving a disc image is useful if you want to back up your discs on your computer’s hard drive. To save as a disc image, do this: 1. In the Disc Utilities window, click Save Disc Image. 2. Insert your disc and then select your drive in the Drive drop-down if required. 3.
CyberLink Po w erPro ducer Exporting to a File Use the Export to File function to export DVD Video, DVD-VR, DVD+VR, BDMV*, and AVCHD* files from a disc to your hard drive. The video files are saved in the MPEG-2 format. Note: * optional feature in CyberLink PowerProducer. Check the version table on our web site for detailed versioning information. To export files to your hard drive, do this: 1. In the Disc Utilities window, click Export to File. The Export to File window opens. 2.
Po w erPro ducer Preferences Chapter 7: PowerProducer Preferences To set your preferences in CyberLink PowerProducer, just click the button. Note: the preferences in CyberLink PowerProducer can only be set when you are in the Produce Movie Disc function. Project Preferences In the Preferences window, select the Project tab. The available options are as follows: Note: the project options that are available depend on the disc format that you have selected.
CyberLink Po w erPro ducer that they will fit on the type of disc you are using in your production. Create new chapter every: select this item if you want to automatically add chapters to videos during capture. CyberLink PowerProducer will add a chapter at the intervals you specify in the fields provided. Enable Cyberlink MPEG@Best technology: select this option to burn MPEG video at the highest possible quality.
Po w erPro ducer Preferences File format: indicates the video format of the file that will be burned to your disc. If available, you can select a different video file format from the drop down. However, not all selected disc types allow you to change the video file format. Video quality: select the video quality for your disc from the drop-down. The video qualities available depend on the video disc format you selected in the Select Your Media window.
CyberLink Po w erPro ducer PowerProducer language display to be the same as the default language of your operating system. User defined: select this option and then select the language from the dropdown list that you want CyberLink PowerProducer to use. Connect to the Internet: select this option to allow CyberLink PowerProducer to automatically connect to the Internet to check for updates and display promotional information from CyberLink.
Technical Suppo rt Chapter 8: Technical Support This chapter contains technical support information. It includes all the information to find the answers you need to assist you. You may also find answers quickly by contacting your local distributor/dealer. Before Contacting Technical Support Please take advantage of one of CyberLink’s free technical support options: consult the user’s guide or the online help installed with your program.
CyberLink Po w erPro ducer Web Support Solutions to your problems are available 24 hours a day at no cost on the CyberLink web sites: Note: you must first register as a member before using CyberLink web support. CyberLink provides a wide range of web support options, including FAQs, in the following languages: Language Web Support URL English http://www.cyberlink.com/prog/support/cs/index.do Traditional Chinese http://tw.cyberlink.com/prog/support/cs/index.do Japanese http://support.jp.cyberlink.
Index Index B enabling 15 overview 15 previewing discs 39 selecting discs 9 setting source format 15 video 15 3D-Like overview 15 Back up photos 27 Background music menus 34 slideshows 28 Blu-ray Disc 7 Browsable slideshow 30 Buffer underrun protection 53 Burn 40 disc image 54 DV content 45 DVD folder 55 Right-to-disc 46 A C AB Cut 19 Adding playlists 37 Albums background music 28 Aspect ratio 7 adjusting 19 Audio Dolby 58 format on disc 59 LPCM 58 Auto-menu timeout 58 AVCHD 7 AVCREC 7 Capture prefe
CyberLink Po w erPro ducer Disc folder burning to disc 55 Disc images burning 54 creating 52 saving 55 Discs 3D 9, 39 adding menus 30 audio format 59 burning 40 capacity 7 capturing scenes from 12 copying 52 creating folders 42 creating images 42 editing 49 erasing 51 exporting to file 56 finalizing 54 previewing 39 supported formats 9 utilities 51 video format 59 video quality 59 DivX 7 Dolby 58 DVD 7 E Effects pan & zoom 29 transition 29 64 F File format 59 Folder 42 I Images editing 30 importing 11
Index Menus text 33 Merge clips 21 N New features 1 NTSC 59 R Right-to-disc 46 Rotate 27, 57 S Save projects 6 Set 3D format 15 Settings PAL 59 capture 14, 47, 57 Pan & zoom 29 menu 58 PhotoNow! 30 Slides Photos rearranging 27 adding to slideshow 27 Slideshow auto rotate 57 duration 28 backing up 27 editing 18 creating slideshows 25 Slideshows editing 30 background music 28 importing 11 browsable 30 rearranging 27 creating 25 rotating 27 effects 29 supported formats 11 merging 21 Playback modes 57 tran
CyberLink Po w erPro ducer T Technical support 61 Temp directory 57 Thumbnails duration 58 index 57 setting 29 Titles setting thumbnail 22 Transitions 29 TV format 59 TV safe zone 58 W U Web support 62 Welcome 1 Working directory 57 Upgrade 2 Utilities 51 V VCD 7 Video CD 7 Video thumbnail 57 Videos 7 3D 15 capturing 13 chapters 35 commercial cut 23 cutting 19 editing 18 format on disc 59 66 importing 11 merging 21 quality 59 rearranging 18 recording format 7 selecting format 7 setting thumbnail 22 s