
Operation Manual
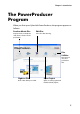

CyberLink PowerProducer
8
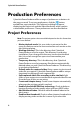
Production Preferences
CyberLink PowerProducer offers a range of preferences to better suit
the way you work. To set your preferences, click the button,
available on most windows. The Preferences dialog box opens,
displaying the Project tab and the Video/Audio tab, which contain
customizable preferences. These preferences are described below.
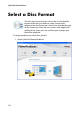
Project Preferences
Note: The project options that are available depend on the disc format that
you have selected.
• Movie playback mode: Set your video to return to the disc
menu or continue on to the next movie after each movie on the
disc finishes playing.
• Working directory: This is the directory that CyberLink
PowerProducer uses for output. This directory is set during
installation. If you change this directory, be sure that the hard
disc it is on has enough free space to accommodate your
production.
• Temporary directory: This is the directory that CyberLink
PowerProducer uses for temporary files that are automatically
deleted when you exit CyberLink PowerProducer. This directory
is set during installation.
• Default name for captured video: Enter a name to give to each
video file you capture. CyberLink PowerProducer adds a unique
timestamp to distinguish each captured file.
• Split captured video files according to disc size limit: Split
video as you capture to ensure that each captured video file can
fit on the type of disc you are using.
• Create new chapter every: Create a new chapter automatically
whenever the set time period is reached.
• Enable Cyberlink MPEG@Best technology: Check to balance
burning speed and video quality when you burn MPEG video.
• Add thumbnail index: Check to add a thumbnail index to the
disc’s menu.
• Enable video thumbnail: Check to allow chapter thumbnails to
display moving video on the disc’s menu. If you select this