
Operation Manual
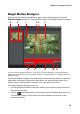


CyberLink PowerDirector
62
and effects to your specification to ensure the freeze frame effect fits your
creation.
You can choose to not have CyberLink PowerDirector insert the effects by
deselecting the option in preferences. See "Editing Preferences" on page 38 for
more information.
Time Info
When a DV-AVI video clip captured from a DV tape camcorder (with CyberLink
RichVideo enabled) or an EXIF image is added to the timeline, the Time Info
button is enabled. Click the Time Info button to enable the date or time stamp
(displayed as an image) that was captured from the original camcorder or digital
camera. You may also add a text remark to your video or image if required.
Note: CyberLink PowerDirector does not support the enabling of running time codes
on video files.
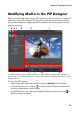
Setting Video Clip Interlacing Format
All video clips have an interlacing (TV) format, which specifies how frames are
displayed. Using video clips with conflicting (or incorrect) TV formats can result in
degraded video quality in your final production.
Before you produce your video, set all of the video clips to the same format. While
CyberLink PowerDirector can normally detect and suggest the correct format,
some interlaced video (such as a video with very little motion) may be misjudged
as a progressive video.
CyberLink PowerDirector automatically produces interlaced video for DVD, SVCD
and DV-AVI. Only change this setting if you are sure that CyberLink PowerDirector
has wrongly set the format.
Note: this is an extremely important step to take before production, as it can drastically
affect final video quality.
To set a video clip’s TV format, right-click the video clip whose interlacing format
you want to set and select Set TV format.