
Operation Manual


CyberLink PowerDirector
58
• use and in magnifier tools to set the magnification level on the video
clip. The size of the timeline magnifier changes based on the magnification
level selected.
• drag the timeline magnifier along the timeline to find the section of video you
want to trim.
• use the timeline slider to find the starting and end points of your video clips
that you want to trim. You can also use the player controls to find the exact
frames in the frame display area.
• click on in the trimming tools to mark the starting point of a trim, and
to mark the end point.
Note: the portions of video that CyberLink PowerDirector inserts into the timeline are
indicated in blue. If you want to omit these portions from the timeline, click the Invert
button in the trimmed portions area.
• move the timeline slider over a trimmed portion and click the button in
the trimming tools to split it into two clips.
• click on in the trimming tools to detect all the scenes in your video clip.
You can then choose to just mark them on the timeline or have CyberLink
PowerDirector automatically trim them for you.
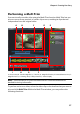
Trimming Audio/Video Clips
To perform a single trim of an audio or video clip, select the clip on the timeline
and then click Trim.
In the trim window, you can perform the following functions:
• use and to decrease or increase the magnification level on the clip.
• use the timeline slider or the playback controls to find the starting and end
points of your clip that you want to trim.
• click on to mark the starting point of a trim, and to mark the end point.
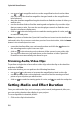
Setting Media and Effect Duration
Once you add media clips, such as images, color boards, backgrounds, titles, etc.,
you can set the duration they display in your project.
To set a clips/effect’s duration, do this:
1. Click on the clip in the timeline.