
Operation Manual

CyberLink PowerDirector
16
• Click the button, select Grid Lines and then select the number of lines you
want to display in a grid over the video image. Use this grid to more precisely
place the PiP media where you want on the video image.
Once enabled, select Snap to Reference to have the selected objects snap to the
grid lines, TV safe zone, and the boundary of the preview window.
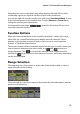
Dual Preview
If you have a secondary display device, such as a monitor, TV, or DV camcorder
connected to your computer, click the button and select Dual Preview to
extend your workspace and preview your project on a secondary display.
Note: to use a connected monitor or TV as a secondary preview window, you must first
enable extend desktop to a secondary display in the Windows Display Properties
Settings.
Once enabled, when you select play on the preview window, you can preview your
production on both your primary and secondary display (TV or monitor), or on a
connected DV camcorder, depending on your selected preference.
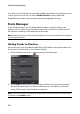
Editing Workspace
The editing workspace is where you create your project by adding your media,
various effects, transitions, and titles. The editing workspace has two different
views, the Timeline and Storyboard view, which are accessed by clicking on the
or buttons.
Note: you can set which workspace view is displayed by default in "Editing
Preferences" on page 38.
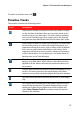
Timeline View
The timeline view lets you view your entire project based on running time. This
view is useful if you want to insert effects, subtitles, etc. at a specific moment in
production. The timeline view also provides a view of all the tracks, media, and
other content (chapter markers, subtitle markers) that are displayed in the
timeline.